
Husqvarna HU775H Support Question
Husqvarna HU775H Support Question
Find answers below for this question about Husqvarna HU775H.Need a Husqvarna HU775H manual? We have 2 online manuals for this item!
Question posted by FeisCkb on September 7th, 2013
Husqvarna Hu775h Won't Start
The person who posted this question about this Husqvarna product did not include a detailed explanation. Please use the "Request More Information" button to the right if more details would help you to answer this question.
Current Answers
Related Husqvarna HU775H Manual Pages
Owners Manual - Page 2
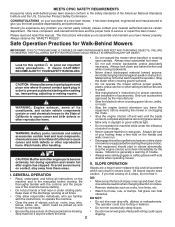
...vibrate abnormally, stop before removing grass catcher.
• Mow only in the manual(s) before starting . • Do not put hands or feet near drop-offs, ditches or embankments. never... severe injury.
DO: • Mow across the face of a new lawn mower. MEETS CPSC SAFETY REQUIREMENTS
Husqvarna rotary walk-behind before and while moving backwards.
• Never direct discharged material...
Owners Manual - Page 3
...damage, and deterioration, which could expose moving parts or allow children to prevent accidental starting.
• Keep nuts and bolts, especially blade attachement bolts, tight and keep...
THE MODEL AND SERIAL NUMBERS WILL BE FOUND ON A DECAL ATTACHED TO THE REAR OF THE LAWN MOWER HOUSING. Never assume that may obscure vision. V. Frequently check components and replace with the engine...
Owners Manual - Page 4

...2
shipped.
Frame handle
3. Save this manual in the parts bag. IMPORTANT: THIS LAWN MOWER IS SHIPPED WITHOUT OIL OR GASOLINE IN THE ENGINE. Frame opening
4 All parts such...
Read these instructions and this manual for a few minutes. Compare the illustrations with your lawn mower, all parts have been placed in its entirety before using.
2. Vinyl bindings
for future...
Owners Manual - Page 5
... and padding holding operator presence control bar to be adjusted for additional loose parts.
1
LIFT UP
LIFT UP
MOWING POSITION
2 3
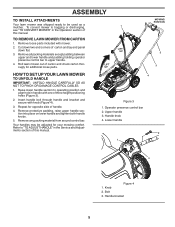
HOW TO SET UP YOUR LAWN MOWER
TO UNFOLD HANDLE
IMPORTANT: UNFOLD HANDLE CAREFULLY SO AS NOT TO PINCH OR DAMAGE CONTROL CABLES.
1. Raise lower handle section to operating position and align...
Owners Manual - Page 7
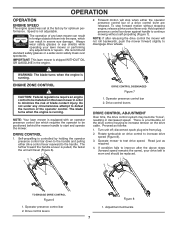
...drive control system may become "loose", resulting in order to minimize the risk of any lawn mower can result in foreign objects thrown into the eyes, which requires the operator to increase... this lawn mower in decreased speed.
Forward motion will stop forward motion without self-propelling (Figure 7). Hold operator presence control bar down to start and operate the mower.
ENGINE...
Owners Manual - Page 8
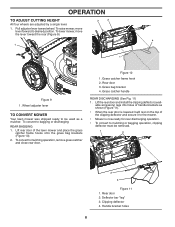
... operation, clipping deflector must be used as shown (Figure 11).
• When the rear door is lowered it will rest on the top of the lawn mower and place the grass
catcher frame hooks onto the grass bag brackets (Figure 10). 2. Grass catcher handle
REAR DISCHARGING (See Fig. 11)
1. Pull adjuster lever...
Owners Manual - Page 9
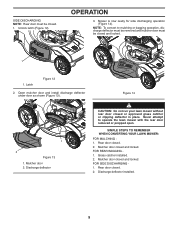
... 13). Figure 14
1
2
Figure 13 1. Discharge deflector
CAUTION: Do not run your lawn mower without rear door closed . 2. Never attempt to mulching or bagging operation, discharge deflector must... closed and locked.
1
1.
Discharge deflector installed.
9 NOTE: To convert to operate the lawn mower with the rear door removed or propped open. Mulcher door closed . 1. Mulcher door 2. ...
Owners Manual - Page 11
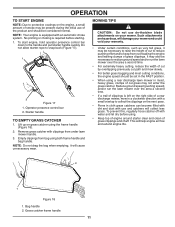
...presence control bar 2. Empty clippings from under lawn mower handle.
3. This will collect less grass....start engine, hold operator presence control bar
down to protective coatings on the engine, a small amount of smoke may be necessary to collect the clippings on the next pass.
• Pores in a clockwise direction with a small overlap to reduce ground speed and/or run the lawn mower...
Owners Manual - Page 12
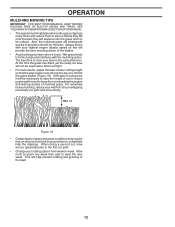
... mulching action. At this will not be exposed to direct sunlight. • For best results, adjust the lawn mower cutting height so that an area be mulched a second time to provide nutrients for the lawn. If the lawn is overgrown it is the early afternoon. MAX 1/3
Figure 19
• Certain types of grass and...
Owners Manual - Page 13
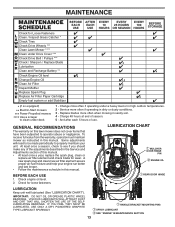
...Check for Loose Fasteners Clean / Inspect Grass Catcher * Check Tires Check Drive Wheels *** Clean Lawn Mower **** Clean under Drive Cover *** Check Drive Belt / Pulleys *** Check / Sharpen / ... 25 HOURS 100 OR SEASON HOURS
BEFORE STORAGE
* (if so equipped)
** Electric-Start mowers
*** Power-Propelled mowers
****
Use a scraper to clean under a heavy load or in high outdoor temperatures....
Owners Manual - Page 14
...hardened washer into blade adapter and crankshaft.
6.
Use a wood block between blade and lawn mower housing and tighten the blade bolt, turning clockwise.
• The recommended tightening torque ...be sure they move freely. Install debris shield using screw.
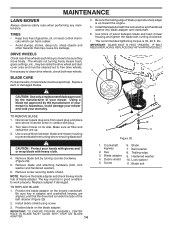
3. Key 3. MAINTENANCE
LAWN MOWER
Always observe safety rules when performing any maintenance. Position blade on the blade adapter....
Owners Manual - Page 15
...quality detergent oil rated with approved replacement catcher. Select the oil's SAE viscosity grade according to lawn mower or engine. • The blade can be kept clean and free of operation or at ...the factory. NOTE: Multi-viscosity oils (5W30, 10W30 etc.) improve starting the engine and after every 25 hours of trash build-up. SAE VISCOSITY GRADES
5W-30
SAE ...
Owners Manual - Page 16
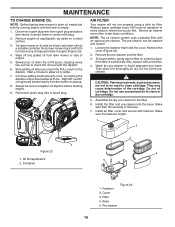
...fastener is excessively dirty, replace with the dipstick.
6. Cover 3. lay aside on the dipstick. Tip lawn mower on a hard surface. Continue adding small amounts of oil, rechecking the dipstick until fuel tank is... on its side as kerosene, are not to be sure to retighten oil dipstick before starting engine.
9. Do not oil the precleaner. They may cause deterioration of operation or every...
Owners Manual - Page 17
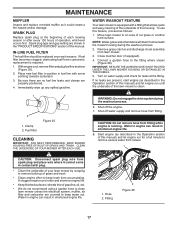
... a fire hazard and/or damage.
Shut off water supply and remove hose from lawn mower.
3.
Move lawn mower to the fitting where shown (Figure 26).
IMPORTANT: BE SURE THE GARDEN HOSE IS NOT ROUTED UNDER THE LAWN MOWER HOUSING OR ENTANGLED IN THE WHEELS.
5. Start engine (as described in fuel line with a fitting that allows quick and...
Owners Manual - Page 18
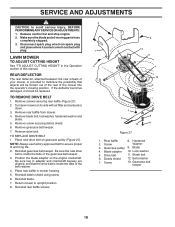
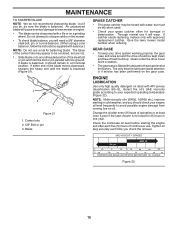
... pulley 9. Debris shield 12.
TO REMOVE DRIVE BELT
1. Rear baffle
8. Hardened
2. Drive belt
11. Make sure the blade and all moving parts have
completely stopped. 3. LAWN MOWER
TO ADJUST CUTTING HEIGHT
See "TO ADJUST CUTTING HEIGHT" in adapter and crankshaft keyway are aligned, and that objects will be replaced. Turn...
Owners Manual - Page 19
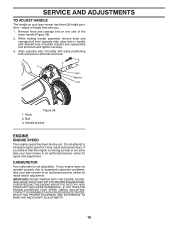
... set. CARBURETOR
Your carburetor is running too fast or too slow, take your lawn mower has three (3) height positions - OVERSPEEDING THE ENGINE ABOVE THE FACTORY HIGH SPEED ...of the
lower handle (Figure 28). 2.
Do not attempt to suspected carburetor problems, take your lawn mower to an authorized service center for repair and/or adjustment. IMPORTANT: NEVER TAMPER WITH THE ENGINE ...
Owners Manual - Page 21
...CAUTION: Never store the lawn mower with new spark plug. ACIDIC GAS CAN DAMAGE THE FUEL SYSTEM OF AN ENGINE WHILE IN STORAGE. • Empty the fuel tank by starting the engine and letting
it... store gasoline from dust and dirt. • Cover your unit to rust. IMPORTANT: NEVER COVER MOWER WHILE ENGINE AND EXHAUST AREAS ARE STILL WARM. NOTE: Fuel stabilizer is an acceptable alternative in any...
Owners Manual - Page 22
... level. 6. Tighten blade bolt. 2. Blade adapter broken. 4. Move lawn mower to handle.
9. Lift on pulleys/replace belts if broken. 4. Hard to the ON position.
11. Loss of drive (or slowing of mower housing. Belt off .
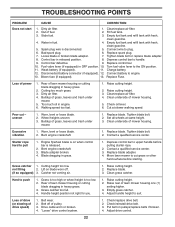
(if so equipped) 3. TROUBLESHOOTING POINTS
PROBLEM
CAUSE
CORRECTION
Does not start
1. uneven
1. Wheel heights uneven. 3. Replace blade. Clean underside...
Parts List - Page 3
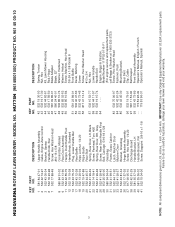
...NO. inches. 1 inch = 25.4 mm. Failure to do so could be hazardous, damage your lawn mower and void your warranty. HUSQVARNA ROTARY LAWN MOWER - MODEL NO. IMPORTANT: Use only Original Equipment Manufacturer (O.E.M.) replacement parts. NO.
42 532 19 30...Operator's Manual, Spanish
3
NOTE: All component dimensions given in U.S. HU775H (96145001000) PRODUCT NO. 961 45 00-10
KEY PART NO.
Parts List - Page 5
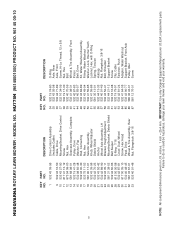
...HU775H (96145001000) PRODUCT NO. 961 45 00-10
KEY PART NO. MODEL NO. inches. 1 inch = 25.4 mm. IMPORTANT: Use only Original Equipment Manufacturer (O.E.M.) replacement parts. Failure to do so could be hazardous, damage your lawn mower...Head Pawl, Drive Wheel & Tire Assembly, Rear Nut, Flangelock 3/8-16
KEY PART NO. HUSQVARNA ROTARY LAWN MOWER - NO.
34 532 19 74-80 35 532 43 05-98 36 532 44 ...
Similar Questions

Husqvarna Riding Lawn Mower Starts, Blade Spins, Won't Go Forward Nor Reverse
(Posted by shywolfalways82 3 years ago)


How To Adjust The Speed Of A Husqvarna Lawn Mower Model Hu775h
(Posted by Bdbi 9 years ago)
