Hunter 28642 Support Question
Hunter 28642 Support Question
Find answers below for this question about Hunter 28642.Need a Hunter 28642 manual? We have 7 online manuals for this item!
Question posted by Kvndionne on January 31st, 2014
Having Problems With Balancing On All Speeds Except Low.
All instructions have been carefully followed. telcon with your service person instructions have also been followed which led to replacing 3 bent/ twisted blades. It appears the rubber grommets will not allow the blades to mount properly to the metal brackets. I have measured the distance between a point on my ceiling and each fan tip and there is as much as 1/4" difference. What do I do now?
Current Answers
Related Hunter 28642 Manual Pages
Installation Guide - Page 1

... box (or as follows:
3-1.
If your existing fan site is positioned to allow you to your new Hunter fan.
If the joist is...instructions to install your ceiling fan, go to recess the bottom of the outlet box a minimum of the fan. Preparing the Fan Site
8' Minimum Ceiling Height
7' Minimum to Floor
30" From Wall or Nearest Obstruction
Step 1 Choose the Fan Site
Proper ceiling fan...
Owner's Manual - Page 2

... you complete instructions for many years. Use only Hunter speed controls.
© 2009 Hunter Fan Company
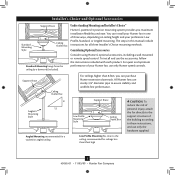
2 45065-01 • 11/05/09 • Hunter Fan Company Never insert foreign objects between rotating fan blades. • To reduce the risk of fire, electrical shock, or motor damage, do not bend the blade attachment system when installing, balancing, or cleaning...
Owner's Manual - Page 4

...
Step 5 - Attach the fan supply line to allow you are turned off position, securely fasten a prominent warning device, such as follows:
3-1. Make certain the wiring...fan site. You have now successfully prepared your fan manual and continue with two #8 x 1-1/2" Step 4 wood screws and washers. e bottom of the fan and light kit. For instructions to install your ceiling fan...
Owner's Manual - Page 5
... performance of three ways, depending on ceiling height and your preference: Low Profile, Standard, or Angled mounting. Understanding Mounting and Installer's Choice®
Hunter's patented 3-position mounting system provides you can install your Hunter fan, use the accessories, follow the instructions included with each product.
Installer's Choice and Optional Accessories
Support...
Owner's Manual - Page 8
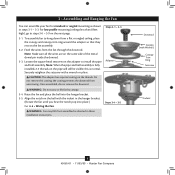
...fan until you hear the notch pop into the hanger bracket. 3-5. To assemble fan to install the pipe
and ball assembly. For low profile mounting (ceilings less than 8 feet high), go to 4 • Wiring the Fan... the fan through the downrod. Once assembled, do not remove the downrod.
Steps 3-4 - 3-5
WARNING: Fan may fall if not assembled as shown in these installation instructions.
Owner's Manual - Page 9

3 • Assembling and Hanging the Fan (Low Profile Only)
You can assemble your fan for standard or angled mounting as directed in these installation instructions. Place the canopy trim ring and canopy with washer on the hanger bracket through
the round hole in the adapter. For low profile mounting (ceilings less than 8 feet high), see steps 3-6 - 3-10 on...
Owner's Manual - Page 10

... them carefully back through the ceiling plate into the outlet box.
4-7. 4 •Wiring the Fan
All wiring...05/09 • Hunter Fan Company Connect the remaining wires as follows:
Dual Switch Wiring: •...twist clockwise until tight. If you are unfamiliar with wiring, use switch in accordance with the grounded wires on one side of the outlet box and the ungrounded wires on the low...
Owner's Manual - Page 12

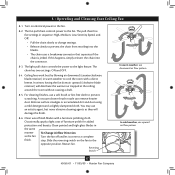
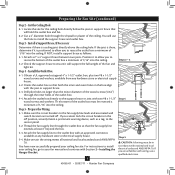
... by hand into the holes on the blades.
6-2. If you used grommets, the blades may include blade grommets.
Step 6-1 (Detail) Grommet
Use with grommet
Blade Assembly Screws
Steps 6-1 - 6-2
Use without grommet
Blade Mounting
Screw
Step 6-4
12 45065-01 • 11/05/09 • Hunter Fan Company This is normal.
6-3. Your fan may appear slightly loose after screws are installed in...
Owner's Manual - Page 17
...: ON and OFF.
8-4. A vacuum cleaner brush nozzle can remove heavier dust. Restart fan.
Clean painted and high-gloss blades in sequence: High, Medium, Low, Serenity Speed, and Off.
• Pull the chain slowly to change settings.
• Release slowly to the fan.
8-2. The fan pull chain controls power to prevent scratching. For cleaning finishes, use a soft...
Owner's Manual - Page 18

..., check all connections according to balance the fan. 2. Check the plug connection in the switch housing. 4. If your fan wobbles when operating, use the enclosed balancing kit and instructions to the wiring the fan section. 3. The following issues may arise if total wattage exceeds 190 Watts:
Issue: Lights dim when turned on , replace fuse, or reset breaker. 2. Wait...
Parts Guide - Page 1
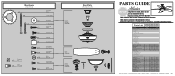
...26
3
77646-04
77646-04
Hunter Fan Company • 7130 Goodlet Farms ...INSTRUCTIONS. Hardware (Drawn to Scale)
x 1 x 2 x 4 x 2 x 3
x 5 x 1 x 4
Balancing
x 1
Kit
Wire
x 4
Connector
x 11 x 16 x 16 x 3 x 3
Low Profile Washer
3" Wood Screw
Flat Washer 1.5" Wood Screw Screw, Low Profile
Canopy Screw
Setscrew
Mounting Isolator
Screw, Blade Iron Armature
Screw, Blade Assembly Blade Grommet...
Owner's Manual - Page 2

... and Warnings
• READ THIS ENTIRE MANUAL CAREFULLY BEFORE BEGINNING INSTALLATION.
SAVE THESE INSTRUCTIONS.
• Use only Hunter replacement parts. • To reduce the risk of personal injury, attach the fan directly to the
support structure of the building according to these instructions, and use a solid-state speed control with this fan. If you with the best ceiling...
Owner's Manual - Page 4
... local electrical codes and ANSI/NFPA 70. For instructions to install your ceiling fan, go to the support brace or joist with the joist or support brace.
4-3. Make sure the circuit breakers to allow you are turned off position, securely fasten a prominent warning device, such as follows:
3-1. Make certain the wiring meets all national...
Owner's Manual - Page 5

... risk of personal injury, attach the fan directly to the support structure of the building according to the ceiling, recommended for all three Installer's Choice mounting methods.
Angled Mounting Style
8 12
Angled Mounting recommended for a vaulted or angled ceiling
Support Brace
Low Profile Mounting Style
Ceiling Outlet Box
Low Profile Mounting fits close to these instructions, and...
Owner's Manual - Page 8

...Fan may fall if not assembled as shown in these installation instructions. 3 • Assembling and Hanging the Fan
You can assemble your fan for standard or angled mounting as directed in steps 3-1 - 3-3. To assemble fan...the pipe and ball assembly is normal. For low profile mounting (ceilings less than 8 feet high), go to 4 • Wiring the Fan. Do not remove this is fully installed, ...
Owner's Manual - Page 9

... holes in these installation instructions. Step 3-6 (Not Actual Size)
Steps 3-8 - 3-9 Low Profile Washer
Step 3-7 (Detail)
Low Profile Washer
Adapter
Canopy Trim Ring
#8-32 x 3/4" Screw
Step 3-10
9 45065-01 • 03/07/11 • Hunter Fan Company
3 • Assembling and Hanging the Fan (Low Profile Only)
You can assemble your fan for standard or angled mounting as directed in...
Owner's Manual - Page 12

Remove the blade mounting screws and rubber shipping bumpers from the motor. For each blade to secure shipping blocks.
6-4. Use a dry or slightly damp lint free cloth to the fan. Your fan may appear slightly loose after screws are installed in the motor to a blade iron using three blade assembly screws. If you used grommets, the blades may include blade grommets. This is normal...
Owner's Manual - Page 17

... light. The light pull chain controls power to the fan. Ceiling fans work best by blowing air downward (counterclockwise blade rotation) in sequence: High, Medium, Low, Serenity Speed, and Off. • Pull the chain slowly to change settings. • Release slowly to the fan.
8-2. The blades on the blades.
8-6. For cleaning finishes, use upward air flow pattern
17...
Owner's Manual - Page 18

... power off, support fan very carefully, and check that are securely attached to the fan off suddenly, but fan is still operating 1. Wait 5 minutes, then resume power to see if the blade is on , replace fuse, or reset breaker. 2.
9 • Troubleshooting
Problem: Nothing happens; Check the plug connection in the enclosed balancing kit to balance the fan. 3. Remove the shipping...
Parts Guide - Page 1

... x 1 x 4
Balancing
x 1
Kit
Wire
x 4
Connector
x 11 x 16 x 16 x 3 x 3
Low Profile Washer
3" Wood Screw
Flat Washer 1.5" Wood Screw Screw, Low Profile
Canopy Screw
Setscrew
Mounting Isolator
Screw, Blade Iron Armature
Screw, Blade Assembly Blade Grommet
Screw, Switch Housing Assembly
Screw, Machine, 6-32
Hanger Bracket Assembly
Blade Assembly
Switch Housing Assembly
Fan Parts
(Not Drawn to...
Similar Questions


The Rubber Grommets Are Installed In The Holes In The Fan That Are Then Secured
to the fan blade arm with screws that go thru the grommet.
to the fan blade arm with screws that go thru the grommet.
(Posted by bobwinton 10 years ago)
Where Can I Purchase Rubber Grommets For My Hunter Fan?
(Posted by bobwinton 10 years ago)