
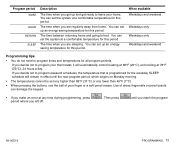
Honeywell CT3200 Support Question
Honeywell CT3200 Support Question
Find answers below for this question about Honeywell CT3200.Need a Honeywell CT3200 manual? We have 1 online manual for this item!
Question posted by milamans on December 1st, 2013
How To Remove Honeywell Thermostat Cover
The person who posted this question about this Honeywell product did not include a detailed explanation. Please use the "Request More Information" button to the right if more details would help you to answer this question.
Current Answers
Related Honeywell CT3200 Manual Pages
Owner's Manual - Page 1

... comfort and energy savings with your home, keeping you have any questions about using this thermostat, visit our home expert Web site at www.honeywell.com/yourhome or call Honeywell Customer Relations at 1-800-468-1502. MagicStat® CT3200 Programmable Thermostat
Installation and Programming Instructions
Weekday/Weekend (5-day/2-day) Programmable Heat and/or Cool Low...
Owner's Manual - Page 2
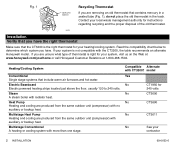
... system. If you are unsure what type of thermostat is the right thermostat for instructions regarding recycling and the proper disposal of the old thermostat.
Multistage Heat Pump Heating and cooling are produced from the same outdoor unit (compressor) with the CT3200, the table recommends an alternate Honeywell model. Read the compatibility chart below to...
Owner's Manual - Page 3

... drill bit
• Pencil
c.
Honeywell recommends Energizer® • Wire cutter/stripper or sharp knife
batteries.
• Level
• Screwdriver
• Electrical tape
• Hand or power drill with either system, call a heating/air conditioning contractor-the problem may persist after you have the following parts:
• Thermostat and mounting plate •...
Owner's Manual - Page 4

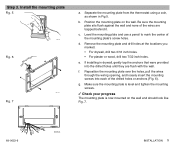
b. Remove the cover of the terminal that are extra wires that it . Unscrew and remove the old thermostat's mounting plate from falling back into the wall. d. Inspect the old thermostat wiring. If the labels do not disconnect the wires. Using the enclosed labels, mark the wires with wires attached to keep them from the wall, ...
Owner's Manual - Page 5
... Fig. 7.
69-0653-6
Y
G Rc
RW
M20128
INSTALLATION 5
c. Separate the mounting plate from the thermostat using a coin, as shown in drywall, gently tap the anchors that were provided into each of the ... mounting plate sits flush against the wall and none of the mounting plate's screw holes. Remove the mounting plate and drill holes at the locations you marked. • For drywall, drill...
Owner's Manual - Page 6
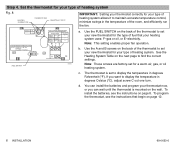
...IN B-OUT
E
FURNACE
1 TURN
W Y G
R
Rc
FUEL SWITCH
M20145
IMPORTANT: Setting your thermostat correctly for your heating system uses: F-gas or oil, or E-electricity. To install the batteries, ...see the instructions that your type of heating system
Fig. 8
HEATING SYSTEM TYPE
THERMOSTAT BACK
SELECTING ºF OR ºC
A
DISPLAY F C-IN DISPLAY C C-OUT
1 TURN
...
Owner's Manual - Page 7

... A-leave in B-leave in
A-out one turn B-leave in
A-out one turn B-leave in
A-leave in B-out one complete turn
Fuel switch F
F F E
Step 5.
d. b. Wire the thermostat terminals
Fig. 9
G Y W
R
Fig. 10
5/16 in Fig. 9. Securely tighten the terminals.
69-0653-6
END OF WIRE VISIBLE HERE
M20126
INSTALLATION 7 c. Loosen the terminal screws and...
Owner's Manual - Page 8

... negative terminals are installed correctly, the digital display flashes all entries once, then begins to program the thermostat.
Using a coin, open the battery door as marked inside the battery case. Replace the battery door. Remove the clear plastic label from the digital display. Check your progress When the batteries are oriented correctly...
Owner's Manual - Page 9

...terminals that power to the heating/cooling system is most likely a variation of your new 3200 thermostat and must be returned to the place of purchase. Place the wires where they will NOT ...
As you disconnect the wires, do not connect to operate. Six or more wires If your old thermostat has six or more wires (excluding clock wires attached to the C or C1 terminals), your heating/...
Owner's Manual - Page 10
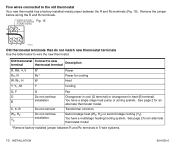
...-installed jumper between the R and Rc terminals (Fig. 15). Five wires connected to the old thermostat Your new thermostat has a factory-installed metal jumper between R and Rc terminals in heat (B terminal). Remove the jumper before wiring the R and Rc terminals.
You have a multistage heating/cooling system. INSTALLED). See page 2 for cooling Heat
Cooling...
Owner's Manual - Page 11

...1 Fan switch-Selects automatic fan operation or fan on
(page 17)
9
2 Set Schedule-Puts the thermostat into programming
10
mode (page 14)
11
3 Set Clock/Day-Sets the clock and day (page ...11 Temp Warmer and Cooler-Sets the temperature warmer and cooler (page 14)
12 Run Program-Returns thermostat to normal operating mode
13 Hold Temp-Holds a selected temperature (page 19) 14 System switch-Selects...
Owner's Manual - Page 12

... energy-saving temperature higher. Press
again.
Fig. 19
Step 2. The program periods are
displayed (Fig. 19). Press
once.
Learn about the programming features
Your 3200 thermostat allows you to program schedules for both a heating season and a cooling season. • During the heating season, you can set the normal room temperature higher...
Owner's Manual - Page 13
... automatically control heating at 68°F (20°C), and cooling at 78°F (26°C), 24 hours a day. If you decide not to program your thermostat, it will remain in effect until you reach the program
69-0653-6
PROGRAMMING 13 You can set any higher than 88°F (31°C) or...
Owner's Manual - Page 16

... system when the temperature outdoors is below 50°F (10°C). Set the System switch to AUTO. d. c. Step 5. e.
b. c.
Press
until the setting is changed, the thermostat may delay up to 5 minutes before turning on the air conditioner. Set the System switch to COOL, and the Fan switch to COOL. Note: When...
Owner's Manual - Page 17

... runs continuously. f.
Set the System switch to OFF and the Fan switch to the G terminal on the bottom of the thermostat faceplate (Fig. 16 page 11) control the operation of the thermostat.
69-0653-6
OPERATION 17 Press
once. Press and hold
or
until the setting is displayed. Set the Fan and System...
Owner's Manual - Page 18

Make sure that the positive and negative terminals are oriented correctly as possible, within 20-30 seconds of removing the old ones, you will have to lack of battery power in the thermostat. d. Note: If you are : You should:
Flashing "bAt Lo" Low
Replace the batteries as soon as marked inside the battery...
Owner's Manual - Page 21

Remove the batteries and then insert them as soon as possible. replace them
backwards for assistance.
69-0653-6
FREQUENTLY ASKED QUESTIONS .... • If the temperature setting is higher than the current room temperature and
the SYSTEM ON arrow is displayed, the thermostat is set the System switch to OFF and insert the batteries backwards for the furnace to heat up and the fan to reset the...
Owner's Manual - Page 22
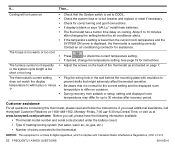
..., Monday-Friday, 7:00 AM-5:30 PM Central Time, or visit us at www.honeywell.com/yourhome. Then...
Before you need additional assistance, call , please have the following information available:
• Thermostat model number and serial code (located under the battery cover)
• Type of heating/cooling system (hot water, warm air, oil, gas...
Owner's Manual - Page 23

..., and you . MN10-3860 1885 Douglas Drive North Golden Valley, MN 55422-3992
Honeywell Canada: Honeywell Limited/Honeywell Limitée 35 Dynamic Drive Scarborough, Ontario M1V 4Z9
This warranty does not cover removal or reinstallation costs. If the product is shown by Honeywell that the defect or malfunction was caused by the consumer.
THIS WARRANTY IS...
Owner's Manual - Page 24

Home and Building Control Honeywell 1985 Douglas Drive North Golden Valley, MN 55422
69-0653-6 Rev. 9-01
Home and Building Control Honeywell Limited-Honeywell Limitée 35 Dynamic Drive Scarborough, Ontario M1V 4Z9
Printed in the U.S.A.
www.honeywell.com/yourhome
Similar Questions

How Do I Remove The Cover To Replace The Batteries?
I don't see a release to remove the cover, and when I apply pressure, the screen goes blank, and the...
I don't see a release to remove the cover, and when I apply pressure, the screen goes blank, and the...
(Posted by loismsteil 3 years ago)

Where Is Reset Button Honeywell Thermostat Ct3200 Manual
(Posted by Camce 9 years ago)

Honeywell Thermostat Ct3200- Cooling Does Not Come On
(Posted by sdceasyg 9 years ago)


How Do I Remove Thermostat Cover From Honeywell Rth 7500 To Replace Battery
(Posted by keara20 12 years ago)