
Homelite UT13124 Support Question
Homelite UT13124 Support Question
Find answers below for this question about Homelite UT13124.Need a Homelite UT13124 manual? We have 2 online manuals for this item!
Question posted by matmac1164 on June 24th, 2014
Where Can I Buy A Replacement Rear Flap For A Homelite Electric Mower # Ut 13124
The person who posted this question about this Homelite product did not include a detailed explanation. Please use the "Request More Information" button to the right if more details would help you to answer this question.
Current Answers

Answer #2: Posted by online24h on June 24th, 2014 6:40 PM
online24h

Member since:
March 28th, 2014 Points: 531,660

Member since:
March 28th, 2014 Points: 531,660
Hope this will be helpful "PLEASE ACCEPT"
Related Homelite UT13124 Manual Pages
User Manual - Page 1
... you years of rugged, trouble-free performance.
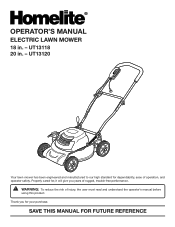
WARNING: To reduce the risk of operation, and operator safety. SAVE THIS MANUAL FOR FUTURE REFERENCE
OPERATOR'S MANUAL
ELECTRIC LAWN MOWER
18 in . - Properly cared for, it will give you for dependability, ease of injury, the user must read and understand the operator's manual before
using...
User Manual - Page 2

TABLE OF CONTENTS
Introduction ...2 General Safety Rules...3-4 Specific Safety Rules ...4 Symbols ...5-6 Electrical...7 Features...8-9 Assembly...9-11 Operation...12-13 Maintenance...14-16 Troubleshooting...17 Exploded View/Parts List ...18-19 Warranty ......
User Manual - Page 3
...and the mowing activity. Failure to follow all times.
Operate the lawn mower only in electric shock, fire, and/or serious personal injury. They can be sure to ... polarized extension cord. Replace damaged cords immediately. Page 3 If the plug still does not fit, contact a qualified electrician to the presence of inattention while operating the lawn mower may block your extension...
User Manual - Page 4
... cause severe injuries to persons. Use of unauthorized parts may be replaced only by the manufacturer or by the lawn mower blade can be thrown by unqualified personnel could cause a slip and...shut off.
SPECIFIC SAFETY RULES
Do not operate the mower without the entire grass catcher, discharge guard, rear guard, or other hidden objects. Refer to them frequently and use...
User Manual - Page 6

... Mask for assistance. When servicing, use over eyeglasses or standard safety glasses with side shields and, when needed, a full face shield.
Call Homelite customer service for use only identical replacement parts.
SYMBOLS
The following signal words and meanings are intended to explain the levels of any power tool can result in death...
User Manual - Page 7
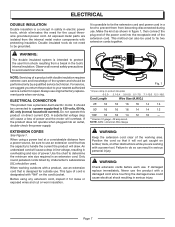
... for outside use an extension cord that it for repair. Always use . ELECTRICAL CONNECTION
This product has a precision-built electric motor. This type of cord is designated with protecting insulation. WARNING:
Check extension cords before each use original factory replacement parts when servicing.
NOTE: Servicing of the system and should be performed only...
User Manual - Page 9
...;FEATURES
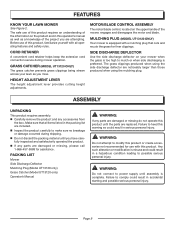
KNOW YOUR LAWN MOWER
See Figure 2.
MULCHING PLUG (MODEL UT13120 ONLY)
Your mower is complete.
Failure to power supply until the parts are noticeably larger than those produced when using the side discharge deflector are replaced.
SIDE DISCHARGE DEFLECTOR
Use the side discharge deflector on your...
User Manual - Page 10
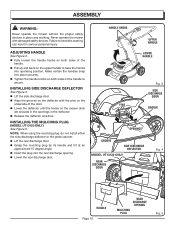
.... Align the grooves on the deflector with damaged safety devices. Never operate the mower with the pins on the
underside of the door. Lower the deflector until the hooks...
MODEL UT13120 ONLY
REAR DISCHARGE
DOOR
Fig. 4
HANDLE Page 10
REAR DISCHARGE
OPENING
MULCHING PLUG
Fig. 5 ADJUSTING HANDLE
See Figure 3. Fully loosen the handle knobs on the mower deck
are secured ...
User Manual - Page 11
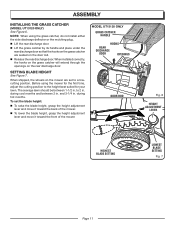
... SETTING
LOWEST BLADE SETTING
Fig. 7
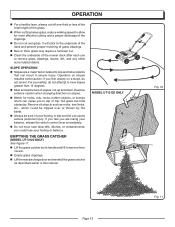
Page 11 NOTE: When using the mower for your lawn. during cool months and between 1-1/2 in . Before using the grass catcher, do not install either the side discharge deflector or the mulching plug.
Lift the rear discharge door.
Lift the grass catcher by its handle and...
User Manual - Page 12
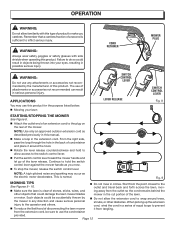
...lawn mower blades
mower in the back of the mower. NOTE: Use only an approved outdoor extension cord as described previously in this manual.
Make a loop in any attachments or accessories not recommended by the mower in the extension cord. Continue to the plug on the rear... against the mower handle as the electric motor decelerates. Fig. 9
MOWING TIPS
See...
User Manual - Page 13
...tripped over or thrown by its handle and lift to remove from mower.
Empty grass clippings.
Lift the rear discharge door and reinstall the grass catcher as rocks, tree limbs,...hide obstacles. Remove all objects such as described earlier in severe injury. OPERATION
For a healthy lawn, always cut off one-third or less of the total length of the grass.
� ...
User Manual - Page 14
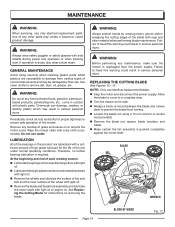
... Figures 12 - 13. NOTE: Only use only identical replacement parts. If operation is required. Therefore, no further bearing lubrication is dusty, also wear a dust mask. Periodically check all nuts and bolts for proper tightness to a complete stop. Turn the mower on the rear discharge door with light
oil. � Lubricate the...
User Manual - Page 15
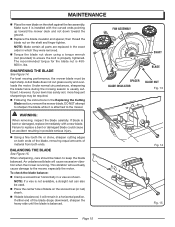
The recommended torque for the blade nut is 450600 in the Replacing the Cutting
Blade section, remove the mower blade.
However, if your lawn has sandy soil, more frequent sharpenings may be used. Place the center hole of blade on the shaft against the fan assembly. WARNING:
When ...
User Manual - Page 16
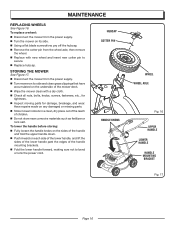
... AXLE
Fig. 16
UPPER HANDLE LOWER HANDLE HANDLE MOUNTING BRACKET
Fig. 17
Page 16 MAINTENANCE
REPLACING WHEELS
See Figure 16.
STORING THE MOWER
See Figure 17. Disconnect the mower from the wheel axle, then remove
the wheel. Replace with a dry cloth. � Check all nuts, bolts, knobs, screws, fasteners, etc., for...
User Manual - Page 17
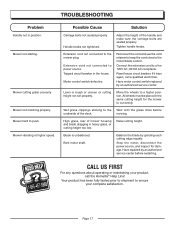
... Homelite® Help Line! Move the wheels to the motor/blade control.
Mower vibrating at higher speed.
Connect the extension cord to ensure your product, call a qualified electrician. Lawn is unbalanced. mowing. Stop the motor, disconnect the power source, and inspect for the mower to cut evenly.
Bent motor shaft.
Have motor control switch replaced...
User Manual - Page 18
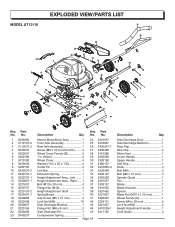
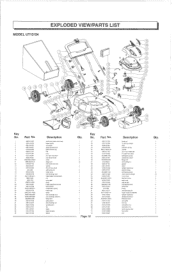
Mower Motor/Deck Assy 1 24 Front Axle Assembly 1 25 Rear Axle Assembly 1 26 Screw (M5 x 10 mm Pan Hd.)......... 4 27 Wheel Cover Ferrule (B 3 28 7 in. Side Discharge Door 1 Side Discharge Deflector 1 Rear Flap 1 Wire Clip 2 Motor Vent 1 Lower Handle 1 Upper Handle 1 Soft Grip 1 Knob 4 Bolt (M8 2 Bolt (M6 x 12 mm 3 Spindle Guard 1 Fan 1 Blade 1 Blade...
User Manual - Page 19
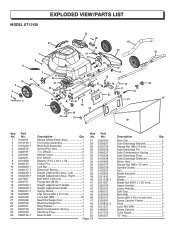
...Screw (M5 x 15 mm 4 45 Lock Nut (M5 10 46 Rear Discharge Door 1 47 Rear Discharge Pin 1 48 Ring Washer 2 49 Rear Compression Spring 1 50 Mulching Plug 1 51 Rear Shield 1 52
Page 19
Part No.
3330490 3330637 3220136 3320338 3340237 3410338...
46 26
39
23 50
42
48 47
Key Part No. Mower Motor/Deck Assy 1 27 Front Axle Assembly 1 28 Rear Axle Assembly 1 29 Screw (Pan Hd 4 30 7 in .
User Manual - Page 20
... between 7:30 a.m. - 4:30 p.m. Call us first with tool functionality. Freight costs from Homelite Consumer Products, Inc.
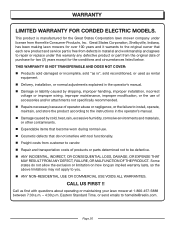
WARRANTY
LIMITED WARRANTY FOR CORDED ELECTRIC MODELS. Great States Corporation, Shelbyville, Indiana, has been making lawn mowers for the Great States Corporation lawn mower company under this warranty any defective product or part from the original date of...
User Manual - Page 22
... in . - Be sure to the housing. MODEL NUMBER SERIAL NUMBER
987000-034 11-8-06 (REV:00)
HOMELITE CONSUMER PRODUCTS, INC.
1428 Pearman Dairy Road Anderson, SC 29625
Phone 1-866-457-5888 www.homelite.com OPERATOR'S MANUAL
ELECTRIC LAWN MOWER
18 in the space provided below. REPAIR PARTS
The model number of the authorized service dealer...
Parts List - Page 1
...1 1 4 1.2 1 4 1 1 2 1 2 1 1 1 1 2 1 1 1 1 1 1 4
T LI T
MODEL UT13124
2 3
5 0
6
7
8
9
10
e e 13 12
•
tkeitm4
8
20
23 22 21
ota o
24 27
30
33...electric bridge self-tapping screw motor cover envelope motor cover Machine screw motor vent right shutter self-tapping screw left shutter E-ring rear discharge pin height adjust bracket(left rear wheel self locking nut wheel cover rear...
Similar Questions

Blades
Where can I buy 20 inch mulching blades for the above lawn mower. Thank you
Where can I buy 20 inch mulching blades for the above lawn mower. Thank you
(Posted by bdpersaud 7 months ago)


Need A Grass Catcher Bag For A Homelite Electric Model Ut13124 20inch 12 Amp
(Posted by Craig81745 2 years ago)

Homelite Electric Mower Ut13126 Won't Run When Handle Engaged
No lights on showing battery level, battery checks out at 24 volts, once the screws are removed will...
No lights on showing battery level, battery checks out at 24 volts, once the screws are removed will...
(Posted by qupua311 8 years ago)
How To Replace The Battery For Homelite Ut-13126 Lawn Mower
(Posted by dergro 9 years ago)