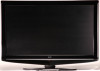
Haier LT42M1CFA Support Question
Haier LT42M1CFA Support Question
Find answers below for this question about Haier LT42M1CFA.Need a Haier LT42M1CFA manual? We have 1 online manual for this item!
Question posted by jeannierob on February 19th, 2013
I Need A Stand For This Tv. Is There A Catalogue Number For This Part
The person who posted this question about this Haier product did not include a detailed explanation. Please use the "Request More Information" button to the right if more details would help you to answer this question.
Current Answers
Related Haier LT42M1CFA Manual Pages
User Manual - Page 1

Instruction Manual - Please keep for future reference
Bush 32/37/42/47in LCD TV
4-08
User Manual - Page 2
.... • Attempt to service this product, check
with your dealer or service center. • Place the TV in such a position that the voltage on or next to the unit. • Cover the unit - Excessive...electrical appliances. It is securely inserted into the mains socket, and it will need time for household use in any way. • Make sure that the plug is best to have...
User Manual - Page 3

... Troubleshooting 36 Specifications 37 Product Guarantee 39
2
BUSH HD Ready Digital LCDTV User Manual Customer Helpline 0845 604 0105
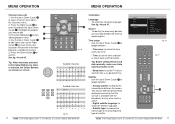
KNOW YOUR MACHINE
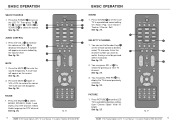
A POWER B VIDEO C SCART D TV E PC F Numerical Keys G EPG H PRE PR J ASPECT K SOURCE L NICAM M SLEEP N PICTURE O PR LIST P SOUND Q VOL R MUTE S PR T DISPLAY U MENU V EXIT X OK Y Cursor a Green Button b Yellow...
User Manual - Page 4
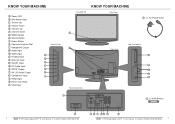
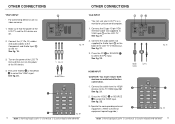
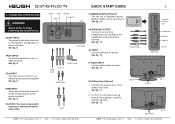
... O S-Video Input P Antenna Input Q SCART Input R PC Audio Input S SPDIF Output T AV L/R Audio Output U Component Input V HDMI Input X Power Connector Y VGA Input
Control Panel
C D E F G H J
1 x LCD TV
KNOW YOUR MACHINE
Front View
Z 1 x AC Power Cord
A B
Rear Connections
Rear View
Side Connections
K
L M N O
Y a 2 x AAA Battery
X
4
BUSH HD Ready Digital LCDTV User Manual Customer Helpline...
User Manual - Page 5

... marks correctly aligned.
Unclip the Battery Cover from your remote control, please consider the following:
• Ensure there is no obstruction between remote control and TV set.
• Bright sunlight may affect the remote control performance.
• Always ensure that both batteries are replaced at the same time. REMOTE CONTROL
NOTES...
User Manual - Page 6

... are not sure. Put the unit face down on the Bracket (not included). Stand
Screws
Stand
2. Unscrew the screws of the stand. For the Wall Bracket -
WALL MOUNTING (Optional) IMPORTANT: When drilling into
walls... WALL MOUNTING
3. Use 4 Wall Mount Holes B and Screws (not included) to mount the TV on a safe, flat surface that there are suitable for supporting the unit. Make sure that the...
User Manual - Page 7

... and the Power LED A will turn on and the
fig. 9
Power LED A on for your local voltage is turned on the front of the TV. For optimum picture quality, adjust antenna direction if needed. See fig. 10 and 11. ANTENNA CONNECTION
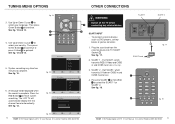
TUNING MENU OPTIONS
WARNING:
-
When the POWER J or A is
pressed the...
User Manual - Page 8
... 0845 604 0105
BUSH HD Ready Digital LCDTV User Manual Customer Helpline 0845 604 0105
13 SCART 1 - See fig. 13 and 14.
4. a
b
e
TV Installation
Language
fig. 14
Next
TV Installation
Country
fig. 15
Next
English Espanol Français Deutsch Italiano Nederlands Svenska Dansk
Previous
1/3
Austria Belgium Czech Republic Denmark Finland France...
User Manual - Page 9
...HDMI devices to select the PC input. For connecting devices such as a monitor for your LCD-TV as video cameras.
1. Connect the D type 15-pin VGA interface cable (not supplied) to the Component and....
2. Connect the audio cable (not supplied) to select the HDMI input. Turn on the power of the LCD-TV first and then turn on the back of the AV device.
4. Press the VIDEO B or SOURCE K to PC
...
User Manual - Page 10

... See fig. 24. For connecting video recorders.
1.
IMPORTANT: When using headphones always set of the LCD-TV and the AV device are off .
2. For connecting an AV device.
1. and then turn on the ... Please refer to a low level before you put the headphones on, then put the headphones on the LCD-TV first ; See fig. 23.
3.
Turn on and gradually increase the volume to the Video Input N ....
User Manual - Page 11
... select MONO, STEREO, DUAL 1 and DUAL 2 for DTV channel. NICAM
1. See fig. 27. Enter the
N
P
channel number you want to select the source. S To select the previous or next TV channel.
See fig. 27.
3. Then press TV D ,
PC E , SCART C , VIDEO B or
B
SOURCE K to
watch, the keys must be pressed
within 3 seconds. R
See fig...
User Manual - Page 12

... 4:3 format.
- Automatic: DTV and HDMI input will automatically display the correct format, while ATV and SCART will need to set .
-
See fig. 28.
2. Press OK X to 16:9.
- 16:9 subtitle: Display 4:3 ... See fig. 28.
3. Panorama: Removes the black bars on the remote control to turn the LCD TV off after a preset time. M
See fig. 28. Movie expand 14:9: Scales the classic 4:3 format...
User Manual - Page 13
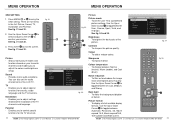
...quality.
Picture format
- fig. 31
2. To set the audio environment of the TV channels and language. Use the Up or Down Cursor Y to a predefined
picture ...the dark parts of available display
formats. To sharpen the picture quality. Settings Picture Sound TV Installation Parental
5
Picture
9
Picture mode
Brightness
Contrast
Sharpness
Colour temperature
Noise Reduction
Back light...
User Manual - Page 14

... 38 and 39.
Tip: When Bit stream is On. Settings Picture Sound TV Installation Parental
MENU OPERATION
5
Picture
7
Balance
Bass Treble
Virtual surround Sound mode...audio out. Hearing impaired -
Sound mode -
visually impaired function. Y
Settings Picture Sound TV Installation Parental
5
Picture
7
Balance
Bass Treble
Virtual surround Sound mode
AVL
Digital audio out
...
User Manual - Page 15
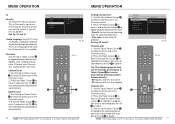
...or Down Cursor Y to select Channel scan in the Channels menu. 2. Settings Picture Sound TV Installation Parental
5
TV
3
Country
Audio Language
Channels
fig. 40
fig. 41
X
Y
26
BUSH HD Ready ... second program
you want to exchange with and
press the OK X to be accessed by pressing number buttons directly. • Programs with this are active • Programs with this are in the...
User Manual - Page 16
...) or only when mute is Off.
• Sleep timer: to set the TV to set period of subtitle.
Press the Red Button e to the table
below for...language. • Subtitle type: to display the transmitted subtitle on screen.
Settings Picture Sound TV Installation Parental
5
Installation
7
Language
Source Time setup Subtitle
Teletext Current software info
Reset AV ...
User Manual - Page 17

... instructions to set to the regional location. All number combinations from 0000 to digital channels.
If your TV
software information. See fig. 48 and 49....change your access code. Current software info - Reset AV settings - Settings Picture Sound TV Installation Parental
MENU OPERATION
5
Installation
7
Language
Source Time setup Subtitle
Teletext Current software info...
User Manual - Page 18

... which have the same coloured text. Press Colour Buttons a , e , b ,
and d to activate Teletext
overlaying the TV picture.
MIX - Press SIZE h to 9.
SUBPAGE
- See fig. 52.
fig. 51
fig. 52
32
BUSH HD ...or the
secondary item. R/G/Y/B (Colour button) - The teletext page
n
q
will be numbered and added to display the
sub page (when available)
f
h
a
b
e
d
g
k
INDEX
-
User Manual - Page 20

...signal cable correctly. 4.
Please use the Channel scan function to increase the number of antenna/signal cable. 2. Check if channel is in memory. Please use the Update scan...in play mode. 3. Press signal source and change battery. 2. Please use multi-directional outdoor antenna. (If your TV is connected correctly. 2. ENHANCEMENT
2x5 W
2x10 W
2x10 W
2x10 W
Rock, Pop, Live, Dance, Techno...
User Manual - Page 23
... connection. fig. 9
See fig. 10.
See fig. 10. Audio Cables
to the wall mounting bracket (not supplied), using the stand fixing holes. Fix the TV to PC
QSG
Customer Helpline 0845 604 0105
Wall Mounting (Optional)
1.
To connect external devices such
as DVD players, set of stereo
headphones (not included) ...
Similar Questions


Haier Tv Volume Does Not Work With Cable But Works When Watching Dvd Player.
TV model number L32B1120 32inch TV. The volume on TV does not work. I tried the mute & remote fo...
TV model number L32B1120 32inch TV. The volume on TV does not work. I tried the mute & remote fo...
(Posted by cherylcode 10 years ago)
Bush Television Lt42m1cfa Weight
Dear Sirs, I am trying to ascertain the weight of the above television, as I am looking to buy an ...
Dear Sirs, I am trying to ascertain the weight of the above television, as I am looking to buy an ...
(Posted by carralumsden 10 years ago)

On My Bush Lt42m1cfa Tv The Source Menu Comes Up And Wont Go When Using Volume
when i try to change the volume on my tv the source menu comes up and wont disappear and the channel...
when i try to change the volume on my tv the source menu comes up and wont disappear and the channel...
(Posted by elainesj 10 years ago)

Why Does My Tv Keep Turning Itself Off And On
why does my tv keep turning itself off and on
why does my tv keep turning itself off and on
(Posted by cindy1947 11 years ago)