Haier HWD1000 Support Question
Haier HWD1000 Support Question
Find answers below for this question about Haier HWD1000 - 1.7 cu. Ft. Washer/Dryer Combo.Need a Haier HWD1000 manual? We have 2 online manuals for this item!
Question posted by anahid67 on May 25th, 2017
I Removed The Lint Trap/button Trap And Now When I Put It Back It Leaks. I've
had other people put it in for me and same leak we think the rubber is worn but where can we buy it or what is the part number?
Current Answers
Answer #1: Posted by BusterDoogen on May 25th, 2017 10:40 AM
BusterDoogen

Member since:
October 30th, 2011 Points: 28,565,427

Member since:
October 30th, 2011 Points: 28,565,427
Go here for the part I think you are seeking.
I hope this is helpful to you!
Please respond to my effort to provide you with the best possible solution by using the "Acceptable Solution" and/or the "Helpful" buttons when the answer has proven to be helpful. Please feel free to submit further info for your question, if a solution was not provided. I appreciate the opportunity to serve you!
Answer #2: Posted by Odin on May 25th, 2017 9:41 AM
Odin

Member since:
April 10th, 2010 Points: 41,236,700
Member since:
April 10th, 2010 Points: 41,236,700
The first step is to check with the manufacturer: use the contact information here--https://www.contacthelp.com/haier/customer-service. (By the "rubber," you probably mean the gasket.) If you can't get the part directly from the manufacturer, ask for a part number and (with or without a part number) follow the applicable suggestions at this previous answer.
Hope this is useful. Please don't forget to click the Accept This Answer button if you do accept it. My aim is to provide reliable helpful answers, not just a lot of them. See https://www.helpowl.com/profile/Odin.
Related Haier HWD1000 Manual Pages
User Manual - Page 17
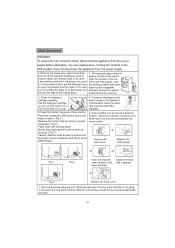
Button trap replacement is replaced correctly to Remove the button trap by turning counterclockwise; the button trap is the reverse of the button trap cover board to avoid
5.Clean the button trap(every three month) Push the underside of removal.
Instruction Manual - Page 2
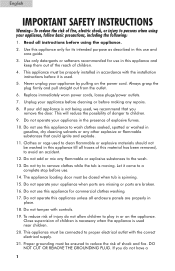
Replace immediately worn power cords, loose plugs/power outlets.
7. If your appliance, follow basic precautions, including the ...12. Close supervision of shock and fire. Use only detergents or softeners recommended for use this material has been removed, to wash clothes soaked, spotted or washed in accordance with the installation instructions before using your old appliance is ...
Instruction Manual - Page 3

...used in more than 2 weeks. Clean button trap before using this process do not use heat dry for a...not use extension cords or adapters to connect the unit to catch fire. 28. To reduce the risk ...dryer. During this appliance turn on all the hot faucets and let the hot water run for articles containing foam rubber or similarly textured rubber-like materials. 26. This will let the trapped...
Instruction Manual - Page 4
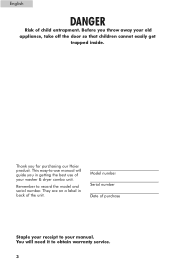
... you for purchasing our Haier product. Thank you in back of your washer & dryer combo unit. Remember to obtain warranty service.
3
Model number Serial number Date of child entrapment. This easy-to your old appliance, take off the door so that children cannot easily get
trapped inside.
Before you throw away your manual. English
DANGER
Risk of...
Instruction Manual - Page 5
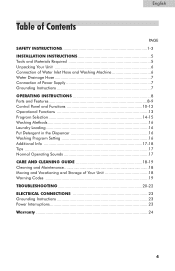
... 5 Tools and Materials Required 5 Unpacking Your Unit 6 Connection of Water Inlet Hose and Washing Machine 6 Water Drainage Hose 7 Connection of Power Supply 7 Grounding Instructions 7 OPERATING INSTRUCTIONS 8 Parts and Features 8-9 Control Panel and Functions 10-12 Operational Functions 13 Program Selection 14-15 Washing Methods 16 Laundry Loading 16 Put Detergent in the...
Instruction Manual - Page 6
...holder
1
5. User Manual
1
1
2
3
4
5
5
USER MANUAL Drain Hose
1
3. Flat Water Inlet Hose
4
Washers
4. Hot & Cold water inlet
2
hoses
2. English
Installation Instructions
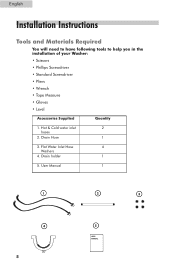
Tools and Materials Required
You will need to have following tools to help you in the installation of your Washer: • Scissors • Phillips Screwdriver • Standard Screwdriver • Pliers •...
Instruction Manual - Page 7
... factory.
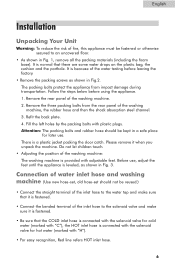
• Remove the packing screws as shown in Fig. 3. There is because of the water testing before using the appliance. 1. English
Installation
Unpacking Your Unit
Warning: To reduce ...As shown in Fig.2. Please remove it is fastened.
• Connect the bended terminal of the washing machine. 2. Connection of the washing machine, the rubber hose and then the shock absorption...
Instruction Manual - Page 9
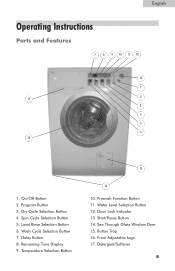
...Door Lock Indicator 13. Front Adjustable Legs 17. Program Button 3. Water Level Selection Button 12. Dry Cycle Selection Button 4. See Through Glass Window Door 15. Wash Cycle Selection Button 7. Start/Pause Button 14. Detergent/Softener
8 Spin Cycle Selection Button 5. Button Trap 16. English
Operating Instructions
Parts and Features
7 8 9 10 11 12
13 1 2 17 3 4 5 6 14...
Instruction Manual - Page 11
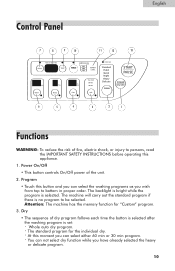
... INSTRUCTIONS before operating this appliance.
1. Attention: The machine has the memory function for the individual dry. • At this button and you can not select dry function while you wish from top to be selected. Program
• Touch this moment you can...Delicate
PROGRAM PROGRAMME
START PAUSE
POWER ON/OFF
6
5
4
3
2
1
Functions
WARNING: To reduce the risk of the unit.
2.
Instruction Manual - Page 12
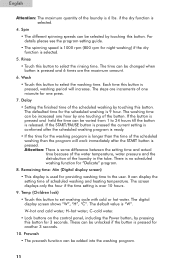
... rpm (800 rpm for 3 seconds. W-hot and cold water; C-cold water.
• Lock buttons on the control panel, including the Power button, by touching this button. English
Attention: The maximum quantity of the laundry in the tube. Rinse
• Touch this button to set washing cycle with cold or hot water. Delay
• Setting the...
Instruction Manual - Page 13
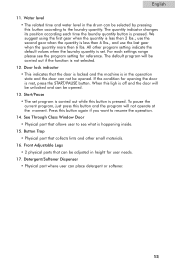
... to resume the operation.
14. For each time the laundry quantity button is met, press the START/PAUSE button. Press this button again if you want to the laundry quantity. English
11. All other small materials.
16. Door lock indicator • This indicates that collects lints and other program setting indicate the default values when the...
Instruction Manual - Page 14
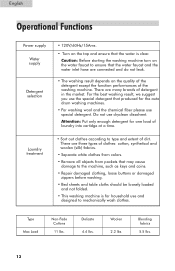
... as keys and coins.
• Repair damaged clothing, loose buttons or damaged zippers before washing.
• Bed sheets and table...(silk) fabrics.
• Separate white clothes from colors.
• Remove all objects from pockets that produced for the auto drum washing machines.
...not leak.
• The washing result depends on the tap and ensure that the water is for one load of laundry into...
Instruction Manual - Page 15
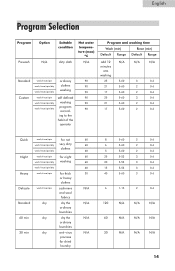
...
dry
for not very dirty clothes
for night washing
for thick or heavy clothes cashmere and wool fabrics
dry the ordinary laundries dry the ordinary laundries anti-virus procress for dried laundry
60 60 60 60 60 60 30
N/A
N/A
N/A
N/A
8
5-60
2
0-6
6
5-60
2
0-6
5
5-60
2
0-6
25
5-53
3
0-6
20
5-53
3
0-6
15
5-53
3
0-6
40
5-60
3
0-6
6
1-15
2
0-6
120
N/A
N/A
N/A
60...
Instruction Manual - Page 17
... 2.
2.
The above operation should be under the condition of the unit. English
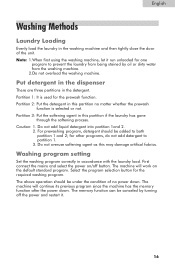
Washing Methods
Laundry Loading
Evenly load the laundry in the washing machine and then tightly close the door of no ...run unloaded for other programs, do not add detergent to prevent the laundry from being stained by turning off button. The machine will continue its previous program since the machine has the ...
Instruction Manual - Page 19
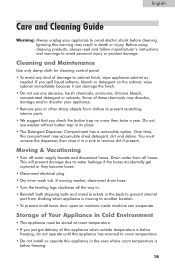
... door open so moisture inside machine can damage the finish. • Do not use washer without button trap in the area where room temperature is below freezing.
18 If you spill liquid softener,... product damage. English
Care and Cleaning Guide
Warning: Always unplug your appliance. • Remove pins or other sharp objects from clothes to prevent scratching interior parts. • We ...
Instruction Manual - Page 21
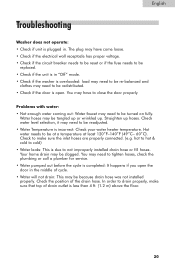
...water needs to make sure that top of drain outlet is less than 4 ft. (1.2 m) above the floor.
20 Check the position of the drain hose...
replaced. • Check if the unit is in "Off" mode. • Check if the washer is overloaded: load may need to ... order to close the door properly. English
Troubleshooting
Washer does not operate: • Check if unit is plugged in the middle of cycle. •...
Instruction Manual - Page 22
...; Spots or stains on your load. Press the "ON" button again. • Check if the door is unplugged. Avoid overloading...Dryer does not operate: • Check if unit is open.
21 English
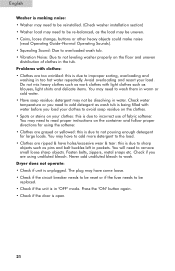
Washer is making noise: • Washer may need to be reinstalled. (Check washer installation section) • Washer...not leveling washer properly on the container and follow proper directions for large ...
Instruction Manual - Page 23
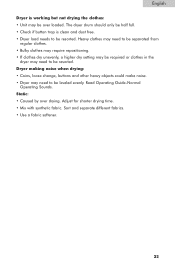
... should only be half full. • Check if button trap is working but not drying the clothes: • Unit may need to be leveled evenly. Dryer making noise when drying: • Coins, loose change, buttons and other heavy objects could make noise. • Dryer may need to be resorted. Read Operating Guide-Normal
Operating Sounds. Adjust...
Instruction Manual - Page 24
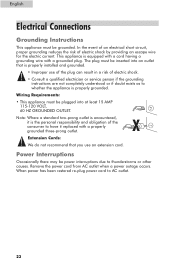
Wiring Requirements:
• This appliance must be grounded.
Remove the power cord from AC outlet when a power outage occurs.
In the event of an electrical short circuit, proper grounding reduces the risk of the ...
Instruction Manual - Page 25
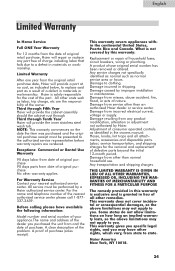
...number and serial number of your nearest authorized service center. A clear description of purchase. What is not covered by this warranty is exclusive and is solely responsible for the removal and replacement of nature. Hoses, knobs, lint traps..., wiring or plumbing. This warranty covers appliances within the continental United States, Puerto Rico and Canada. Damage caused by a Haier ...
Similar Questions


How Do I Remove The Gasket On The Haier Washer Dryer Combo Xqg65-11su
how do i remove the gasket on the haier washer dryer combo xqg65-11su
how do i remove the gasket on the haier washer dryer combo xqg65-11su
(Posted by austinprudential 11 years ago)
Blower Fan Motor Replacement
The blower fan motor went out on my HWD1000. Ordered new fan and removed manifold top that motor is ...
The blower fan motor went out on my HWD1000. Ordered new fan and removed manifold top that motor is ...
(Posted by patn0011 12 years ago)
Dry Only
I was told when I purchased this combo unit that I could use the DRYER only when I just needed to. I...
I was told when I purchased this combo unit that I could use the DRYER only when I just needed to. I...
(Posted by pamelaperrin 12 years ago)

Lint Trap
Is there not a lint trap for the dryer portion of this combo? I'm concerned that my machine is not w...
Is there not a lint trap for the dryer portion of this combo? I'm concerned that my machine is not w...
(Posted by jomarie6 13 years ago)