
Genie Excelerator Support Question
Genie Excelerator Support Question
Find answers below for this question about Genie Excelerator.Need a Genie Excelerator manual? We have 1 online manual for this item!
Question posted by MERLEMTE on April 28th, 2014
Genie Excelerator Shaft Won't Turn
The person who posted this question about this Genie product did not include a detailed explanation. Please use the "Request More Information" button to the right if more details would help you to answer this question.
Current Answers
Related Genie Excelerator Manual Pages
Owner's Manual - Page 1

... Set to Operation of this Garage Door Operator.
Need Help?
Extension Kit is available for Service 11 Garage Door Opener Installation 12 Accessories 22 Maintenance 25 Troubleshooting 26 Wiring Diagram 29 Warranty information 30
COMPLETE WITH INTELLICODE® REMOTE CONTROL AND SERIES II ELECTRONICS
For 7' 6" Doors. Please call us: 1-800-35-GENIE (354-3643) www.geniecompany.com...
Owner's Manual - Page 2

... The light turns on , or next to 60 Watts max. SAFETY INFORMATION
Garage Doors are heavy objects that move with the help of springs under tension, and electric opening equipment may ...GENIE or visit www.geniecompany.com
SAFETY FEATURES
Safe-T-Beam® (STB) Non-Contact Reversing System Places an invisible beam across door opening, that reverses the door during down travel to which door...
Owner's Manual - Page 3

...call 1-800-35-GENIE or visit www.geniecompany.com
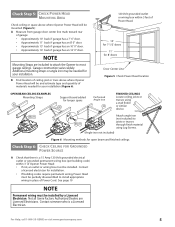
3 D Contact your garage door for installing Door Bracket onto door. E If you will need. NOTE
The Excelerator Opener is acceptable. B If door is designed for repairs
and adjustments to your door is a sectional or a one -piece door.
One-Piece Door
B Raise door to most garage doors. More than 2" thick, brace door or use shorter...
Owner's Manual - Page 4

...
enough to studs beside your rail is above the top of the garage door opening. For sectional doors, add 2-1/2" to connect points. NOTE
• For both types of Travel
4
For Help, call 1-800-35-GENIE or visit www.geniecompany.com
Check Step 4: CHECK DOOR HEADER AREA
NOTE
The header is a heavily reinforced section of the wall...
Owner's Manual - Page 5
... be partially disassembled to most garage ceilings.
Not all Genie Factory Authorized Dealers are included to attach the Opener to install appropriate wiring in place of garage: • Approximately 10' back if garage has a 7' 6" door. • Approximately 11' back if garage has an 8' 0" door. • Approximately 13' back if garage has an 10' 0" door. • Approximately 14' back if...
Owner's Manual - Page 6

... Extensions (dealer) ❐ Garage door opener reinforcement bracket (dealer) ❐ Garage door frame reinforcement brackets, screws, bracing
or reinforcement kits (dealer)
❐ Lag Screws (11/4") for a wood door less than 2" thick (store) ❐ Electrical outlet and/or wiring (supplied by a
licensed electrician)
❐ Excelerator Extension Kit (for 8' garage doors) (store) ❐...
Owner's Manual - Page 8
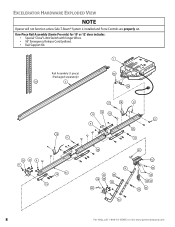
EXCELERATOR HARDWARE EXPLODED VIEW
NOTE
Opener will not function unless Safe-T-Beam® System is installed and Force Controls are properly set.
One-Piece Rail Assembly (Genie Pro only) for 10' or 12' door includes: • Special "Close" Limit Switch with longer Wires. • 96" Emergency Release Cord (yellow). • Rail Support Kit.
11
Rail...
Owner's Manual - Page 9

...Figure 10 Bolt 1st Rail Section to Collar (Figure11D). Snap on Motor Shaft (Figure 9). E If you have a 1-piece rail unit, skip...Attach Middle Rail Section
For Help, call 1-800-35-GENIE or visit www.geniecompany.com
9
B Attach Middle Rail... Bolts (Figure 11). GARAGE DOOR OPENER ASSEMBLY
Assembly Step C1H: CONNECT RAIL TO POWER HEAD
OPEN BLUE PARTS BAG
A Turn Power Head upside down and...
Owner's Manual - Page 10

...Close Limit Switch
(Brown wire)
19
DOOR
Open Limit Switch
(White wire)
18
DOOR
15"
Arrows point DOOR toward door
Wire Clip
53
15"
#8-32 x...slot on Assembled Rail
10
For Help, call 1-800-35-GENIE or visit www.geniecompany.com Assembly Step C3H: INSTALL MAGNETIC CARRIAGE... Step C6H: INSTALL AND CONNECT LIMIT SWITCHES
OPEN GREEN PARTS BAG
A Turn Opener right side up and support Power Head to...
Owner's Manual - Page 12

GARAGE DOOR OPENER INSTALLATION
NOTE
For lightweight garage doors, make sure you have sufficient support.
• If a door spring is recommended) Lag Screws and Flat Washers (not supplied).
The Bracket can then be mounted at the proper location and have installed the proper reinforcement (See Check Door Condition and Thickness on space.
However, it is critical that the...
Owner's Manual - Page 13
...
For Help, call 1-800-35-GENIE or visit www.geniecompany.com
13
B Attach Door Bracket: • For metal doors, use 3 (1/4" -20 x 3/4") Self-Drilling Screws (provided). • For wood doors, use 3 (1/4" x 2") Lag Screws.
For sectional doors:
A Place Door Bracket on top of your garage door. See page 3.
Check door condition and thickness. For doors thinner than top roller, and mark...
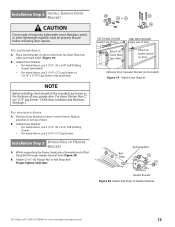
Owner's Manual - Page 15

...
32
Curved
36
34 Door Arm
31 Straight Door Arm
33
For Help, call 1-800-35-GENIE or visit www.geniecompany.com
Figure 24 Assemble Arms (ONE-PIECE)
15 Failure to 6' above floor: • Pull Cord through Magnetic Carriage Assembly Lever
until Knob is pulled with garage door fully or partially open, garage door may leave Emergency Release...
Owner's Manual - Page 16
...the door opening, where it now. Blocks of the Brackets until it clicks into outlet, Unplug it will not close the door ...DOOR GARAGE
TWO DOOR GARAGE
GREEN LED
RED RED LED LED
GREEN GREEN LED LED
RED LED
THREE DOOR GARAGE
Figure 26 Source/sensor Locations
Top edge of garage door frame or wall 6" above floor
Figure 27 Final Check Safe-T-Beams®
16
For Help, call 1-800-35-GENIE...
Owner's Manual - Page 18

... not be sure to only tap them in dark. • Controls door Opener from Entrapment Warning Label, and attach it to Terminal #2.
• On back of garage door. • At least 5' above with Entrapment Warning Label
18
For Help, call 1-800-35-GENIE or visit www.geniecompany.com
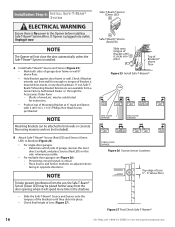
Installation SteCpH7: WALL CONSOLE INSTALLATION
WARNING
Verify...
Owner's Manual - Page 20

...
Figure 35 Making Force Adjustments
20
For Help, call 1-800-35-GENIE or visit www.geniecompany.com B Setting Open Limit Switch:
• Manually open garage door to run, move , check Safe-T-Beam® System. If door opens completely, but motor continues to full open position.
• Slide Open Limit Switch until it runs, until it is disengaged.
• With...
Owner's Manual - Page 21

...
contacts board: • If door does not reverse, decrease Close Force until garage door runs smoothly from resetting. If your Excelerator® is blocked, door will prevent the Timer/Cycle Counter from Open Limit Switch to Open Limit Switch. - Do Not Unplug the Unit -
If not, adjust Open Force Control slightly clockwise, close garage door, and open garage door, and close . If not...
Owner's Manual - Page 22
...
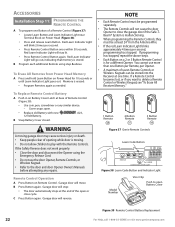
Figure 37 Genie Remote Controls
Learn Code Button
STATUS
LEARN LEARN INDICATOR LIGHT
Figure 38 Learn Code Button and Indicator Light
Model Number
Visor Clip
Push to the door and door Opener Owner's Manuals
before attempting any similar device. - Garage door will stop:
• The door automatically stops at one time. Garage door will not cause the door Opener to delete...
Owner's Manual - Page 23

...8226; If the door does not move the garage door:
- Red LED blinks - twice per second. • Enter your PIN (3 to Door and Door Opener Owner's Manuals before attempting any repairs.
B Repeat step A above for 2 or 3 Door Openers
A Set Wireless Keypad PIN (Personal ID Number): • Activate programming mode.
-
Press (in order)
.
- Learn Code Indicator LED turns off . After...
Owner's Manual - Page 27

...-balance spring, binding door hardware or rollers may result in (reapply power), and activate from Opener. NOTE: Force Settings are restored at factory. The Green LED light will turn ON, then OFF when power is fully closed.
• The Remote Controls and Wireless Keypad will run at slow speed. Have a Genie Factory Authorized Dealer...
Owner's Manual - Page 28

...garage door and door spring(s). • WARNING: If you suspect a problem with the garage door hardware or springs,contact a Genie Factory Authorized De aler for service,or contact Customer Service at 1-800-35-GENIE.
• Check Open...8226; Check that all Remote Control codes from Remote Control
1. Door starts up
Door will not turn off
• Check Safe-T-Beam® System as needed ....
Similar Questions

Garage Door Opener Not Working
Green light and red light are on the safety"eye" When pushing wall, remote or key pad the screw driv...
Green light and red light are on the safety"eye" When pushing wall, remote or key pad the screw driv...
(Posted by scanty5 9 years ago)

Is Genie Excelerator Garage Door Opener Compatible With The 3 Button Remote?
(Posted by ven1anubis 10 years ago)

Garage Door Opener.
The unit will not work from the wall remote. The wall remote lights up but does not operat the unit....
The unit will not work from the wall remote. The wall remote lights up but does not operat the unit....
(Posted by ckniffen 10 years ago)

Where Is The Learn Code Button Situated On The 3060l-07 Genie Garage Door Opener
Where is the learn code button situated on the 3060L-07 Genie garage door opener. Trying to intregat...
Where is the learn code button situated on the 3060L-07 Genie garage door opener. Trying to intregat...
(Posted by katiaella 10 years ago)