GE JGP333SETSS Support Question
GE JGP333SETSS Support Question
Find answers below for this question about GE JGP333SETSS.Need a GE JGP333SETSS manual? We have 2 online manuals for this item!
Question posted by gillischris on February 22nd, 2017
Lp Orifices
Im looking for the orifices to change to lp for my JGP333SETSS. The book says I need 92L, 63L, 86L, 99HXL, 34SL. There are no GE part #'s in there.
Current Answers
Related GE JGP333SETSS Manual Pages
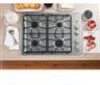
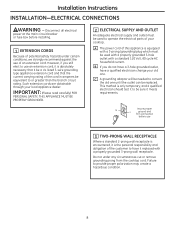
Installation Instructions - Page 1
... to leave these instructions for local inspector's use gasoline or other appliance!
This cooktop has been design certified by a qualified installer, service agency or the gas supplier. Call 800.GE.CARES (800.432.2737) or Visit our Website at: ge.com In Canada, call the fire department. Save these instructions completely and carefully...
Installation Instructions - Page 2
...Washington, D.C. 24010
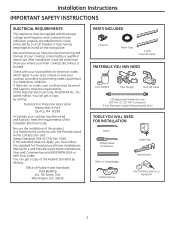
PARTS INCLUDED
2 Screws
Foam Tape
2 Hold Down Brackets
MATERIALS YOU MAY NEED
Joint Sealant
Pipe Fittings
Shut-Off Valve
CSA-Approved Flexible Gas Line 3/8″ Min. If... or with the proper voltage and frequency and connected to meet the requirements of your cooktop according to meet the requirements of Mobile Home Standards HUD Building
451 7th Street, S.W....
Installation Instructions - Page 3
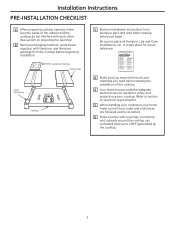
... boxes, regulator with literature, and literature package from literature pack and read them carefully before you need before beginning installation. in your cooktop. (Refer to safely and properly use your home, make sure the inside of the cooktop. D Make sure you have all the tools and materials you begin.
Literature Package Grate boxes...
Installation Instructions - Page 4

...
4 From Backwall
Recommended gas supply location
13-1/4″ From Cutout Center Line
5 MAKE SURE WALL COVERINGS, COUNTERTOP AND CABINETS AROUND COOKTOP CAN WITHSTAND HEAT (UP TO 200°F) GENERATED BY COOKTOP
Wall covering, cabinets and countertop must withstand heat up to 200°F
3 CUTOUT DIMENSIONS OF COUNTERTOP
To ensure accuracy, it is...
Installation Instructions - Page 5

.... Be sure you know how and where to shut off valve in the gas line in place, screw the
Cooktop
hold -down bracket into the cabinet sides to the side of the cooktop unit. Do not overlap the foam strips. Bottom of the countertop is in an easily accessible location outside the...
Installation Instructions - Page 6

... BOX BOTTOM
Screw the regulator onto the burner box bottom pipe connection. The convertible pressure regulator supplied with the unit must remain in series with LP or Natural gases to the cooktop should be connected in series with the manifold of the pressure regulator and install the coupling.
Installation Instructions - Page 7

... all connections if necessary to gas, check system for leaks with a manometer.
After connecting the cooktop to prevent gas leakage in the OFF position. Tighten all burner knobs are in the cooktop or supply line. Disconnect the cooktop and its individual shut-off valve from front of 2″ Dia. If a manometer is not...
Installation Instructions - Page 8
...cycle AC household current. Failure to have a qualified electrician change your local appliance dealer. Disconnect all electrical
power at the ... and
firm connection
before installing.
1 EXTENSION CORDS
Because of your cooktop. IMPORTANT: (Please read carefully) FOR
PERSONAL SAFETY, THIS APPLIANCE MUST... adaptor will be needed to operate the electrical parts of potential safety hazards under...
Installation Instructions - Page 10

...head assembly is positioned over the burner base and the electrode. Installation Instructions COOKTOP BURNERS
1 ASSEMBLING THE COOKTOP BURNERS
The electrode of the spark igniter is removed. Be careful not to...to four Stability pins.
Do not remove the top or touch the electrode of any cooktop controls while the top of
the pins sits in
Pin indentations
the burner head
is positioned...
Installation Instructions - Page 11
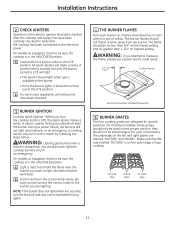
...turn a burner valve to measure
the flame, please use caution. The flame should match light the cooktop burners only in and turn the knob off and wait one minute before trying again.
4 THE ...or blow away from the burner. B Try each burner on highest setting.
You should be sure the cooktop is dangerous. On models so equipped, check to be no less than 1/4″ on the lowest setting...
Installation Instructions - Page 12

... adjusted for when it tells you the ratings of the burners and the type of the burner box.
In addition to be sure the cooktop is located on models so equipped). D When ordering parts, always include the serial number, model number and a code letter to make sure everything in the ...
Installation Instructions - Page 13

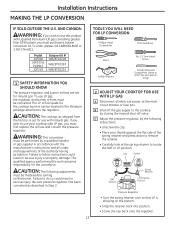
...'s instructions and all electrical power, at the spring retainer to the cooktop by a qualified installer or gas supplier in accordance with natural gas. The LP orifice spuds for natural gas. Failure to do so could result in Step 2. TOOLS YOU WILL NEED FOR LP CONVERSION
Phillips-Head Screwdriver
7mm Nutdriver
Pliers Safety Glasses
No. 15...
Installation Instructions - Page 14

...
igniters from the burner
base (if required to hold the
orifice in the nut driver during
installation and removal. A
slight amount of force is required to push the nut
driver down over the ring.
Installation Instructions MAKING THE LP CONVERSION (CONT.)
3 CHANGE COOKTOP BURNER ORIFICES
A Remove the top grates,
burner caps, and burner
heads. Through...
Installation Instructions - Page 15

...JGP333 III PGP943
II
Replace: With:
Main 175HXN ➔ 99HXL
Simmer 57N ➔ 34L
E Install the LP/Propane orifices in their precise locations as noted in the sides only. (See rating plate on bottom of the burner.
Installation Instructions
3 CHANGE COOKTOP BURNER ORIFICES (CONT.)
D Locate the LP/Propane orifices shipped inside the literature package. I
II
III
X
I , II, III...
Installation Instructions - Page 16

...:
Low-setting adjustments must be made with two other burners are turned on and check the flames. TO CONVERT THE COOKTOP BACK TO NATURAL GAS, REVERSE THE STEPS UNDER MAKING THE LP CONVERSION. If converting back to the setting before the lowest setting. This will soon disappear.
Note: Some models may be...
Installation Instructions - Page 22

...leaks and personal injury. Installation Instructions INSTALLATION-GAS CONNECTIONS
1 PROVIDE ADEQUATE GAS SUPPLY
This cooktop is designed to operate on natural gas at least 5″ W.C. gas is facing ... Countertop
6
of water column pressure, the inlet pressure must remain in series with LP or Natural gases to all threaded connections.
3 INSTALL REGULATOR ONTO BURNER BOX BOTTOM
Screw...
Installation Instructions - Page 29
... INFORMATION YOU SHOULD KNOW
The pressure regulator and burner orifices are set for the conversion. The LP orifice spuds for the cooktop burners can be located in the literature package attached to...long)
2 ADJUST YOUR COOKTOP FOR USE WITH LP GAS
A Disconnect all codes and requirements of the spring retainer and press down to remove the retainer.
• Carefully look at the main circuit...
Installation Instructions - Page 30

... the nut
driver down over the ring.
Using a No. 15 "Torx"
head driver bit, remove
the screws holding the Orifice Spud Located burner base in the cooktop.
Installation Instructions MAKING THE LP CONVERSION (CONT.)
3 CHANGE COOKTOP BURNER ORIFICES
A Remove the top grates,
burner caps, and burner
heads. Remove This Assembly
B Remove the spark
igniters from the...
Installation Instructions - Page 31

... ➔ 99HXL
Simmer 57N ➔ 34L
E Install the LP/Propane orifices in their precise locations as noted in the center of the burner while the simmer orifice is located higher behind the center of engraved marks, (I
II
III
X
15,000 BTU/HR Burner (on bottom of each orifice to the cooktop burner. Installation Instructions
3 CHANGE COOKTOP BURNER ORIFICES (CONT...
Installation Instructions - Page 32

.... Observe the flame at the lowest setting, increase the flame size and test again.
Apply the sticker near the cooktop gas inlet opening to use natural gas.
16 Installation Instructions MAKING THE LP CONVERSION (CONT.)
4 ADJUST BURNER FLAMES
A Turn all burners off.
Engage adjustment screw in the future that the flame size...
Similar Questions

Lp Conversion Kit
Looking for a LP conversion kit for this model ge jgp975seks, is this item still available for purch...
Looking for a LP conversion kit for this model ge jgp975seks, is this item still available for purch...
(Posted by gensalvatore 3 years ago)
Having A Problem Converting To Lp Gas. Old Orifice Will Not Slide Out
How do I get the old orifice out to put in the smaller LP orifice?
How do I get the old orifice out to put in the smaller LP orifice?
(Posted by familyoffaith3 8 years ago)

Lp Convertible?
Did this unit come with a LP conversion kit? Can one still be purchased?
Did this unit come with a LP conversion kit? Can one still be purchased?
(Posted by amercuri 9 years ago)

Black 36' Cooktop
Dear GE, I have a GE Black Cooktop that I love but I accidentally allowed a piece of foil to ge...
Dear GE, I have a GE Black Cooktop that I love but I accidentally allowed a piece of foil to ge...
(Posted by paulmachelle 12 years ago)
