
Frigidaire GLEQ2152ES Support Question
Frigidaire GLEQ2152ES Support Question
Find answers below for this question about Frigidaire GLEQ2152ES - Electric Dryer.Need a Frigidaire GLEQ2152ES manual? We have 4 online manuals for this item!
Question posted by caldy6058 on January 10th, 2016
Problem With Dryer
hWhy the dryer is so loud? Why it turns off by itself in middle of cycle?
Current Answers
Answer #1: Posted by Odin on January 11th, 2016 7:46 AM
Odin

Member since:
April 10th, 2010 Points: 41,236,690

Member since:
April 10th, 2010 Points: 41,236,690
See http://www.repairclinic.com/RepairHelp/Dryer-Repair/8-2--R0xFUTIxNTJFUw==/Frigidaire-Dryer-Troubleshooting. There are several links there that may apply to your issues. Good luck!
Hope this is useful. Please don't forget to click the Accept This Answer button if you do accept it. My aim is to provide reliable helpful answers, not just a lot of them. See https://www.helpowl.com/profile/Odin.
Related Frigidaire GLEQ2152ES Manual Pages
Use and Care Manual - Page 2

......2
Important Safety Instructions...2-4 Drying Procedures...4 Features...5 Care and Cleaning...5-6 Common Drying Problems...6 Avoid Service Checklist...7 Warranty...8 Español ...9-15
Product Record
The symbol...word "DANGER" or "WARNING". Your dryer may
Serial Number not have provided many important safety messages in this or any electrical switch; Instead
it in personal injury...
Use and Care Manual - Page 3

... softener or product. • Failure to comply with these items on or near dryer at any circumstances cut, remove or bypass the grounding prong from electrical power cord. Close supervision of aerosol into, on or near children. Do not stack or place laundry or throw rugs against the front or back of the...
Use and Care Manual - Page 4

...laundry product labels. Do not install or store the dryer where it inside out for even drying. • Check for easy removal.
2. Fill dryer drum 1/3 to the weather. • A thermal limiter switch automatically turns off the motor in electrical... lint. Items need room to resume the cycle. 6. Close the dryer door and select the cycle, temperature, dryness level and
options desired. ...
Use and Care Manual - Page 5

... the dryer drum during Extended Tumble at the end of the cycle and periodically during loading and unloading.
Inside • Clean the lint screen after every load.
Refer to avoid electrical shock ... lint screen from noncolorfast fabrics, clean the drum with a reversible door. Closing the door turns off the light. To reduce risk of fire or serious injury to persons or property, ...
Use and Care Manual - Page 6
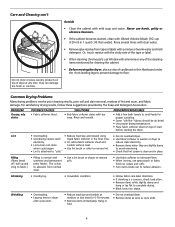
...and mild detergent.
PROBLEM
Greasy, oily ...cuffs. • Turn items inside out ...dryer to
electricity.
• Or, add a fabric softener sheet and
reduce static electricity.
• Lint screen not clean
tumble without heat.
• Remove items when they are slightly damp
when cycle...laundry products on top of dryer at medium or low heat for 5-10 minutes.
• Remove items ...
Use and Care Manual - Page 7

... before starting each cycle.
It may be clogged or restricted. House fuse blown or circuit breaker tripped.
SOLUTION
Make sure the plug fits tightly in or plug may be hitting the inside the dryer.
If 1of the 2 fuses is not securely plugged in wall outlet.
See INSTALLATION INSTRUCTIONS for replacement. Electric dryer is overloaded...
Technical Data Sheet - Page 1

... for anything that cycle.
If problem persists, replace electronic control. If reading is open . If good, replace electronic control. Position cycle selector to NORMAL,...problem persists, replace electronic control. Press Pause Cancel and SELECT buttons for six seconds. 3. Dryer Tech Data Sheet
This information is stuck
Fault
closed (active). CAUTION: DISCONNECT ELECTRICAL...
Technical Data Sheet - Page 2
... on . 4 O'clock: Drive motor runs; When the OPTION or Select key is pressed, all the cycle status LED's should light. d. When the Pause Cancel key is pressed, all the TEMP LED's should ...Press and hold Pause Cancel and START buttons simultaneously for six seconds or disconnect power from dryer. heat source is off . "H" and the control thermistor reading will determine the value of...
Installation Instructions - Page 2

...Channel-lock adjustable pliers. 3. Carpenter's level. 4. Plastic knife. OUTLET RECEPTACLE - minimum time delay fuses or circuit breakers. maximum time delay fuse or circuit breaker.
ELECTRICAL REQUIREMENTS
ELECTRIC Dryer
CIRCUIT -
NEMA 10-30R (3-wire) receptacle or NEMA 14-30R (4-wire) receptacle to prevent property damage, personal injury or loss of all occupants. ·...
Installation Instructions - Page 3

...in a fire hazard. Failure to come in a garage, it with exhaust system. Number of 90°
Turns
0 1 2 3
MAXIMUM LENGTH of insects and rodents.
Excessive lint can create excessive drying times and fire ...plastic duct or metal foil duct, replace it must be exhausted into the laundry area. The dryer exhaust system MUST be a minimum of your present system is not described in death...
Installation Instructions - Page 4

...anything that is not plastic-coated. However, on electric dryers, exhausting can be of 1/2 inch (1.27 cm) pipe.
3. On carpet. DO NOT install your dryer in the absence of local codes, with a ... the full length of every 18 months with equivalent air openings for proper
ventilation. A dryer installed in vent restriction. The gas supply line MUST have an individual shutoff valve.
...
Installation Instructions - Page 5
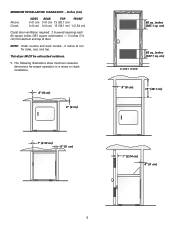
....1 cm) 1 (2.54 cm)
Closet door ventilation required: 2 louvered openings each 60 square inches (387 square centimeters) - 3 inches (7.6 cm) from bottom and top of door. This dryer MUST be exhausted outdoors.
5. MINIMUM INSTALLATION CLEARANCES - NOTE: Under counter and stack models - 0 inches (0 cm) for proper operation in a recess or closet installation.
0" (0 cm)
0" (0 cm...
Installation Instructions - Page 6

... (70.49cm) 28.5 to clear door handle (72.39cm)
2.375" (6.03cm)
(34.29cm) 13.5" To rear & base exhausts
27.0"
(68.58cm)
Stacked Dryer Installation Dimensions
(68.58cm) 27.0"
Electrical supply on rear of unit
28.25" to front of cabinet(71.76cm)
28.75" to clear knobs (73.03cm) 29.5" to clear...
Installation Instructions - Page 7
...of the door opening .
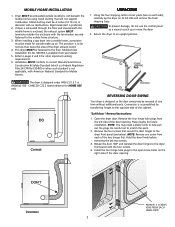
This provision is available from each side), carefully lay the dryer on the right side of the two hinges first. Mobile Home Installation Kit No. ...of the door opening . NOTE: You may be exhausted outside make up or move the dryer.
2. Installation MUST conform to current Manufactured Home Construction & Safety Standard (which is a Federal...
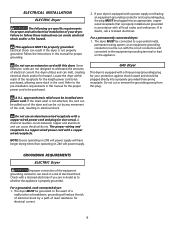
Installation Instructions - Page 8
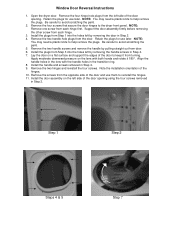
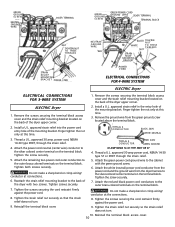
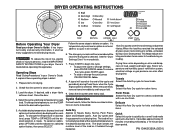
...left by pulling straight out from door. 6. Step 1
Step 2
Steps 4 & 5
Step 7 Open the dryer door. Install the plugs from the left by removing the handle screws in Step 2. 4. Lay the door .... Align the handle holes in Step 4. 9. Remove the screws from turning. Retain the plugs for use later. Be careful to the dryer front panel. Be careful to reinstall the hinges. 11. NOTE: Remove...
Installation Instructions - Page 9
... purchased, allowing some slack in the cord.
In the event of a
malfunction or breakdown, grounding will have longer drying times than operating on the appliance. ELECTRICAL INSTALLATION
ELECTRIC Dryer
The following are in doubt as to whether the appliance is properly grounded. This appliance MUST be installed onto power cord. The...
Installation Instructions - Page 10
....
7. Tighten the strain relief nut securely so that the strain relief does not turn .
10. Remove the screws securing the terminal block access cover and the strain ...MOUNTING B R A C K E T POWER CORD
POWER CORD
ELECTRICAL CONNECTIONS FOR 4-WIRE SYSTEM
ELECTRIC Dryer
ELECTRICAL CONNECTIONS FOR 3-WIRE SYSTEM
ELECTRIC Dryer
1. Remove the screws securing the terminal block access cover and ...
Installation Instructions - Page 11

...dryer for proper operation. GENERAL INSTALLATION
1. The dryer MUST be bled of the dryer. Plug the power cord into the outlet.
4. NOTE: On gas dryers, before making another attempt to flow through a cycle...dangerous operation. If your dryer, call 1-800-944-9044, or visit our website, www.frigidaire.com, for service.
7. Cartons covered with this happens, turn the timer to disconnection...
Operating Instructions - Page 1
...dryer Owner's Guide before operating this appliance. The changes you make will be dried. Press START to begin the cycle. • To pause the cycle or change settings, press PAUSE/CANCEL once.To resume the cycle, press START again. • To stop or change the temperature, turn...few items. It provides approximately 20 minutes of fire, electric shock or injury to quickly dry a small load ...
Operating Instructions - Page 3
...*
Less Dry
*
Damp Dry Options
Shrink Guard
Press Saver
Cycle Signal * Factory
setting
*
Available settings
*
*
*
** Not recommended
*
*
*
*
*
*
*** Estimated cycle duration is displayed, an error has occured.
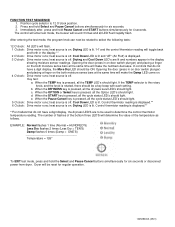
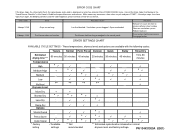
DRYER SETTINGS CHART
AVAILABLE CYCLE SETTINGS -
Press buttons lightly and release.
ERROR CODE CHART
If the dryer stops, the status lights flash, the signal beeps and...
Similar Questions

How To Solve This Problem Dryer Stop Drying Then The Light Start Blinking
dryer stop drying then it start blinking then u have to start it over then it keep doing it
dryer stop drying then it start blinking then u have to start it over then it keep doing it
(Posted by tsmith137211 8 years ago)


Error Code E56
dryer will run for a few minutes then the timer will go away while it is still running and it wont h...
dryer will run for a few minutes then the timer will go away while it is still running and it wont h...
(Posted by trevorcoleneuman 11 years ago)

I Put The Dryer On The Normal Cycle It Dries For About 5 Minutes And Then Stops
(Posted by ninalombardo 13 years ago)

Frigidaire Gleq2152es Electric Dryer Runs A While, Heats On Then Stops After 10m
(Posted by thespen691 13 years ago)