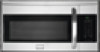
Frigidaire FGMV154CLF Support Question
Frigidaire FGMV154CLF Support Question
Find answers below for this question about Frigidaire FGMV154CLF.Need a Frigidaire FGMV154CLF manual? We have 4 online manuals for this item!
Question posted by hollokat2 on July 2nd, 2014
Has A Model Number Changed?
Has the model number for the cfmv154cisa changed to the FGMV154CLF ???
Current Answers

Answer #2: Posted by TechSupport101 on July 2nd, 2014 11:10 AM
TechSupport101

Member since:
May 24th, 2013 Points: 12,171,305

Member since:
May 24th, 2013 Points: 12,171,305
Related Frigidaire FGMV154CLF Manual Pages
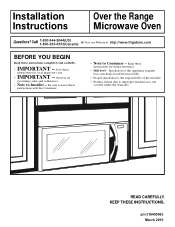
Installation Instructions (All Languages) - Page 1
... Consumer.
• Note to leave these
instructions for local inspector's use.
• IMPORTANT - KEEP THESE INSTRUCTIONS. Be sure to Consumer - Installation Instructions
Over the Range Microwave Oven
Questions?
p/n 316495063 March 2010
Installation Instructions (All Languages) - Page 2

... for Outside Back Exhaust 17-18
Mount the Microwave Oven 19
C Recirculating 20 -22
Attach Mounting Plate to Wall 20 Preparation of Top Cabinet 20 Check Blower Plate 21 Mount the Microwave Oven ..........21-22 Installing or Change the Charcoal Filter 22 Before You Use Your Microwave 23
2 Installation Instructions
CONTENTS
General information
Important Safety Instructions...
Installation Instructions (All Languages) - Page 3
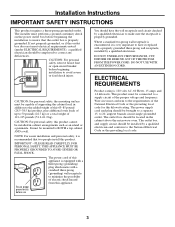
...CAUTION: For personal safety, the mounting surface must be located in the cabinet above the microwave oven.
Ensure proper ground exists before use
You should have it is 120 volts AC, 60 ...of electric shock hazard from this 63-85 pound (28.5-38.5 kg) product, plus additional oven loads of up to minimize the possibility of 113-135 pounds (51.3-61.2 kg).
ELECTRICAL REQUIREMENTS...
Installation Instructions (All Languages) - Page 5
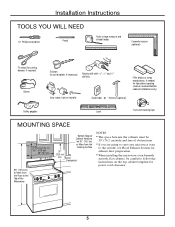
...)
30" (76.2 cm)
2" (5.1 cm)
Bottom Edge of obstructions.
• If you are going to vent your microwave oven
to follow the instructions on the top cabinet template for exhaust duct preparation.
• When installing the microwave oven beneath
smooth, flat cabinets, be 30w (76.2 cm) or More from the Cooking Surface
30" (76.2 cm...
Installation Instructions (All Languages) - Page 6
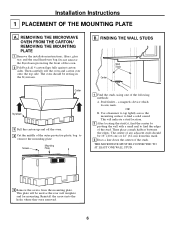
... plate will indicate a stud location.
2 After locating the stud(s), find the center by probing the wall with a small nail to find a solid sound. REMOVING THE MICROWAVE
OVEN FROM THE CARTON/ REMOVING THE MOUNTING PLATE
1 Remove the installation instructions, filters, glass tray and the small hardware bag. Reinstall the screws into the holes...
Installation Instructions (All Languages) - Page 9
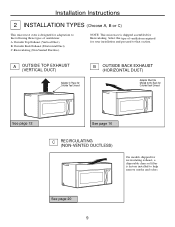
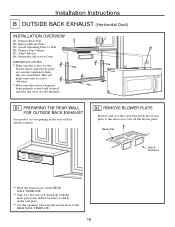
... microwave oven is factory installed to that section. Outside Back Exhaust (Horizontal Duct) C. A OUTSIDE TOP EXHAUST (VERTICAL DUCT)
Adaptor in Place for Outside Top Exhaust
B OUTSIDE BACK EXHAUST (HORIZONTAL DUCT)
Adaptor Must Be Moved to the Back for Outside Back Exhaust
See page 12
See page 16
C RECIRCULATING (NON-VENTED DUCTLESS)
On models...
Installation Instructions (All Languages) - Page 12
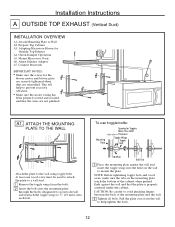
This will help tighten the bolts.
12
Check Damper Operation A5. Mount Microwave Oven A6.
ATTACH THE MOUNTING PLATE TO THE WALL
To use toggle bolts:
... on the mounting plate touch the bottom of the mounting plate and the wall.
4 Tighten all bolts. Adapting Microwave Blower for the
blower motor and blower plate are securely tightened when they are not pinched. A1. At least ...
Installation Instructions (All Languages) - Page 14

... grommet around the power cord hole to bottom of top cabinet.
Do not pinch cord or lift oven by pulling cord.
1 Lift microwave, tilt it into the guides of the cord. NOTE: When mounting the microwave oven, thread power cord through top center cabinet hole. Make sure the screw is installed so that the...
Installation Instructions (All Languages) - Page 15
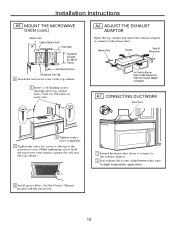
... Needed
A7. CONNECTING DUCTWORK
House Duct
6 Tighten center screw completely.
7 Tighten the outer two screws to the top of Cabinet Recess
Self-Aligning Screw
Microwave Oven Top 4 Attach the microwave oven to the exhaust adaptor.
2 Seal exhaust duct joints using furnance duct tape for high temperature applications.
8 Install grease filters.
Turn two full turns...
Installation Instructions (All Languages) - Page 16
... BLOWER PLATE
Remove and save the screw that the wires are reinstalled. Installation Instructions
B OUTSIDE BACK EXHAUST (Horizontal Duct)
INSTALLATION OVERVIEW
B1. Mount the Microwave Oven
IMPORTANT NOTES:
• Make sure the screws for outside exhaust. This will help to prevent excessive vibration.
• Make sure the motor wiring has
been ...
Installation Instructions (All Languages) - Page 18
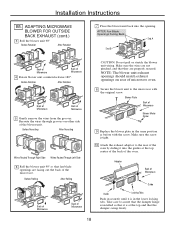
... freely.
18 Adaptor
Back of the blower unit. Reroute the wires through grooves on rear of microwave oven.
8 Secure the blower unit to the rear of Microwave
CAUTION: Do not pull or stretch the blower unit wiring.
ADAPTING MICROWAVE BLOWER FOR OUTSIDE BACK EXHAUST (cont.)
3 Roll the blower unit 90°
Before Rotation
After...
Installation Instructions (All Languages) - Page 20
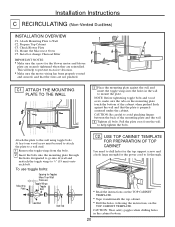
Check Blower Plate C4. Install or change Charcoal Filter
IMPORTANT NOTES:
• Make sure the screws for the power cord to fit through...use toggle bolts:
Mounting Plate
Spacing for Toggles More Than Wall Thickness
Toggle Wings Toggle Bolt
Wall Bolt End
C2. Mount the Microwave Oven C5.
Attach the plate to help to 3⁄4w (19 mm) onto each bolt. ATTACH THE MOUNTING PLATE TO THE WALL...
Installation Instructions (All Languages) - Page 22
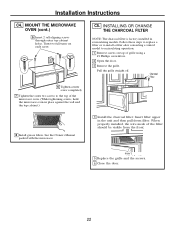
... screws on top of the microwave oven. (While tightening screws, hold the microwave oven in recirculating models.
Pull the grille straight off. Follow these steps to replace a filter or to install a filter after converting a vented model to the top of grille using a #1 Phillips screwdriver.
2 Open the door.
3 Remove the grille. INSTALLING OR CHANGE THE CHARCOAL FILTER
NOTE...
Complete Owner's Guide (English) - Page 2

... enjoy your microwave oven only as instructed in the back of a new microwave oven! It is particularly important that the oven door close properly and that may occur. WELCOME & CONGRATULATIONS
Questions? 1-800-944-9044
(United States)
1-800-265-8352
(Canada)
Please attach sales receipt here for future purchases. Your satisfaction is damaged. Model Number
Serial Number
Purchase Date...
Complete Owner's Guide (English) - Page 10
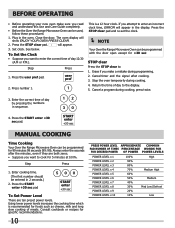
... with the door open except for foods such as cheese, milk and long slow cooking of day by pressing the numbers in the display. START enter
+30 sec
MANUAL COOKING
Time Cooking
Your Over the Range Microwave Oven can be programmed for 99 minutes 99 seconds (99 :99). Enter cooking time.
(The first...
Complete Owner's Guide (English) - Page 11
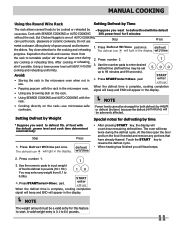
... glassware or ceramic cookware, Do not use microwave-safe cookware. Press number 2.
1
any portions that have already thawed. Power levels cannot be changed for 5 minutes:
without the rack. defrost... Press number 1.
1
3. START
4 .Press START/enter/+30sec. NOTE
The weight amount must be a valid entry for defrosting by time
• Suppose you will light in the microwave oven.
4....
Complete Owner's Guide (English) - Page 13
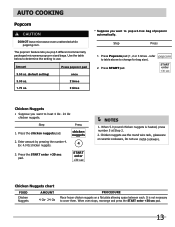
....
The popcorn feature lets you pop 3 different commercially packaged microwave popcorn sized bags.
AUTO COOKING
Popcorn
DO NOT leave microwave oven unattended while popping corn. Step
Press
1. Press the chicken nuggets pad. When 5.0 pound chicken nuggets is not necessary to change for bag size).
2. It is heated, press number 5 at plate allowing space between each.
Complete Owner's Guide (English) - Page 23
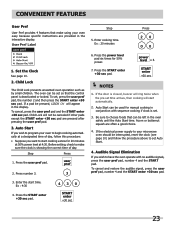
...time arrives, then cooking will start automatically.
2. Auto Start
If you wish to program your microwave oven should be interrupted, reset the clock (see page 10) and follow this procedure:
•...Press the START enter +30 sec pad. To cancel and restore the audible signal, press the user pref pad, number 4 and the START enter +30 sec pad.
3. Set the Clock
See page 10.
2. Ex : 4:30...
Complete Owner's Guide (English) - Page 26
... hot water.
Clean the outside surface is located on both sides with hot soapy water, rinsed and dried. EASY CARE™ STAINLESS STEEL
(SOME MODELS)
Your microwave oven finish may
26 Close door and touch Clear/Off. The turntable motor shaft is recommended to maintain if wiped frequently with a soft cloth. overheat and...
Product Specifications Sheet (English) - Page 2
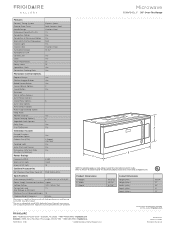
...change. Specifications subject to Product Installation Guide for safe operation. Height B - Depth
16-13/32" 29-7/8" 15-7/16"
Height (Min.) Height (Max.) Width (Min.) Depth (Min.) Depth (Max.)
16-3/4" 17" 30" 12" 13"
1Microwave...Yes Stainless Steel 13-1/2"
Yes
Yes
27 10
30" Over-the-Range Microwave Oven w/Side
Yes
Yes Gallery
Popcorn Button
Yes
Chicken Nugget Button
Yes
Baked ...
Similar Questions


How To Set Time Clock On Fgmv154clf Frigidaire Gallery Microwave
(Posted by lanzoseias 9 years ago)

Frigidaire Microwave Oven Model Fgmv174kfa Door Wont Latch
(Posted by dpellhutchi 10 years ago)

Converting A Vented Model To A Recirculating Operation
(Posted by dandppowell 11 years ago)

Circuitry Required
In redoing my kitchen, I purchased this convection/microwave to replace the over the head fan that I...
In redoing my kitchen, I purchased this convection/microwave to replace the over the head fan that I...
(Posted by Anonymous-35455 12 years ago)