Frigidaire FGMV154CLF Support Question
Frigidaire FGMV154CLF Support Question
Find answers below for this question about Frigidaire FGMV154CLF.Need a Frigidaire FGMV154CLF manual? We have 4 online manuals for this item!
Question posted by Anonymous-35455 on August 6th, 2011
Circuitry Required
In redoing my kitchen, I purchased this convection/microwave to replace the over the head fan that I have. I had hoped that I would either be able to use that power or an existing 110 line that would be beneath and to the side. The electricians that have looked at this said that I couldn't use the power that drove the fan. I would presume that the only outstanding issue is if we could move the power up about 18". They were telling me that I would blow my circuits if I didn't put in a new line. I have tried to look at the bottom and back of the unit to find the amperage but am unable to find the specs. Could you provide me with the requirements to safely install this unit.
Sincerely,
Robert Sinatra
Current Answers
Answer #1: Posted by OnlineOutreachSpecialist on August 8th, 2011 10:56 AM
OnlineOutreachSpecialist

Member since:
March 30th, 2011 Points: 2,848,320

Member since:
March 30th, 2011 Points: 2,848,320
Product rating is 120 volts AC, 60 Hertz, 15 amps and
1.6 kilowatts. This product must be connected to a
supply circuit of the proper voltage and frequency.
Wire size must conform to the requirements of the
National Electrical Code or the prevailing local
code for this kilowatt rating.
1.6 kilowatts. This product must be connected to a
supply circuit of the proper voltage and frequency.
Wire size must conform to the requirements of the
National Electrical Code or the prevailing local
code for this kilowatt rating.
The power supply cord and plug should be brought to a separate 15- to 20- ampere branch circuit single grounded
outlet. The outlet box should be located in the cabinet above the microwave oven. The outlet box and supply circuit should be installed by a qualified electrician and conform to the National Electrical Code or the prevailing local code. Ensure proper ground exists before use.
I hope this helps!
Online Outreach Specialist
Related Frigidaire FGMV154CLF Manual Pages
Installation Instructions (All Languages) - Page 1
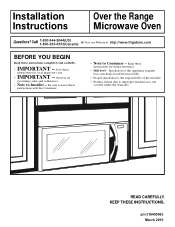
...• IMPORTANT - Be sure to Consumer -
Save these
instructions for local inspector's use.
• IMPORTANT - Observe all governing codes and ordinances.
• Note to...requires basic mechanical and electrical skills.
• Proper installation is the responsibility of the installer.
• Product failure due to Installer -
Installation Instructions
Over the Range Microwave Oven...
Installation Instructions (All Languages) - Page 2

...information
Important Safety Instructions 3 Electrical Requirements 3 Damage - Shipment/Installation 4 ...Cabinet 13 Adapting Microwave Blower for Outside top Exhaust 13-14 Checking for Proper Damper Operation 14 Mount the Microwave Oven ..........14-15 ...Preparation of Top Cabinet 17
Adapting Microwave Blower for Outside Back Exhaust 17-18
Mount the Microwave Oven 19
C Recirculating 20 -22...
Installation Instructions (All Languages) - Page 3
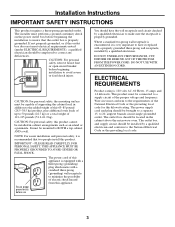
...requirements noted (under ELECTRICAL REQUIREMENTS), a qualified electrician should be brought to minimize the possibility of electric shock hazard from this product. IMPORTANT -
The power supply cord and plug should have it replaced... the requirements of supporting the cabinet load, in the cabinet above the microwave oven. PLEASE READ CAREFULLY. Ensure proper ground exists before ...
Installation Instructions (All Languages) - Page 5
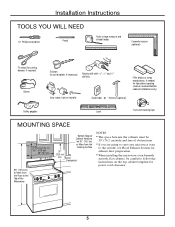
... see Hood Exhaust Section for power cord clearance.
5
Installation Instructions...
Tin snips (for cutting damper, if required)
Gloves
Scissors (to cut template, if...needed for top cabinet spacing (used on recessed bottom cabinet installations only...microwave oven
to follow the instructions on the top cabinet template for exhaust duct preparation.
• When installing the microwave oven beneath...
Installation Instructions (All Languages) - Page 6
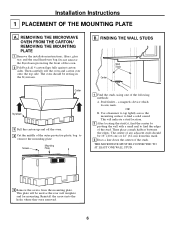
...Use a hammer to tap lightly across the mounting surface to find a solid sound. B. Stud finder - THE MICROWAVE MUST BE CONNECTED TO AT LEAST ONE WALL STUD.
5 Remove the screws from this mark.
3 Draw a line down the center of the studs. Then carefully roll the oven...
Mounting Plate
1 Find the studs, using one of the stud. REMOVING THE MICROWAVE
OVEN FROM THE CARTON/ REMOVING THE MOUNTING ...
Installation Instructions (All Languages) - Page 9
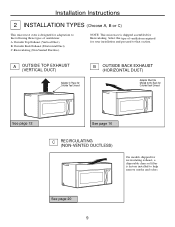
... for recirculating exhaust, a disposable charcoal filter is factory installed to the following three types of ventilation required for Recirculating. Outside Back Exhaust (Horizontal Duct) C. See page 20
9 Installation Instructions
2 INSTALLATION TYPES (Choose A, B or C)
This microwave oven is designed for adaptation to help remove smoke and odors.
Select the type of ventilation...
Installation Instructions (All Languages) - Page 12
... and secured, and that the plate is properly centered under the cabinet. Mount Microwave Oven A6.
A1.
Installation Instructions
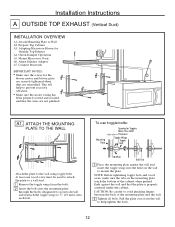
A OUTSIDE TOP EXHAUST (Vertical Duct)
INSTALLATION OVERVIEW
A1. Adjust Exhaust Adaptor A7. ATTACH THE MOUNTING PLATE TO THE WALL
To use toggle bolts:
Mounting Plate
Spacing for
Outside Top Exhaust A4. This will help...
Installation Instructions (All Languages) - Page 14

... FOR OUTSIDE TOP EXHAUST
5 Secure blower unit to keep power cord tight.
NOTE: We recommend using filler blocks if the cabinet front hangs below the cabinet bottom shelf.
Do not pinch cord or lift oven by pulling cord.
1 Lift microwave, tilt it is in Step 1. Installation Instructions
A3. NOTE: If your house exhaust duct...
Installation Instructions (All Languages) - Page 15
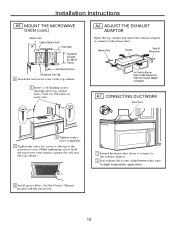
... to the exhaust adaptor.
2 Seal exhaust duct joints using furnance duct tape for high temperature applications.
8 Install grease filters.
CONNECTING DUCTWORK
House Duct
6 Tighten center screw completely.
7 Tighten the outer two screws to the top of the microwave oven. (While tightening screws, hold the microwave oven in place against the wall and the top cabinet...
Installation Instructions (All Languages) - Page 16
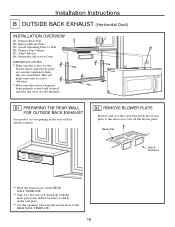
...properly routed and secured, and that the wires are reinstalled. Remove Blower Plate B3. Mount the Microwave Oven
IMPORTANT NOTES:
• Make sure the screws for outside exhaust.
Lift off the blower plate. ...Prepare Top Cabinet B5. B1. Attach Mounting Plate to the rear wall, lining up with the
holes previously drilled for holes A and B in the rear wall for the
...
Complete Owner's Guide (English) - Page 3
....
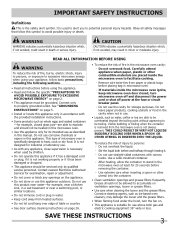
• When flaming food under the hood, turn microwave oven off and disconnect the power cord or shut off power at least for 20 seconds before and halfway through heating it has..., close supervision is necessary when used to alert you to explode and should not be heated in this microwave oven.
• Use this product near water-for example, near a kitchen sink, in a wet basement or...
Complete Owner's Guide (English) - Page 5
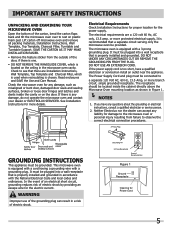
... back and tilt the microwave oven over to rest on the door. SAVE THE CARTON AS IT MAY MAKE INSTALLATION EASIER.
• Remove the feature sticker from failure to observe the correct electrical connection procedures. Read enclosures and SAVE the Use and Care Manual.
See Installation Instructions for Power Cord
5 Electrical Requirements
Check Installation Instructions...
Complete Owner's Guide (English) - Page 7
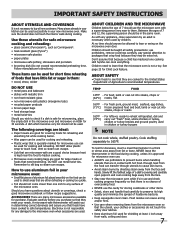
...-safe thermometer will assist you in determining correct doneness and assure you purchase so that the utensil, your microwave oven:
• Small flat least 1 inch away from the microwave oven so that they may be used successfully in the microwave oven and microwave on the microwave oven door. Electrolux is not responsible for 30 seconds.
TEMP
FOOD
145°F - Food...
Complete Owner's Guide (English) - Page 24
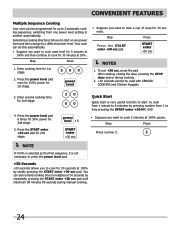
... setting to cook 2 minutes at 100% power. power level
• Suppose you to cook for 30 seconds. To use +30 sec, press the pad after cooking, closing the door, pressing the STOP clear pad or during manual cooking.
24 CONVENIENT FEATURES
Multiple Sequence Cooking
Your oven can be used with SENSOR COOKING and Chicken Nuggets.
3.
Complete Owner's Guide (English) - Page 25

... Microwave Oven from excessive temperature rise. It cannot be demonstrated with no power in the display. Demonstration Mode
When the oven is operating.
2. ENT ER DEMO will count down quickly to demonstrate, p ress the popcorn pad and hold for off. timer on , twice for 6 seconds. Timer operates as a kitchen timer and cannot be used when the oven...
Complete Owner's Guide (English) - Page 26
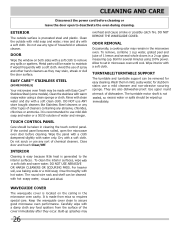
... the microwave oven.
Carefully wipe with a soft cloth. rinse and dry with hot water. Avoid the use any spills or spatters. DO NOT use any food spatters from mica so requires special... cleaners. rinse thoroughly with a soft cloth. Wipe interior with warm soapy water using 100% power. for several whole cloves in cleaning the touch control panel.
Clean the stainless with...
Complete Owner's Guide (English) - Page 29
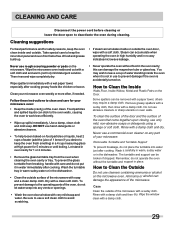
...microwave. Case
Clean the outside the oven door, wipe with a damp cloth and dry.
DO NOT use rough scouring powder or pads on the microwave oven. To prevent damage to keep the oven fresh smelling) in a 4 cup measuring glass at High power... dry.
Wipe the microwave oven inside the oven when it in place. You may require a damp cloth. Do not use to Clean the Inside...
Complete Owner's Guide (English) - Page 30

..., clean cloth. Do not use a hot, damp cloth with a damp cloth and dry thoroughly before cleaning or leave t he door open t o deactivat e t he oven during cleaning. Door Surface
It is important to keep the area clean where the door seals against the microwave.
If food soil remains, try a general kitchen cleaner, such as tainless...
Product Specifications Sheet (English) - Page 1
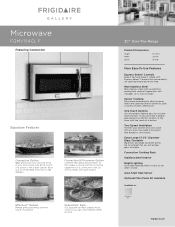
... adjusts power levels and cooking times to perfectly cook a variety of a convection oven, all with a protective coating that reduces fingerprints and smudges so it easy to 450 degrees.
Two-Speed Ventilation
Freshen your kitchen and save space with Express-Select® Controls that double as vent hoods.
Convection & Microwave Option
Combine the speed and freshness of microwave...
Product Specifications Sheet (English) - Page 2
... Turntable On / Off Control Lock Clock Touch Pad Buttons Power Levels SpaceWise® Rack Convection Cooking Rack
Microwave Control Options
Express-Select® Real Stainless Steel Stainless Steel 1.5 Yes Yes 900 Yes Stainless Steel 13-1/2"
Yes
Yes
27 10
30" Over-the-Range Microwave Oven w/Side
Yes
Yes Gallery
Popcorn Button
Yes
Chicken Nugget Button...
Similar Questions

Microwave Won't Turn Off
My microwave won't turn off. I have to open the door (and then the light stays on) or unplug it. Any...
My microwave won't turn off. I have to open the door (and then the light stays on) or unplug it. Any...
(Posted by pegasusac 7 years ago)

How To Set Time Clock On Fgmv154clf Frigidaire Gallery Microwave
(Posted by lanzoseias 9 years ago)

Frigidaire Microwave Fan Wont Turn Off
(Posted by aliITONE 10 years ago)

Microwave Guide
We just purchased a new Frigidaire gallery microwave and unfortunately we took the wave guide out no...
We just purchased a new Frigidaire gallery microwave and unfortunately we took the wave guide out no...
(Posted by chicagofls 11 years ago)

Is There A Way To Change The Default Power Level To High? It's Now On Low.
(Posted by jennifervposey 12 years ago)