
Epson LX-300II Support Question
Epson LX-300II Support Question
Find answers below for this question about Epson LX-300II - LX-300+ II Impact Printer.Need a Epson LX-300II manual? We have 3 online manuals for this item!
Question posted by MlPFl on August 2nd, 2014
How To Sharing Lx 300 Ii In Windows 7 32bit
The person who posted this question about this Epson product did not include a detailed explanation. Please use the "Request More Information" button to the right if more details would help you to answer this question.
Current Answers
Related Epson LX-300II Manual Pages
Product Information Guide - Page 1

... for printing on continuous multipart forms.
Roll Paper Holder (C12C811141 or 8310)
Allows you can purchase the following options from an Epson authorized reseller.
Epson LX-300+II
LX-300+II Parts
Printer cover
Paper supports
Edge guides
Paper guide
User Replaceable Parts
User replaceable part Knob Logo plate Paper supports Paper eject assembly...
Product Information Guide - Page 2
...LX-300+II
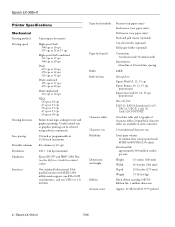
Printer Specifications
Mechanical
Printing method Printing speed
Printing direction Line spacing Printable columns Resolution Emulation Interfaces
9-pin impact dot matrix
High-speed draft 300 cps at 10 cpi 337 cps at 12 or 15 cpi
High-speed draft condensed 321 cps at 17 cpi 300... 63ms/line at 20 cpi
Bidirectional logic seeking for text and graphics printing. Epson LX-300+II
7/06
Product Information Guide - Page 3

Epson LX-300+II
Electrical
Input voltage range Rated frequency range Input frequency range Rated current
Power consumption
120 V
220 to..., as follows:
Temperature: 59 to 77 °F (15 to 25 °C) Humidity: 30 to 0.035 inch (0.9 mm)
7/06
Epson LX-300+II - 3
Ordinary single sheets: paper guide and cut-sheet feeder entry
Width
Paper guide 3.9 to 10.1 inches (100 to 257 mm)
Cut-...
Product Information Guide - Page 4
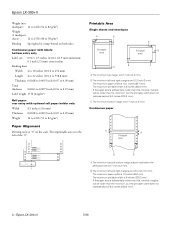
... the minimum, but the printable width does not increase beyond 8.0 inches (203.2 mm).
4 - Epson LX-300+II
7/06 B The minimum left and right margins are 0.17 inch (4.2 mm). The maximum printable width is...area is 8 inches (203.2 mm).
The maximum paper width is 10.1 inches (257 mm). Epson LX-300+II
Weight (not multipart) 14 to 22 lb (52 to 82 g/m2)
Weight
(1 multipart
sheet)
12...
Product Information Guide - Page 5
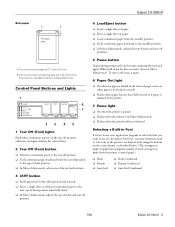
... correctly.
❏ Flashes when paper has not been fully ejected or if paper is jammed in the printer.
7 Pause light
❏ On when the printer is paused. ❏ Flashes when the printer is 8 inches (203.2 mm). Epson LX-300+II
Roll paper
A
B
Printable area
A The minimum top margin is best to use your application program to...
Product Information Guide - Page 6

... Positions
Top-of-Form Position
The top-of paper is not fed to turn off edge. You can identify many printer problems using the lights on the page. Epson LX-300+II
7/06 Epson LX-300+II
Follow these steps to use the control panel to diagnose and fix the problem. n Paper Out ••• n Pause...
Product Information Guide - Page 7

... with the tractor installed in the push position.
❏ Use the tractor in place.
7/06
Epson LX-300+II - 7 Make sure your continuous paper behind the printer. The printer starts printing to the continuous paper position.
4. Move the paper support so it . Slide the right sprocket to remove any slack in the paper and ...
Product Information Guide - Page 8
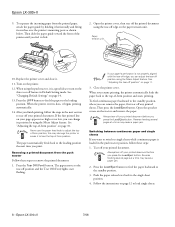
.../Eject button to feed the paper backward to the loading position. Open the printer cover, then tear off feature in the next section to single sheets while ...LX-300+II
7/06 To separate the incoming paper from the push tractor
Follow these steps:
1. Replace the printer cover and close it begins printing automatically.
14. Epson LX-300+II
9. See "Changing Default Settings" on the printer...
Product Information Guide - Page 9
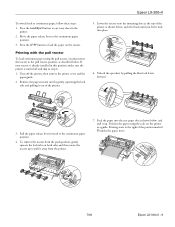
... continuous paper, follow these steps: 1. Lower the tractor onto the mounting slots at the top of the printer as described below , and pull it out of the position marked
0 (under the paper now).
7/06
Epson LX-300+II - 9 Press the Load/Eject button to pull it lock into the rear paper slot as a guide...
Product Information Guide - Page 10

... lever to remove any remaining slack by gently pulling the paper from the printed paper, attach the paper guide. otherwise, the paper may damage the printer or cause it to Off; Epson LX-300+II
7/06 Move the paper supports midway between pages should be just above the print head.
12. When the...
Product Information Guide - Page 11

Epson LX-300+II
Your top-of -form position setting you make with the Micro Adjust feature. The top margin setting ... Hold down the Pause button for instructions.)
7/06
Epson LX-300+II - 11 When you resume printing, the printer automatically feeds the paper back to the tear-off position). so you set the tear-off the printer. The printer advances the paper to the top-of -form position in...
Product Information Guide - Page 12
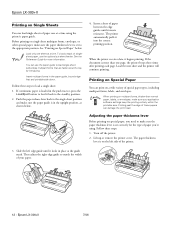
... guides until it locks in the push tractor, press the
Load/Eject button to the appropriate position. Load the next sheet and the printer will continue printing.
Epson LX-300+II
7/06 Follow these steps: 1. To load a stack of singlesheet paper, use the paper guide to load single-sheet carbonless multipart forms that are...
Product Information Guide - Page 13
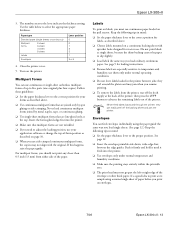
... only at the back of the paper. Epson LX-300+II
3. Envelopes
You can feed envelopes individually using a normal single sheet of up to print a test sample using the paper guide the same way you must not go past the left or right edge of the printer. It's a good idea to five parts (one...
Product Information Guide - Page 14

... buttons while you want to restore all the factory default settings, turn on .)
3. Make sure paper is loaded and the printer is off the printer. The printer prints instructions for selecting the language. Epson LX-300+II
Default Settings
While you can select in inches: 3, 3.5, 4, 5.5, 6, 7, 8, 8.5, 11, 70/6, 12, 14, 17 On, Off On, Off On, Off...
Reference Guide - Page 6
... about the control panel functions, including how to change the printer's default settings.
❏ Chapter 4, "Maintenance and Troubleshooting," includes basic maintenance procedures and solutions to 300 cps (characters per second) at 10 cpi (characters per inch). Introduction
Your Epson® LX-300+II printer provides high-quality printing and superior performance in a compact design...
Reference Guide - Page 40
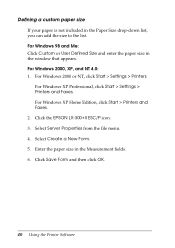
... or User Defined Size and enter the paper size in the Measurement fields. 6. For Windows XP Home Edition, click Start > Printers and Faxes. 2. Click the EPSON LX-300+II ESC/P icon. 3. Click Save Form and then click OK.
40 Using the Printer Software Defining a custom paper size If your paper is not included in the Paper...
Reference Guide - Page 44
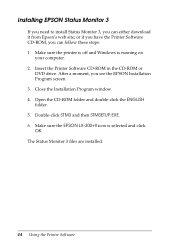
...are installed.
44 Using the Printer Software After a moment, you can either download it from Epson's web site; Close the Installation Program window. 4. Make sure the printer is off and Windows is selected and click OK.... 5. or if you have the Printer Software CD-ROM, you see the EPSON Installation Program screen. 3. Make sure the EPSON LX-300+II icon is running on
your computer. 2.
Reference Guide - Page 46
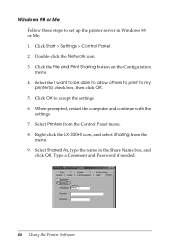
... continue with the settings. 7. Right-click the LX-300+II icon, and select Sharing from the Control Panel menu. 8. Select Shared As, type the name in Windows 98 or Me: 1. Select the I want to be able to allow others to print to accept the settings. 6. Click OK to my printer(s) check box, then click OK. 5. Type a Comment...
Reference Guide - Page 80
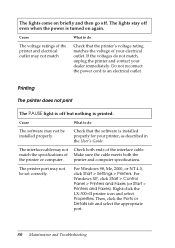
... the interface cable. The printer port may not match. Right-click the LX-300+II printer icon and select Properties. Cause
What to an electrical outlet.
match the specifications of Make sure the cable meets both ends of your dealer immediately.
For Windows XP, click Start > Control Panel > Printers and Faxes (or Start > Printers and Faxes). Then, click...
Reference Guide - Page 92
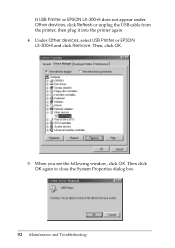
... appear under Other devices, click Refresh or unplug the USB cable from the printer, then plug it into the printer again. 4. Under Other devices, select USB Printer or EPSON LX-300+II and click Remove. Then, click OK.
5. When you see the following window, click OK. Then click OK again to close the System Properties dialog box...
Similar Questions

Printer Driver Not Found For Windows 7, Model-epson Lx 300 Ii,p170b
Printer Driver not found for Windows 7, Model-EPSON LX 300 II,P170B
Printer Driver not found for Windows 7, Model-EPSON LX 300 II,P170B
(Posted by ublora 9 years ago)

Why Epson Lx-300 Ii Impact Printer Cannot Print
(Posted by rojabw 9 years ago)

Driver Epson Lx-300 Ii For Win 7 32bit
How I Get Driver Epson Lx-300+ii For Win 7 32 Bit
How I Get Driver Epson Lx-300+ii For Win 7 32 Bit
(Posted by ramdanmiez 9 years ago)

In Ubuntu 12.04 How To Epson Lx-300 Ii Install Printer Share The Printer
(Posted by bkhomtazo 10 years ago)

How Can I Use Epson Lx 300+ii Printer In Windows 7?
How can I Use Epson LX 300+II Printer in Windows 7
How can I Use Epson LX 300+II Printer in Windows 7
(Posted by praviakshaya 11 years ago)