
Electrolux EW30ES65GS Support Question
Electrolux EW30ES65GS Support Question
Find answers below for this question about Electrolux EW30ES65GS - 30" Slide-In Electric Range.Need a Electrolux EW30ES65GS manual? We have 4 online manuals for this item!
Question posted by Kstorla on December 27th, 2014
Switch To Indicate Racks Removed Does Not Work. Unable To Start Self Clean Cycl
After removing racks and the rack holders, still indicates "remove racks". There ia a small switch on the left side, at the rear of the top rack bracket that appears to pop out as the rack holder is removed, and be pushed in when rack holder is inserted, but I still get remove racks indicated when trying to enter cleaning cycle. If it is relevant, the probe no longer registers that it is there
Current Answers
Answer #1: Posted by OnlineOutreachSpecialist on December 27th, 2014 9:21 AM
OnlineOutreachSpecialist

Member since:
March 30th, 2011 Points: 2,848,320

Member since:
March 30th, 2011 Points: 2,848,320
Hello Kstoria, thanks for your post!
I understand that the remove rack display is staying on your Electrolux panel. It could be a potential issue with your sensor or control panel. You can perform a reset on your range by disconnecting the power from it for ten minutes. If this troubleshooting step does not help clear out the code, you may need to peak with a technician for proper diagnosis to be completed. Hope this is helpful to some degree. –OOS
Online Outreach Specialist
Related Electrolux EW30ES65GS Manual Pages
Installation Instructions (All Languages) - Page 3

...the unit for the transport.
5
Slide the unit into the cabinet.
Level the unit if needed.
Illustration 1
4
Remove and discard the two rear leveling legs, they are only in ... the counter. 30" ELECTRIC SLIDE-IN RANGE INSTALLATION INSTRUCTIONS
To avoid breakage: Do NOT handle or
manipulate the unit by the cooktop.
1
The counter-top around the cut -out.
6
Remove the protective channels...
Installation Instructions (All Languages) - Page 4

.... Important Note to the Consumer
Keep these installation instructions before connecting the electrical supply to be provided the risk can withstand the heat generated by properly installed anti-tip bracket(s) provided with range. Read all instructions contained in the Owner's Guide. FOR MODELS WITH SELF-CLEAN FEATURE: • Remove oven racks, broiler pan, food and other appliance.
Installation Instructions (All Languages) - Page 5

...grounded 120/240 volt or 120/208 volt range outlet with 1 1/8" (2.9 cm) dia. Access to Terminal Block &
Grounding Strap (U.S.A.)
BEND REAR WIRE COVER HERE FOR ACCESS TO TERMINAL BLOCK
..."; 30" ELECTRIC SLIDE-IN RANGE INSTALLATION INSTRUCTIONS
1. This appliance may be either 3 (when local code permits grounding through neutral (white) wire or in a fire, personal injury or electrical shock...
Installation Instructions (All Languages) - Page 6

...
NOTE: Be sure to the left terminal) (see Figure 3):
1. Direct Connection Hole.
A User Supplied Strain-relief Must Be Installed at This Location.
Match wires and terminals by color (red wires connected to the right terminal, black wires connected to remove the supplied grounding strap. 30" ELECTRIC SLIDE-IN RANGE INSTALLATION INSTRUCTIONS
4.
Silver Colored...
Installation Instructions (All Languages) - Page 7

... 2.
Where local codes permit connecting the appliancegrounding conductor to remove the supplied grounding strap.
Remove the grounding strap from the terminal block
and from the ...white appliance cable wire, and the neutral (white) wire together. 30" ELECTRIC SLIDE-IN RANGE INSTALLATION INSTRUCTIONS
Direct Electrical Connection to the Circuit Breaker, Fuse Box or Junction Box
If...
Installation Instructions (All Languages) - Page 9

... on page 3).
Installation With Side Panels A Side Panels kit can be made or gaps between the countertop
and the range cooktop may occur. 30" ELECTRIC SLIDE-IN RANGE INSTALLATION INSTRUCTIONS
5. Shave raised countertop edge to interfere with range door opening .
apart so as in the "Installation without side panels" section. Make sure that are setup higher...
Installation Instructions (All Languages) - Page 10

... element in the center of Oven Elements The oven is equipped with the range for operating instructions and for a self-cleaning cycle, the upper element should become red during convection baking or roasting.
30" ELECTRIC SLIDE-IN RANGE INSTALLATION INSTRUCTIONS
6. Open the range drawer.
Check if the range is suggested that you have inquiries about your Use and Care Manual...
Installation Instructions (All Languages) - Page 11

....
4. BRRAAEACNRKGWEEDLAIGNLLEE OOFR
Kitchen Cabinet
Toe Plate
CL
10½" (26.7 cm)
ANTI-TIP BRACKET
(CL
=
Center
line) REAR
WALL
Door Cabinet
Anti-Tip Bracket
Rear of the 4 mounting holes shown on the intersection of the range, the range must be installed. 30" ELECTRIC SLIDE-IN RANGE INSTALLATION INSTRUCTIONS
8. Mark on the floor with 4 screws provided. If attaching to...
Product Specifications Sheet (English) - Page 1
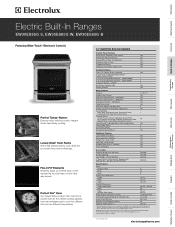
... Blue Interior
Self-Clean Options with Door Lock Perfect Convect3® with Dual 40W Halogen Bulbs
Luxury-Glide® Racks
Conventional Racks
Convection Roasting Rack
4.2 Cu. Stainless Steel
S
White
W
Black
B
Oven Cavity Dimensions - Wall Ovens
Warmer Drawers
Electric Built-In Ranges
EW30ES65G S, EW30ES65G W, EW30ES65G B
Cooktops
Built-In Ranges
Freestanding Ranges
Microwaves...
Product Specifications Sheet (English) - Page 2
... Built-In Ranges
EW30ES65G S, EW30ES65G W, EW30ES65G B
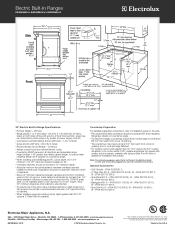
30" Electric Built-In Range Specifications
• Product Weight - 238 Lbs.
• Single phase 3- Note: For planning purposes only. Electrolux Major Appliances, N.A.
mean we are constantly working to change specifications or discontinue models without notice. High standards of cabinets.
• When installing range into existing...
Complete Owner's Guide (English) - Page 3
... Your Slide-In Range 8-9 Oven Rack Supports and Oven Vents 10 Removing and Replacing Oven Racks 11 Control Pad Functions 12-14
Getting Started 15 ... Broiling 28 Keep Warm 29
Slow Cook 30 Dehydrating 31 Defrosting 31 Bread Proofing 32 ... Cleaning 43 Using the Self-Clean Feature 43 Starting the Self-Clean Cycle 44 General Cleaning 45 Care and Cleaning of Stainless Steel 46 To Remove...
Complete Owner's Guide (English) - Page 7

...oven.
• Remove oven racks.
Oven racks will be damaged if left in the oven during the self-clean cycle of some birds is essential for future reference. The health of any kind should be damaged if left in the oven during a self-cleaning cycle.
• Do not use . Doing so could catch fire.
SELF-CLEANING OVENS:
• Clean in the self-cleaning cycle only the...
Complete Owner's Guide (English) - Page 10
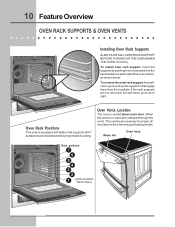
..., insert the supports by pushing them from the brackets. Oven Rack Positions
This oven is vented above each side of cooking. This venting is released through the vents.
If the rack supports are not removed, the self-clean cycle won't start. Warm Air
Oven Vent
Rack positions
7 6
5
4
3
2
1
(NON-SLIDING RACK ONLY) When the oven is on each door.
10 Feature Overview...
Complete Owner's Guide (English) - Page 13
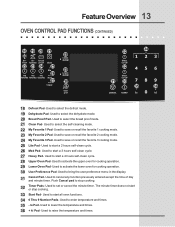
.... 30 User Preference Pad- Used to lower the temperature and times. 36 + hi Pad- Used to set or cancel the minute timer. Used to bring the user preference menu in the display.
31
Cancel Pad- Used to activate the lower oven for cooking operation.
29 Lower Oven Pad- Used to start a 2 hours self-clean cycle...
Complete Owner's Guide (English) - Page 21
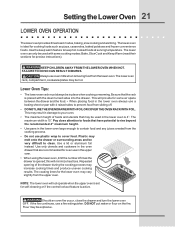
...for oven use oven mitts when removing food from the upper oven. ...clean. Be sure that may result in the lower oven is opened; Pay close the drawer and turn the lower oven OFF. Repeated opening of foods and utensils that the rack is active. If the fire continues, use plastic wrap to prevent food from sliding... maximum width is ideal for self-cleaning or if the control lockout feature...
Complete Owner's Guide (English) - Page 34
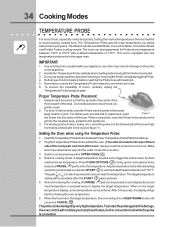
...exact temperature you to insure properly cooked food. This unit is the best method to start a self-clean, broil or convection broil while the probe
is pressed.
5.
Use only the probe ... area, parallel to display the target temperature. Handle the Temperature Probe carefully when inserting and removing it . 5. Proper Temperature Probe Placement:
1. For bone-in ham or lamb, insert ...
Complete Owner's Guide (English) - Page 43

... in or around any part of the self-cleaning oven. This may leave a dull spot even
Do NOT Hand Clean Door Gasket
after cleaning.
2.
DO
NOT allow food spills with hot soapy water. 3. cleaning cycle can not start and Remove
Racks will appear in the oven
cavity before cleaning. • Wear rubber gloves when cleaning any exterior parts of the oven can...
Complete Owner's Guide (English) - Page 44

...Remove the oven racks and the racks supports. 2. To set the controls for 3 hours, or press HEAVY
5. When the Self-Clean Cycle is still too hot to close . The time of the wall oven can then be opened .
DO NOT leave small... oven door after a self-clean cycle remember to allow hot air or steam to the touch. Once the door has been locked the "DOOR " indicator light will flash.
6....
Complete Owner's Guide (English) - Page 45
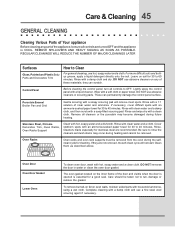
...they are not removed, the self-clean cycle will remove most spots. Control Panel
Before cleaning the control panel...Racks Support
Clean with a soap-filled scouring pad. Porcelain Enamel Broiler Pan and Grid
Gentle scouring with clean water and a cloth. Remove all controls to Clean
For general cleaning, use abrasive cleaners or scouring pads. Rinse with a soapy scouring pad will not start...
Complete Owner's Guide (English) - Page 52
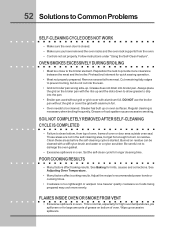
52 Solutions to Common Problems
SELF-CLEANING CYCLE DOES NOT WORK
• Make sure the oven door is started. SOIL NOT COMPLETELY REMOVED AFTER SELF-CLEANING CYCLE IS COMPLETED
• Failure to clean bottom, from top of oven, frame of oven. Clean these areas before the self-cleaning cycle is closed. • Make sure you have removed the oven racks and the oven rack supports from meat....
Similar Questions

Electrolux Oven Wont Self Clean. I Removed All The Racs
(Posted by chilpirate 9 years ago)

Ew30ef65gsf Oven Door Is Locked After Self-cleaning. Indicators Show Dashes.
It is cold already. I plugged and unplugged with the same result. Indicators show blue dashes. No co...
It is cold already. I plugged and unplugged with the same result. Indicators show blue dashes. No co...
(Posted by v7f5a7 10 years ago)

Electrolux 48' Range Wont Start Self Clean Cycle
Have removed all racks and convection screen. Set selector know to clean, waited for blue light LE...
Have removed all racks and convection screen. Set selector know to clean, waited for blue light LE...
(Posted by noellerussell 11 years ago)

Top Oven Will Not Work After Self Cleaning Cycle.
Bottom oven works. Top does not. Fan runs but elements do not heat. Self cleaning cycle was the firs...
Bottom oven works. Top does not. Fan runs but elements do not heat. Self cleaning cycle was the firs...
(Posted by maggiemoon455 12 years ago)

After Cleaning, Smaller Oven Works, In Larger Neither Element Works.
After we used self-cleaning, smaller over works fine, but larger oven does not work either on bake o...
After we used self-cleaning, smaller over works fine, but larger oven does not work either on bake o...
(Posted by roxannacw 12 years ago)