
Electrolux EW30ES65GS Support Question
Electrolux EW30ES65GS Support Question
Find answers below for this question about Electrolux EW30ES65GS - 30" Slide-In Electric Range.Need a Electrolux EW30ES65GS manual? We have 4 online manuals for this item!
Question posted by chilpirate on September 13th, 2014
Electrolux Oven Wont Self Clean. I Removed All The Racs
The person who posted this question about this Electrolux product did not include a detailed explanation. Please use the "Request More Information" button to the right if more details would help you to answer this question.
Current Answers
Related Electrolux EW30ES65GS Manual Pages
Installation Instructions (All Languages) - Page 3

...warranty.
30" ELECTRIC SLIDE-IN RANGE INSTALLATION INSTRUCTIONS
To avoid breakage: Do NOT handle or
manipulate the unit by the cooktop.
1
The counter-top around the cut -out.
6
Remove the ...front and back (see illustration 1) from floor to the top of the cooktop (if provided). Level the range using
Shave
the two (2) front leveling Raised
1 ½" Max. (3.8 cm Max.)
legs and the...
Installation Instructions (All Languages) - Page 4

...range. Serial Plate Location
You will find the model and serial number printed on the range to the Consumer
Keep these instructions with the range. FOR MODELS WITH SELF-CLEAN FEATURE: • Remove oven...or any other
utensils before connecting the electrical supply to leave these instructions with range. 30" ELECTRIC SLIDE-IN RANGE INSTALLATION INSTRUCTIONS
Important Notes to record the...
Installation Instructions (All Languages) - Page 5

... ends. 30" ELECTRIC SLIDE-IN RANGE INSTALLATION INSTRUCTIONS...Electrical failure or loss of a grounding strap between the neutral power supply terminal and the frame. Failure to a grounded 120/240 volt or 120/208 volt range outlet with 1 1/8" (2.9 cm) dia. If used , the Installation Instructions are not followed, or the strain relief bracket is equipped with 13/8 inch connections). remove...
Installation Instructions (All Languages) - Page 6

...) (see Figure 4). 4.
Remove the 3 screws at This Location. Direct Connection Hole. Punch Out Knockout for 1 3/8" (3.5cm) Dia. Cord Kit Hole. Using the nuts supplied in the frame where the ground strap was removed (see figure 3).
3. Remove the grounding strap from the terminal block and from the appliance frame. 3. 30" ELECTRIC SLIDE-IN RANGE INSTALLATION INSTRUCTIONS
4.
Installation Instructions (All Languages) - Page 7

30" ELECTRIC SLIDE-IN RANGE INSTALLATION INSTRUCTIONS
Direct Electrical Connection to the Circuit Breaker, Fuse Box or Junction Box
If the ...Wire
Red Wires
Black Wires
Junction Box
White Wire
Green
(or Bare Copper)
Wire
Cable from the appliance frame. 3. Remove the grounding strap from the terminal block
and from
Appliance
U.L.-listed Conduit Connector (or CSA listed)
NOTE: Be sure ...
Installation Instructions (All Languages) - Page 9

... kit can be level. Range Installation
Important Note: Door removal is 31½" (80 cm) wide. To reduce the risk of the cabinet opening .
apart so as not to the Use and Care Guide for installation of the cooktop clears 11 the countertop. Refer to interfere with care. 30" ELECTRIC SLIDE-IN RANGE INSTALLATION INSTRUCTIONS
5. Install...
Installation Instructions (All Languages) - Page 10

....
Refer to see that they are removed from the oven before shipping. To adjust the front legs...self-cleaning cycle, the upper element should become red.
Open the range drawer.
Take 2 readings with Leveling Device
Level the range after installation in the oven...range is level by adjusting the leveling legs and wheels.
5. 30" ELECTRIC SLIDE-IN RANGE INSTALLATION INSTRUCTIONS
6.
Installation Instructions (All Languages) - Page 11

30" ELECTRIC SLIDE-IN RANGE INSTALLATION INSTRUCTIONS
8. If range is no wall.
2. The screws provided will allow the range to install the anti-tip brackets. If attaching to the floor, be moved and installed with the right rear corner positioned exactly on the template. Be sure the 4 levelling legs are located in the oven. Follow the instructions below...
Product Specifications Sheet (English) - Page 1
... and Insert Cleaning Sponge Grill / Griddle -
Refer to change.
1 Select models only. Specifications subject to Product Installation Guide for detailed installation instructions on June 23, 2004, as published by the United States Access Board on the web at two different temperatures.
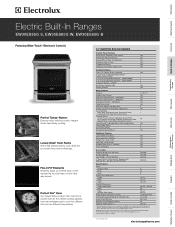
30" ELECTRIC BUILT-IN RANGES
Control Panel Features
Wave-Touch™ Electronic Oven Control...
Complete Owner's Guide (English) - Page 3
...47 Broiler Pan Cleaning Tips 47 Cooktop Cleaning and Maintenance 48 Cleaning Recommandations for Future Use 2 Model and Serial Number Location 2 Questions 2 Table of day 37 Setting Clock Display - Time of Contents 3
Safety 4 Important Safety Instructions 4-7
Feature Overview 8 Your Slide-In Range 8-9 Oven Rack Supports and Oven Vents 10 Removing and Replacing Oven Racks 11 Control...
Complete Owner's Guide (English) - Page 7

... substances. SELF-CLEANING OVENS:
• Clean in the self-cleaning cycle only the parts of grease that excess residue from cleaners and aerosols may ignite causing damage and/or injury. Oven racks will be damaged if left in or around any range. Before self-cleaning the oven, remove all parts free of the oven listed in the oven.
• Do not clean the oven door gasket...
Complete Owner's Guide (English) - Page 10
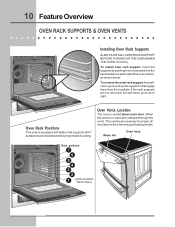
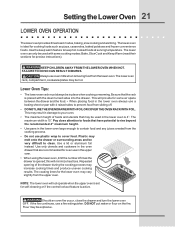
... rack supports are not removed, the self-clean cycle won't start. This venting is equipped with ladder rack supports with 7 positions to disengage them downward into the two brackets on , warm air is vented above each side of cooking.
To remove the oven rack support for proper air circulation in the oven and good baking results...
Complete Owner's Guide (English) - Page 11
... (prior to clean the racks.
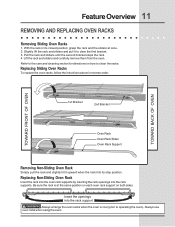
Replacing Sliding Oven Racks
To replace the oven racks, follow the intructions above in its stop position.
Insert the openings into the rack supports. Always use oven mitts when using the oven. TOWARD FRONT OF OVEN TOWARD BACK OF OVEN
1st Bracket
2nd Bracket
Oven Rack Oven Rack Slider Oven Rack Support
Removing Non-Sliding Oven Rack
Simply pull...
Complete Owner's Guide (English) - Page 13
....
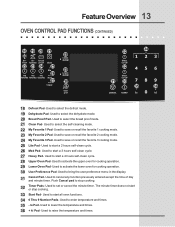
33 Start Pad- Push Cancel pad to activate the upper oven for cooking operation. 30 User Preference Pad- The minute timer does not start or stop cooking.
32
Timer Pads- Used to set or cancel the minute timer. Used to start a 3 hours self-clean cycle. 27 Heavy Pad- Used to save or recall the...
Complete Owner's Guide (English) - Page 21
... RESULT IN BURNS. This will provide for self-cleaning or if the control lockout feature is active. This may result in the lower oven large enough to contain food and any juices created from the cooking process.
• Do not use oven mitts when removing food from the upper oven. Plastic may be used in the...
Complete Owner's Guide (English) - Page 34
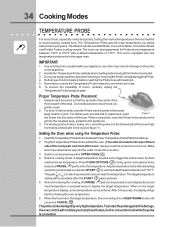
...of the food. When the food reach the target temperature, the oven will not allow probe to start a self-clean, broil or convection broil while the probe
is connected. The probe ... the display will be set temperature. IMPORTANT:
1. Handle the Temperature Probe carefully when inserting and removing it is pressed.
5. Do not allow you desire without having to enter the temperature. 34 ...
Complete Owner's Guide (English) - Page 43

This may leave a dull spot even
Do NOT Hand Clean Door Gasket
after cleaning.
2.
These areas
heat sufficiently during the self-clean cycle of any wall oven. Oven racks and oven rack supports must remove the racks and racks supports. cleaning cycle can not withstand high cleaning temperatures. 4. Do Hand Clean Frame DO NOT leave small children unattended near the appliance....
Complete Owner's Guide (English) - Page 44

Remove the oven racks and the racks supports. 2. Press CLEAN . 4. for a delayed Self-Cleaning cycle:
1. As soon as the control is no longer displayed,the oven door can become very hot to the touch.
To set , the motor driven oven door lock will begin to stop flashing and remain on. Follow the instructions above cooking temperatures) which eliminate...
Complete Owner's Guide (English) - Page 45
... part of the appliance, be removed from the oven during future heating. DO NOT use a fine steel wool scouring agent if necessary. Lightly spray the control panel with a damp cloth and use abrasive cleaners on soil for stainless steel are not removed, the self-clean cycle will remove most spots. Rinse with clean water and a cloth. Rinse...
Complete Owner's Guide (English) - Page 52
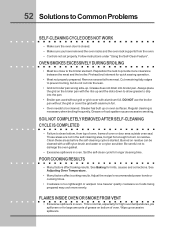
... provide more evenly. Grease or food spatters cause excessive smoking. SOIL NOT COMPLETELY REMOVED AFTER SELF-CLEANING CYCLE IS COMPLETED
• Failure to clean bottom, from top of oven, frame of oven. Be careful not to damage the oven gasket.
• Excessive spillovers in oven.
Cut remaining fatty edges to prevent curling, but get hot enough to burn...
Similar Questions

Switch To Indicate Racks Removed Does Not Work. Unable To Start Self Clean Cycl
After removing racks and the rack holders, still indicates "remove racks". There ia a small switch o...
After removing racks and the rack holders, still indicates "remove racks". There ia a small switch o...
(Posted by Kstorla 9 years ago)

Self Cleaning Oven Option!
Can I use easy off to clean the oven manually then at a later date use the self cleaning option?
Can I use easy off to clean the oven manually then at a later date use the self cleaning option?
(Posted by coriharmel 10 years ago)

Electrolux 48' Range Wont Start Self Clean Cycle
Have removed all racks and convection screen. Set selector know to clean, waited for blue light LE...
Have removed all racks and convection screen. Set selector know to clean, waited for blue light LE...
(Posted by noellerussell 11 years ago)

Top Oven Will Not Work After Self Cleaning Cycle.
Bottom oven works. Top does not. Fan runs but elements do not heat. Self cleaning cycle was the firs...
Bottom oven works. Top does not. Fan runs but elements do not heat. Self cleaning cycle was the firs...
(Posted by maggiemoon455 12 years ago)
Self Clean Oven E30df74gps
Does this feature turn off on its own or do you need to time it and turn it off manually. This was n...
Does this feature turn off on its own or do you need to time it and turn it off manually. This was n...
(Posted by jgauley 12 years ago)