Dell Vostro 470 Support Question
Dell Vostro 470 Support Question
Find answers below for this question about Dell Vostro 470.Need a Dell Vostro 470 manual? We have 2 online manuals for this item!
Question posted by GOBERsts97 on May 24th, 2014
How To Remove A Video Card From A Dell Vostro 470
The person who posted this question about this Dell product did not include a detailed explanation. Please use the "Request More Information" button to the right if more details would help you to answer this question.
Current Answers
Related Dell Vostro 470 Manual Pages
User Manual - Page 1
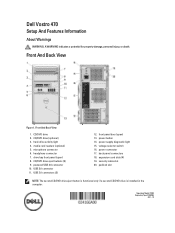
... front panel (open ) 13. Front And Back View
1. Front And Back View
Figure 1. media card readers (optional) 5. USB 2.0 connector 11. CD/DVD drive (optional) 3. Regulatory Model: D10M Regulatory Type: D10M002
2011 - 10 back panel connectors 18. Dell Vostro 470
Setup And Features Information
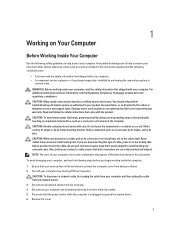
About Warnings
WARNING: A WARNING indicates a potential for property damage, personal injury...
User Manual - Page 2
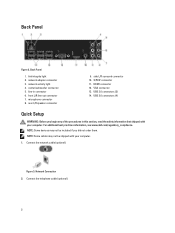
...side L/R surround connector 10. USB 3.0 connectors (2) 14. microphone connector 8. Connect the network cable (optional). HDMI connector 12. For additional best practices information, see www.dell.com/regulatory_compliance. Figure 3. S/PDIF connector 11.
network activity light 4. NOTE: Some devices may not be included if you begin any of the procedures in connector 6. ...
User Manual - Page 3
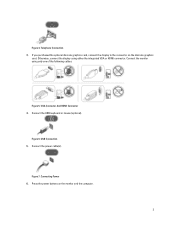
... the monitor using either the integrated VGA or HDMI connector. Press the power buttons on the discrete graphics
card. Telephone Connection 3. VGA Connector And HDMI Connector 4. Figure 6. If you purchased the optional discrete graphics card, connect the display to the connector on the monitor and the computer.
3 Connect the power cable(s). Otherwise...
User Manual - Page 4
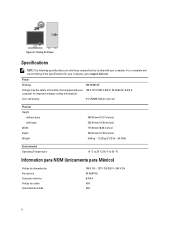
....52 inches) 9.66 kg - 11.22 kg (21.30 lb - 24.74 lb)
Environmental Operating Temperature:
10 °C to 35 °C (50 °F to support.dell.com.
For a complete and current listing of the specifications for important voltage-setting information)
Coin-cell battery
3 V CR2032 lithium coin cell
Physical Height
without base...
User Manual - Page 5

... in this publication is subject to either trademarks or registered trademarks of Microsoft Corporation in this text: Dell™, the DELL logo, Dell Precision™, Precision ON™,ExpressCharge™, Latitude™, Latitude ON™, OptiPlex™, Vostro™, and Wi-Fi Catcher™ are trademarks of Advanced Micro Devices, Inc. Information in the...
Owner's Manual - Page 2
...: A CAUTION indicates potential damage to either trademarks or registered trademarks of Microsoft Corporation in this text: Dell™, the DELL logo, Dell Precision™, Precision ON™,ExpressCharge™, Latitude™, Latitude ON™, OptiPlex™, Vostro™, and Wi-Fi Catcher™ are registered trademarks or trademarks of Wireless Ethernet Compatibility Alliance...
Owner's Manual - Page 3
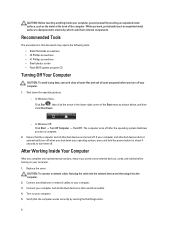
... Tools...6 Turning Off Your Computer...6 After Working Inside Your Computer...6
2 Removing The Cover...7
Installing The Cover...8
3 Removing The Memory...9
Installing The Memory...9
4 Removing The Expansion Card 11
Installing The Expansion Card...12
5 Removing The Optical Disk Drive 13
Installing The Optical Disk Drive...14
6 Removing The Hard Disk Drive 15
Installing The Hard Disk Drive...16...
Owner's Manual - Page 4
... The Power Supply Unit...32
13 Removing The System Board 33
Installing The System Board...35
14 Removing The Front Bezel...37
Installing The Front Bezel...38
15 Removing The WLAN Card...39
Installing The WLAN Card...40
16 Removing The Power Switch And The Hard ... Error Messages 55
Diagnostic Beep Codes...56 System Messages...56
21 Specifications...59
22 Contacting Dell...63
Contacting Dell...63
Owner's Manual - Page 5
... servicing that shipped with your computer (see the Regulatory Compliance Homepage at www.dell.com/ regulatory_compliance. Hold a card by its edges or by performing the removal procedure in on a card. Some cables have read the safety information that is not authorized by Dell is unplugged to avoid bending any connector pins. Ensure that shipped with...
Owner's Manual - Page 6
...computer and attached devices did not automatically turn off when you connect any external devices, cards, and cables before you work, periodically touch an unpainted metal surface to their electrical...turns off .
CAUTION: Before touching anything inside your computer, ground yourself by running the Dell Diagnostics.
6 Shut down your operating system, press and hold the power button for ...
Owner's Manual - Page 9
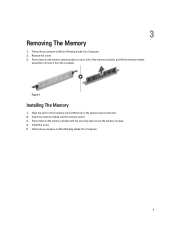
...tabs on each side of the memory modules and lift the memory module
upwards to remove it from the computer. Align the notch on the memory module until the securing ...Insert the memory module into the memory socket. 3. Press down on the memory-card with the tab in place. 4. Install the cover. 5. Remove the cover. 3. Installing The Memory
1. Follow the procedures in Before Working Inside...
Owner's Manual - Page 11
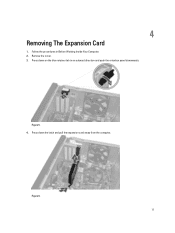
Press down the latch and pull the expansion card away from the computer. Figure 5. 4. Figure 6. 11 Press down on the blue retainer tab in Before Working Inside Your Computer. 2. Remove the cover. 3. 4
Removing The Expansion Card
1. Follow the procedures in an outward direction and push the retention panel downwards.
Owner's Manual - Page 19
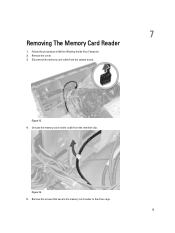
Figure 16. 5. Disconnect the memory card cable from the retention clip.
7
Removing The Memory Card Reader
1. Unroute the memory card reader cable from the system board. Remove the screws that secure the memory card reader to the drive cage.
19 Follow the procedures in Before Working Inside Your Computer. 2. Remove the cover. 3. Figure 15. 4.
Owner's Manual - Page 23
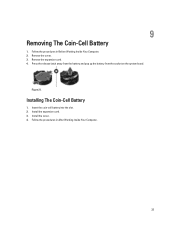
Remove the expansion card. 4.
Install the expansion card. 3. Follow the procedures in Before Working Inside Your Computer. 2. Figure 21. Press the release latch away from the battery and pop up the battery from the socket on the system board. Insert the coin-cell battery into the slot. 2.
Install the cover. 4. Remove the cover. 3. Installing The...
Owner's Manual - Page 33
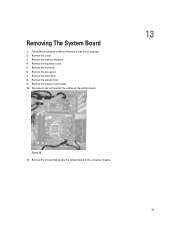
... the processor. 7. Remove the optical drive. 9. Removing The System Board
1. Remove the memory modules. 4. Remove the screws that secure the system board to the computer chassis.
33 Remove the hard drive. 8. Follow the procedures in Before Working Inside Your Computer. 2. Remove the heat sink. 6. Remove the expansion card. 5. Remove the cover. 3. Remove the memory card reader. 10.
Owner's Manual - Page 39

... clips and lift them in Before Working Inside Your Computer. 2. Release the WLAN card cable from the WLAN card. 5.
Remove the WLAN card cable from the computer by sliding it from the front of the computer.
39 Removing The WLAN Card
1. Remove the screw that secures the WLAN card and remove it around from the card slot.
15
Figure 38. 6.
Owner's Manual - Page 49
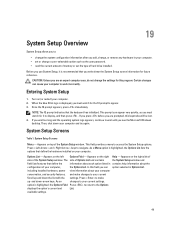
...your computer. When the blue DELL logo is displayed, you ... the Options Field Press to return to wait until you see the Microsoft Windows desktop. Appears on the right Help - Certain changes can option selected in Options List...you to:
• change the system configuration information after you add, change, or remove any hardware in your computer. • set the type of hard drive installed....
Owner's Manual - Page 56
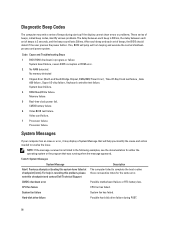
System board failure.
4 RAM Read/Write failure. Video card failure.
7 Processor failure. Processor failure.
System Messages
System Message
Description
Alert! For..., the delay between each set of beeps during POST.
56 Previous attempts at booting this checkpoint and contact Dell Technical Support
The computer failed to resolve the issue. If so, BIOS will help in progress or failure ...
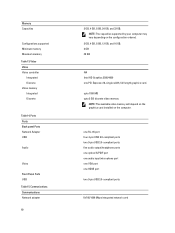
Owner's Manual - Page 59

... SATA drives only)
RAID 0, RAID 1, RAID 5 and RAID 10
Table 11. The following specifications are only those required by region. System Information
System Information
Model
Vostro 470
Processor
Intel Core i3 (2nd Generation)
Intel Core i5 (3rd Generation)
Intel Core i7 (3rd Generation)
L2 cache
256 KB
L3 cache
up to 1600...
Owner's Manual - Page 60
upto 1024 MB upto 2 GB discrete video memory
NOTE: The available video memory will depend on the graphics card installed on the configuration ordered.
2 GB, 4 GB, 8 GB, 12 GB, and 16 GB. 2 GB 32 GB
NA Intel HD Graphics 2500/4000 one HDMI port
...
Similar Questions


How To Remove Video Card For T3600
I need to Remove the video card of Dell T3600. Kindly let me know the steps
I need to Remove the video card of Dell T3600. Kindly let me know the steps
(Posted by sambitmohanty12 10 years ago)
How To Install Xp Dell Vostro 470
How to install Dell Vostro 470 In win XP, and where is i find driver in XP
How to install Dell Vostro 470 In win XP, and where is i find driver in XP
(Posted by Anonymous-69001 11 years ago)