Dell Vostro 3550 Support Question
Dell Vostro 3550 Support Question
Find answers below for this question about Dell Vostro 3550.Need a Dell Vostro 3550 manual? We have 2 online manuals for this item!
Question posted by kstrslhar on December 28th, 2013
How To Install Illuminated Keyboard Vostro 3350
The person who posted this question about this Dell product did not include a detailed explanation. Please use the "Request More Information" button to the right if more details would help you to answer this question.
Current Answers
Related Dell Vostro 3550 Manual Pages
Owners Manual - Page 4

... 29
11 Wireless Wide Area Network (WWAN) Card 31
Removing The Wireless Wide Area Network (WWAN) Card 31 Installing The Wireless Wide Area Network (WWAN) Card 32
12 Keyboard 33
Removing The Keyboard 33 Installing The Keyboard 35
13 Wireless Local Area Network (WLAN) Card 37
Removing The Wireless Local Area Network (WLAN) Card 37...
Owners Manual - Page 29

... The ExpressCard Board
1. Install the palm rest. 7. Install the express card. 10. Install the keyboard. 8. Connect the ExpressCard board cable to the ExpressCard board. 3. Lift up the ExpressCard board at an angle and remove. Install the ExpressCard board on the slot. 2. Install the access panel. 9.
Secure the latch to the system board. 5. Follow the procedures in...
Owners Manual - Page 35

... data cable to the system board. 3. Follow the procedures in After Working Inside Your Computer.
35 7. If your computer comes with a backlit keyboard, connect the keyboard
backlight cable. 4.
Installing The Keyboard
1. Install the battery. 5. If your computer comes with a backlit keyboard, disconnect the keyboard backlight cable. Connect the keyboard data cable to the back of the...
Owners Manual - Page 38

Tighten the screws to the color code on the WLAN card. 4. Install the palm rest. 5. Install the access panel. 7. 8. Installing The Wireless Local Area Network (WLAN) Card
1. Install the keyboard. 6. Slide the WLAN card into its slot. 2. Remove the WLAN card from the computer. Connect the antennaeaccording to secure the WLAN card in After Working ...
Owners Manual - Page 44

Press down on the computer. 2. Install the keyboard. 44 17.
Installing The Palm Rest
1. Install the palm rest on the edges to the bottom of the system securing the palm rest in
place. 6. Connect the touch ...of the computer 7. Tighten the captive screws to the palm rest. 5. Lift up the palm rest from the computer and remove. Install the rubber pads to secure the palm rest. 3.
Owners Manual - Page 49

10. Tighten the screw securing the fingerprint-reader bracket. 3. Install the battery. 7. Install the keyboard. 5. Affix the fingerprint-reader cable to the palm rest. 2. Lift up the fingerprint-reader board and remove. Installing The Fingerprint Reader
1. Follow the procedures in After Working Inside Your Computer.
49 Install the access panel. 6.
Install the palm rest. 4.
Owners Manual - Page 51

.... 5. Hold Switch
Removing The Hold Switch
1. Remove the access panel. 4. Remove the palm rest. 6. Install the hold switch.
16
Installing The Hold Switch
1. Install the palm rest. 3. Install the access panel. 5. Install the keyboard. 4. Remove the battery. 3. Install the battery.
51 Follow the procedures in Before Working On Your Computer. 2. Lift up and remove the hold switch...
Owners Manual - Page 55
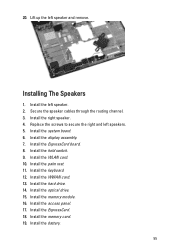
... cables through the routing channel. 3. Install the right speaker. 4. Install the ExpressCard board. 8. Install the optical drive. 15. Install the system board. 6. Install the keyboard. 12. Install the hard drive. 14. Replace the screws to secure the right and left speaker. 2. Install the WLAN card. 10. Install the ExpressCard. 18. Install the battery.
55
Install the palm rest. 11...
Owners Manual - Page 58
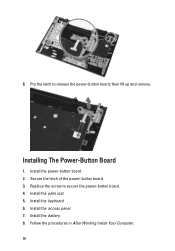
...-button board. 2. Follow the procedures in After Working Inside Your Computer. 58 Install the keyboard. 6. 8. then lift up and remove. Replace the screw to release the power-button board;
Install the battery. 8. Installing The Power-Button Board
1. Install the access panel. 7. Secure the latch of the power-button board. 3. Pry the latch to secure the...
Owners Manual - Page 60
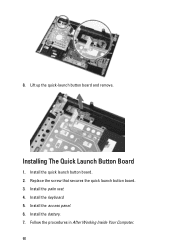
Replace the screw that secures the quick launch button board. 3. 8. Lift up the quick-launch button board and remove. Install the palm rest. 4. Install the access panel. 6. Install the quick launch button board. 2.
Install the keyboard. 5. Installing The Quick Launch Button Board
1. Follow the procedures in After Working Inside Your Computer. 60 Install the battery. 7.
Owners Manual - Page 61

... the coin-cell battery until it from the system board.
Insert the coin-cell battery into place. 3. Install the keyboard. 5. Press on the coin-cell battery to release it secures into the slot. 2. Remove the keyboard. 5. Install the access panel.
61 20
Coin-Cell Battery
Removing The Coin-Cell Battery
1. Follow the procedures in...
Owners Manual - Page 65
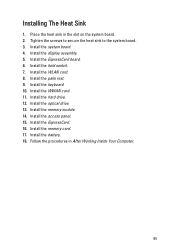
... the procedures in the slot on the system board. 2. Install the battery. 18. Tighten the screws to secure the heat sink to the system board. 3. Install the display assembly. 5. Install the access panel. 15. Install the ExpressCard board. 6. Install the ExpressCard. 16. Install the keyboard. 10. Install the WLAN card. 8. Installing The Heat Sink
1. Install the system board. 4.
Owners Manual - Page 69
... Inside Your Computer.
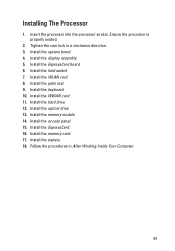
69 Install the hold switch. 7. Install the WWAN card. 11. Install the memory module. 14. Install the memory card. 17. Installing The Processor
1. Install the display assembly. 5. Install the WLAN card. 8. Install the ExpressCard board. 6. Install the optical drive. 13. Install the access panel. 15. Install the keyboard. 10. Install the battery. 18...
Owners Manual - Page 74

... of the computer. 2. Follow the procedures in After Working Inside Your Computer.
74 Connect the middle cover. 8. Attach the display assembly to the installed wireless solutions. 7. Install the WLAN card. 9. Install the keyboard. 11. Connect the touch panel cable (if any) to the system board. 5. Connect the display data cable to the system board...
Owners Manual - Page 76

Install the keyboard. 7. Installing The Display Bezel
1. Starting from the bottom edge, press downward on the computer. 2. Install the palm rest. 6. Install the access panel. 9. Install the battery. 10. Follow the procedures in After Working Inside Your Computer.
76 Place the display bezel on the display bezel to
engage the tabs. 3. Install the WWAN card. 8. Install the WLAN card...
Owners Manual - Page 78

Install the WLAN card. 6. Affix the tape to secure the camera. 3. Install the display bezel. 4. Install the palm rest. 7. Install the keyboard. 8. Install the display assembly. 5. Install the access panel. 78 Place the camera on the display panel slot. 2. Pry the latch, then lift up the display and remove. Install the WWAN card. 9. 12. Installing The Camera
1.
Owners Manual - Page 85
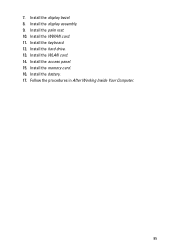
Install the access panel. 15. Follow the procedures in After Working Inside Your Computer.
85 Install the keyboard. 12. Install the hard drive. 13. Install the battery. 17. Install the WLAN card. 14. Install the display assembly. 9. Install the WWAN card. 11. Install the memory card. 16. Install the display bezel. 8. 7. Install the palm rest. 10.
Owners Manual - Page 89
... the hard drive. 12. Install the optical drive. 13. Install the hold switch. 7. Install the WWAN card. 11. Install the battery.
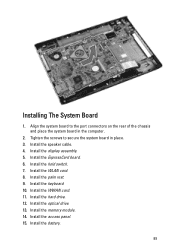
89 Installing The System Board
1. Install the WLAN card. 8. Install the memory module. 14. Install the access panel. 15. Install the speaker cable. 4. Install the palm rest. 9. Install the keyboard. 10. Align the system board to secure the system...
Owners Manual - Page 93
...procedures in After Working Inside Your Computer.
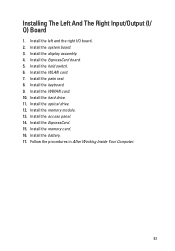
93 Install the WWAN card. 10. Install the memory module. 13. Install the battery. 17. Install the keyboard. 9. Install the WLAN card. 7. Install the memory card. 16. Install the ExpressCard board. 5. Install the hard drive. 11. Install the ExpressCard. 15. Install the access panel. 14. Install the left and the right I / O) Board...
Owners Manual - Page 105

.../ USB 2.0-compliant connector two USB 3.0-compliant connectors, one USB 2.0compliant connector and one eSATA/USB 2.0compliant connector one 8-in-1 memory card reader one
Keyboard Number of keys
Vostro 3350/ 3450/ 3550/ 3555 Vostro 3750
Layout
United States: 86 keys, United Kingdom: 87 keys, Brazil: 87 keys, and Japan: 90 keys United States: 101 keys United...
Similar Questions

Laptop Won't Turn On Installed New Keyboard Vostro 1710
(Posted by joejbe3 9 years ago)


How To Load Or Install Sd Cards Vostro 3550
how to load or install SD cards vostro 3550
how to load or install SD cards vostro 3550
(Posted by jpetercorologos 12 years ago)