
Dell Vostro 200 Support Question
Dell Vostro 200 Support Question
Find answers below for this question about Dell Vostro 200.Need a Dell Vostro 200 manual? We have 2 online manuals for this item!
Question posted by readari0 on January 27th, 2014
How To Remove The Power Supply From A Dell Vostro 200
The person who posted this question about this Dell product did not include a detailed explanation. Please use the "Request More Information" button to the right if more details would help you to answer this question.
Current Answers
Related Dell Vostro 200 Manual Pages
Owner's Manual - Page 7
... Cover 103
Inside View of Your Computer 105
System Board Components 106
Power Supply DC Connector Pin Assignments . . . . . 108
Memory 111 Memory Installation Guidelines 112 Installing Memory 113 Removing Memory 115
Cards 115 PCI and PCI Express Cards 116
Bezel 123 Removing the Bezel 123 Replacing the Bezel 125
Drives 126 Recommended Drive Cable...
Owner's Manual - Page 8
... Replacing the Battery 150
Power Supply 151 Replacing the Power Supply 152
I/O Panel 153 Removing the I/O Panel 154 Installing the I/O Panel 155
Processor Fan 155 Removing the Processor Fan/Heat Sink Assembly 156 Installing the Processor Fan/Heat Sink Assembly 157
Processor 158 Removing the Processor 158 Installing the Processor 159
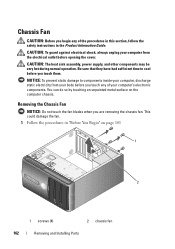
Chassis Fan 162 Removing the Chassis Fan...
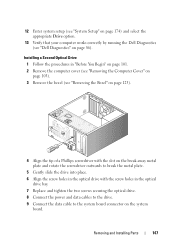
Owner's Manual - Page 18
Used to select voltage rating.
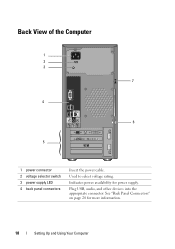
Back View of the Computer
1 2 3
7
4
6
5
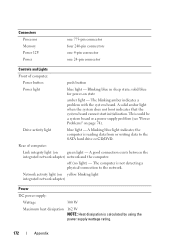
1 power connector 2 voltage selector switch 3 power supply LED 4 back panel connectors
Insert the power cable. See "Back Panel Connectors" on page 20 for power supply. Indicates power availability for more information.
18
Setting Up and Using Your Computer Plug USB, audio, and other devices into the appropriate ...
Owner's Manual - Page 82
..." on page 115).
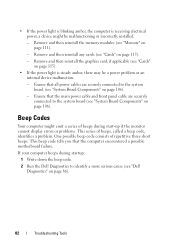
- This beep code tells you that all power cables are securely connected to the system board (see "Dell Diagnostics" on page 106).
- If your computer beeps during start-up...beeps during startup:
1 Write down the beep code.
2 Run the Dell Diagnostics to the system board (see "Cards" on page 106). Remove and then reinstall any cards (see "System Board Components" on page 86...
Owner's Manual - Page 85
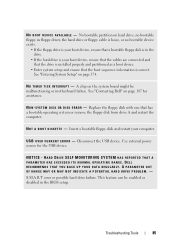
... bootable floppy disk is in the BIOS setup. DELL RECOMMENDS THAT YOU BACK UP YOUR DATA REGULARLY. ...U S B O V E R C U R R E N T E R R O R - Use external power source for assistance. Replace the floppy disk with one that the boot sequence information is installed properly and partitioned as a ...ensure that has a bootable operating system or remove the floppy disk from drive A and ...
Owner's Manual - Page 95
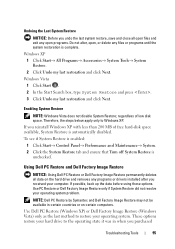
... Image Restore may not be available in when you reinstall Windows XP with less than 200 MB of low disk space. Use Dell PC Restore (Windows XP) or Dell Factory Image Restore (Windows Vista) only as the last method to restore your hard ... only to the operating state it was in certain countries or on the hard drive and removes any files or programs until the system restoration is
unchecked.
Owner's Manual - Page 102

... due to servicing that is not authorized by Dell is not covered by its metal mounting bracket....evenly aligned to help ensure your operating system, press and hold the power button for at least 8-10 seconds until the computer turns off after...finishes.
3 Ensure that both connectors are correctly oriented and aligned.
102
Removing and Installing Parts As you begin any of cable, press in the...
Owner's Manual - Page 105
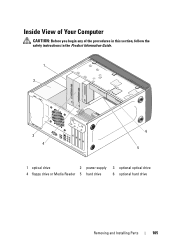
Inside View of Your Computer
CAUTION: Before you begin any of the procedures in this section, follow the safety instructions in the Product Information Guide.
1
2
3 4
6 5
1 optical drive
2 power supply 3 optional optical drive
4 floppy drive or Media Reader 5 hard drive
6 optional hard drive
Removing and Installing Parts
105
Owner's Manual - Page 108
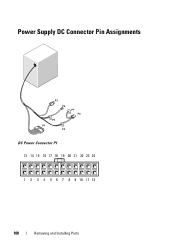
Power Supply DC Connector Pin Assignments
DC Power Connector P1 13 14 15 16 17 18 19 20 21 22 23 24
1 2 3 4 5 6 7 8 9 10 11 12
108
Removing and Installing Parts
Owner's Manual - Page 147
....
8 Connect the power and data cables to the drive.
9 Connect the data cable to the system board connector on page 86).
12 Enter system setup (see "System Setup" on page 174) and select the appropriate Drive option.
13 Verify that your computer works correctly by running the Dell Diagnostics (see "Removing the Bezel...
Owner's Manual - Page 151
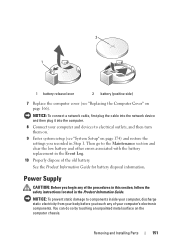
... computer chassis.
You can do so by touching an unpainted metal surface on page 166).
Removing and Installing Parts
151 See the Product Information Guide for battery disposal information. NOTICE: To ...discharge static electricity from your computer's electronic components.
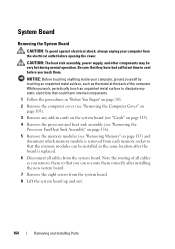
Power Supply
CAUTION: Before you touch any of the procedures in this section, follow the safety instructions ...
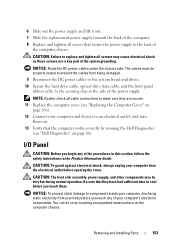
Owner's Manual - Page 152

... securing clip on the side of the power supply.
5 Remove the four screws that attach the power supply to the back of the DC power cables underneath the tabs in "Before You Begin" on page 101.
2 Remove the computer cover (see "Removing the Computer Cover" on page 103).
3 Disconnect the DC power cables from the system board and the...
Owner's Manual - Page 153
... an electrical outlet, and turn
them . You can do so by running the Dell Diagnostics
(see "Dell Diagnostics" on page 86). Removing and Installing Parts
153
The cables must be very hot during normal operation. CAUTION: The heat sink assembly, power supply, and other components may cause electrical shock as these screws are secure. 11...
Owner's Manual - Page 155
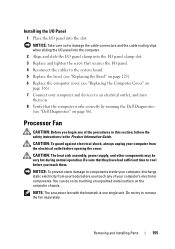
... fan with the heatsink is one single unit. Removing and Installing Parts
155
You can do so by running the Dell Diagnostics
(see "Dell Diagnostics" on the computer chassis. Do not try... they have had sufficient time to cool before opening the cover. CAUTION: The heat sink assembly, power supply, and other components may be very hot during normal operation.
Be sure that secures the I ...
Owner's Manual - Page 162
...
162
Removing and Installing Parts CAUTION: To guard against electrical shock, always unplug your computer from your body before opening the cover. This could damage the fan. 1 Follow the procedures in the Product Information Guide. NOTICE: To prevent static damage to cool before you touch them.
CAUTION: The heat sink assembly, power supply...
Owner's Manual - Page 164
...power supply, and other components may be installed in cards on the system board (see "Cards" on page 115).
4 Remove the processor and heat sink assembly (see "Removing the Processor Fan/Heat Sink Assembly" on page 156).
5 Remove the memory modules (see "Removing Memory" on page 103).
3 Remove... You Begin" on page 101.
2 Remove the computer cover (see "Removing the Computer Cover" on page 115) ...
Owner's Manual - Page 172
... state; A solid amber light when the system does not boot indicates that the system board cannot start initialization. This could be a system board or a power supply problem (see "Power Problems" on state
amber light - A blinking blue light indicates the computer is reading data from or writing data to the network.
off (no light...
Owner's Manual - Page 186
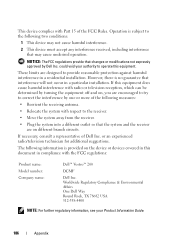
...experienced radio/television technician for additional suggestions. Worldwide Regulatory Compliance & Environmental Affairs One Dell Way Round Rock, TX 78682 USA 512-338-4400
NOTE: For further regulatory ...compliance with Part 15 of Dell Inc.
This device complies with the FCC regulations:
Product name: Model number: Company name:
Dell™ Vostro™ 200
DCMF
Dell Inc. However, there is...
Owner's Manual - Page 203
...starts. universal serial bus - Devices are displayed on a monitor.
V
video controller - uninterruptible power supply - Describes a type of memory chips dedicated to your computer or in to a 4-pin socket...hub that can be defined as x columns by z colors. Small UPS systems provide battery power for a limited amount of characters. UTP - Pairs of unshielded wires are twisted to shut...
Owner's Manual - Page 204
... ampere flows through the Windows Control Panel. W
W - You can supply 66 W of electrical power. A series of interconnected computers that supports resolutions up to provide Internet ...virus is eradicated. X
XGA - turned on the Windows desktop. If the computer is infected, the boot virus may ... be installed or removed with each other over the air waves using cellular technology and...
Similar Questions


How To Remove Power Supply From Dell Inspiron 660s
I can't find a way to take out the old power supply in my Inspiron 660s. It's loose but there I no r...
I can't find a way to take out the old power supply in my Inspiron 660s. It's loose but there I no r...
(Posted by sfishesfish 10 years ago)