Dell PowerEdge 4600 Support Question
Dell PowerEdge 4600 Support Question
Find answers below for this question about Dell PowerEdge 4600.Need a Dell PowerEdge 4600 manual? We have 11 online manuals for this item!
Question posted by Anonymous-30352 on June 7th, 2011
Poweredge 4600 Is Frequently Rebooting Without Warning.
No warning. Orange light on server is blinking. Replace battery light on UPS is lit.
Current Answers
Answer #1: Posted by kcmjr on June 9th, 2011 2:29 PM
kcmjr

Member since:
May 5th, 2011 Points: 4,254,255

Member since:
May 5th, 2011 Points: 4,254,255
Good grief! Get the power looked at before you lose everything.
The circuit breaker is probably tripped.
The orange light on the server is likely to tell you that the redundant power supply has no power. Could also be that something is defective but I'm putting my money on power.
The message from the UPS means that the batteries are cooked and will NOT run the server if the power goes out.
First and foremost get some stable power on the server. The get a new UPS or new batteries. You can replace the batteriescheaper than a new UPS.
If you dont fix this quickly you can lose all the data on your server.
Licenses & Certifications: Microsoft, Cisco, VMware, Novell, FCC RF & Amateur Radio licensed.
Related Dell PowerEdge 4600 Manual Pages
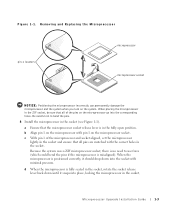
Microprocessor
Upgrade Installation Guide - Page 3

...as the primary microprocessor.
CAUTION: Before you can add secondary microprocessors or replace microprocessors in either the primary or secondary microprocessor sockets.
The following items ... array (PGA) package that is installed in the primary microprocessor socket.
Adding or Replacing a Microprocessor
NOTICE: The secondary microprocessors must be installed in a ZIF socket on ...
Microprocessor
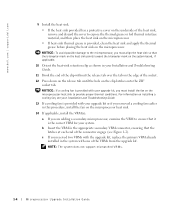
Upgrade Installation Guide - Page 5
...is in the socket. d When the microprocessor is misaligned). Removing and Replacing the Microprocessor
pin-1 locators
microprocessor microprocessor socket
NOTICE: Positioning the microprocessor incorrectly... socket and ensure that all of the microprocessor and socket aligned, set the microprocessor lightly in the socket, rotate the socket release lever back down until it should drop down...
Microprocessor
Upgrade Installation Guide - Page 6
... is the correct VRM for your system. For information on installing a cooling fan, see Figure 1-2). b Insert the VRM in the system with the upgrade kit, replace the primary VRM already installed in the appropriate secondary VRM connector, ensuring that the triangular mark on the heat sink points toward the triangular mark...
Microprocessor
Upgrade Installation Guide - Page 7
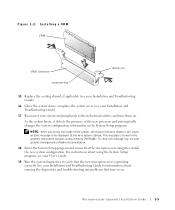
... stored in the System Setup program. Figure 1-2.
Installing a VRM VRM
VRM connector connector key
latches (2)
15 Replace the cooling shroud, if applicable (see your Installation and Troubleshooting Guide).
16 Close the system doors, or replace the system cover (see your system and peripherals to be displayed at the next system startup. This...
Rack-to-Tower
Conversion Guide - Page 3

... Front Panel 1-8 Installing the Trim Panel 1-10 Installing the Front Panel 1-11 Installing the Cover, Metal Feet, and Bezel 1-12 Removing the Slide Assemblies 1-14 Replacing the Rack Doors 1-16
Figures
Figure 1-1.
Rack-to-Tower
Conversion Guide - Page 4
... components in connection with such combinations.
It is very heavy.
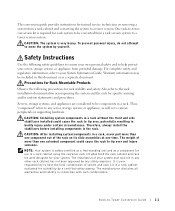
The weight of your server, storage system, or appliance from potential damage. CAUTION: The system is your responsibility ...-to the rack installation documentation accompanying the system and the rack for specific warning and/or caution statements and procedures. This conversion guide provides instructions for trained...
Rack-to-Tower
Conversion Guide - Page 7
... trim panel • Installing the tower front panel • Installing the metal feet • Installing the tower front bezel • Removing the slide assemblies • Replacing the rack doors
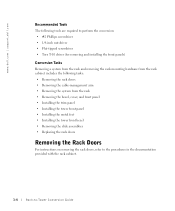
Removing the Rack Doors
For instructions on removing the rack doors, refer to the procedures in the documentation provided with the rack...
Rack-to-Tower
Conversion Guide - Page 15
... T-10 Torx screws that you removed in step 4.
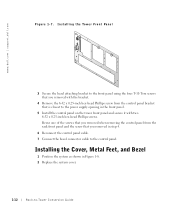
6 Reconnect the control panel cable. 7 Connect the bezel connector cable to the power supply opening in Figure 1-8. 2 Replace the system cover.
1-12
Rack-to-Tower Conversion Guide Reuse one of the screws that you removed when removing the control panel from the control...
Rack-to-Tower
Conversion Guide - Page 19
Label the box as a rack installation kit for replacing the rack doors in a box.
www.dell.com | support.dell.com
3 Repeat step 2 at the back of the cabinet for this slide assembly. 4 ... all fastener hardware in the documentation provided with your rack cabinets.
1-16
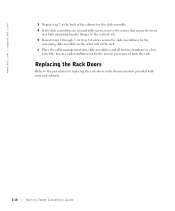
Rack-to the procedures for the system you removed from the rack. Replacing the Rack Doors
Refer to -Tower Conversion Guide
1 x 2
Backplane Installation Guide - Page 43
... • 1x2
(Inter-integrated circuit) • 1x2
SCSI
1 x 2 4 SCSI
:
I2C 68
:
Installation and Troubleshooting Guide First - For You and Your Computer
Safety
:
BIOS
ESM (Embedded Server Management)
Dell | Support Web 1
support.jp.dell.com
:
2 1x2 3
4
( Installation and Troubleshooting Guide )
( Installation and Troubleshooting Guide )
1 x 2
5-1
1 x 2
Backplane Installation Guide - Page 49

4 SCSI
1
SCSI
SCSI
RAID
1
2
( Installation and Troubleshooting Guide
Replacing the Front Fan Assembly
)
3
( Installation and Troubleshooting Guide
)
4
( Installation and Troubleshooting Guide
)
5
1 x 2
5-7
SCSI
Backplane Daughter Card Installation - Page 20

SCSI SCSI
SCSI
6 SCSI
SCSI
2 x 4 SCSI
7 Replacing the System Cover
( Installation and Troubleshooting Guide )
8
5-2
SCSI 5-1.
Removing the Back Fan Assembly - Page 1
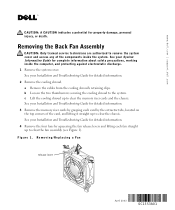
... the system. See your Installation and Troubleshooting Guide for property damage, personal injury, or death. c Lift the cooling shroud up to clear the chassis. Removing/Replacing a Fan
release lever
April 2003
0C1553A01
Removing the Back Fan Assembly - Page 3
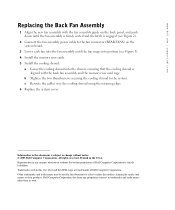
c Reroute the cables over the cooling shroud using the retaining clips. 6 Replace the system cover. a Lower the cooling shroud into the chassis, ensuring that ...disclaims any manner whatsoever without the written permission of Dell Computer Corporation. www.dell.com | support.dell.com
Replacing the Back Fan Assembly
1 Align the new fan assembly with the fan assembly guide on the system board.
...
Similar Questions

How To Replace Power Switch On Dell Poweredge 4600 Server
(Posted by lweltable20 9 years ago)

Poweredge 1800 Flashing Orange Light Wont Boot
(Posted by dditwcrpark 10 years ago)

Dell Poweredge 840 Flashing Orange Light Monitor Does Not Display
(Posted by mofjorg 10 years ago)

Dell Poweredge 4600- How To Remove And Replace The Power Button
I would appreciate step by step instructions to remove and replace a defective (collapsed) power but...
I would appreciate step by step instructions to remove and replace a defective (collapsed) power but...
(Posted by jelkes 10 years ago)
How Update A Dell Poweredge 4600 Server Please?
Hi ! 'excuse-me for my english i speak frensh)I have reinstall my server and i would like to copie d...
Hi ! 'excuse-me for my english i speak frensh)I have reinstall my server and i would like to copie d...
(Posted by marietoumari 12 years ago)