Dell PowerEdge 4600 Support Question
Dell PowerEdge 4600 Support Question
Find answers below for this question about Dell PowerEdge 4600.Need a Dell PowerEdge 4600 manual? We have 11 online manuals for this item!
Question posted by lweltable20 on August 10th, 2014
How To Replace Power Switch On Dell Poweredge 4600 Server
The person who posted this question about this Dell product did not include a detailed explanation. Please use the "Request More Information" button to the right if more details would help you to answer this question.
Current Answers
Related Dell PowerEdge 4600 Manual Pages
Microprocessor
Upgrade Installation Guide - Page 2
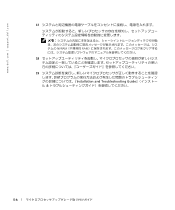
... may be used in this document is subject to either potential damage to hardware or loss of data and tells you make better use of Dell Computer Corporation is strictly forbidden. Notes, Notices, and Cautions
NOTE: A NOTE indicates important information that helps you how to avoid the problem. Information in this...
Microprocessor
Upgrade Installation Guide - Page 3

.... The following subsection describes how to the ZIF socket for the primary microprocessor on the Dell Support website at support.dell.com, and upgrade the BIOS if necessary.
Microprocessor Upgrade Installation Guide
1-1 In addition to install or replace the microprocessor in your Installation and Troubleshooting Guide).
To take advantage of future options in...
Microprocessor
Upgrade Installation Guide - Page 4
... pressing down on the retention clip tab, and then removing the clip from the heat sink. Bending the pins can become extremely hot. www.dell.com | support.dell.com
4 If you can remove the heat sink without removing the fan. Bending the pins can remove the fan to provide easier access to...
Microprocessor
Upgrade Installation Guide - Page 5
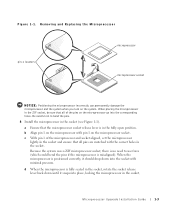
... with pin 1 on the system. b Align pin 1 on the microprocessor with minimal pressure.
Because the system uses a ZIF microprocessor socket, there is misaligned). Removing and Replacing the Microprocessor
pin-1 locators
microprocessor microprocessor socket
NOTICE: Positioning the microprocessor incorrectly can permanently damage the microprocessor and the system when you turn on the...
Microprocessor
Upgrade Installation Guide - Page 6
www.dell.com | support.dell.com
9 Install the heat sink.
• If the heat sink provided has a protective cover on the underside of the connector...each end of the heat sink, remove and discard the cover to the microprocessor, you received two VRMs with the upgrade kit, replace the primary VRM already installed in the system with one of the socket.
12 Press down on the release tab until the ...
Microprocessor
Upgrade Installation Guide - Page 7
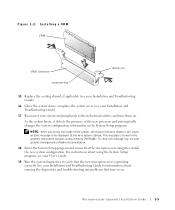
... next system startup. Microprocessor Upgrade Installation Guide
1-5 Installing a VRM VRM
VRM connector connector key
latches (2)
15 Replace the cooling shroud, if applicable (see your Installation and Troubleshooting Guide).
16 Close the system doors, or replace the system cover (see your system and peripherals to verify that the new microprocessor is stored in...
Microprocessor
Upgrade Installation Guide - Page 34
www.dell.com | support.dell.com
2 Installation and Troubleshooting Guide
3 Installation and Troubleshooting Guide
4
Installation and Troubleshooting Guide
a
b Installation and Troubleshooting Guide
5 5-1
6
5-2
Microprocessor
Upgrade Installation Guide - Page 36
www.dell.com | support.dell.com
c 1
ZIF
d
9
10 『Installation and Troubleshooting Guide
11
12 ZIF
Installation and Troubleshooting Guide
13
5-4
Microprocessor
Upgrade Installation Guide - Page 38
www.dell.com | support.dell.com
17
NVRAM RAM
18
19 Installation and Troubleshooting Guide
5-6
Information
Update — 1-GB 512-Mb Memory Modules - Page 1
... same memory module technology. The 1-GB 256-Mb memory module components are stacked and the 1-GB 512-Mb memory module components are not. www.dell.com | support.dell.com
About Cautions
CAUTION: A CAUTION indicates a potential for 1-GB memory modules.
See your Product Information Guide or System Information Guide for memory module installation...
Rack-to-Tower
Conversion Guide - Page 4
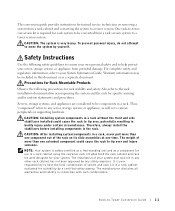
... After installing system/components in a rack, never pull more than one component out of your server, storage system, or appliance from a rack cabinet and converting the system to -Tower Conversion Guide... the following safety guidelines to ensure your own personal safety and to your system.
Servers, storage systems, and appliances are considered to tip over and injure someone. CAUTION:...
Rack-to-Tower
Conversion Guide - Page 5
...total rack load should not exceed 80 percent of the rack rests on the floor. www.dell.com | support.dell.com
• System rack kits are secured to the rack, extend to the floor, ...the component rail release latches and sliding a component into the rack.
• Do not overload the power supply branch circuit that the rack meets the specifications.
• Do not move large racks by trained...
Rack-to-Tower
Conversion Guide - Page 7
www.dell.com | support.dell.com
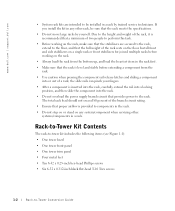
Recommended Tools
The following tools are required to perform the conversion: • #2 Phillips screwdriver ...• Installing the metal feet • Installing the tower front bezel • Removing the slide assemblies • Replacing the rack doors
Removing the Rack Doors
For instructions on removing the rack doors, refer to the procedures in the ...
Rack-to-Tower
Conversion Guide - Page 9
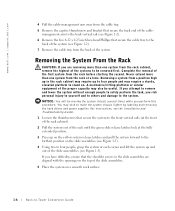
...see Figure 1-3).
4 Using two to four people, grasp the system at a time. www.dell.com | support.dell.com
4 Pull the cable-management arm away from the cable tray.
5 Remove the captive ...the systems to make the system chassis lighter by labeling and removing the hard drives and power supplies (for instructions, see the Installation and Troubleshooting Guide).
1 Loosen the thumbscrews that the...
Rack-to-Tower
Conversion Guide - Page 15
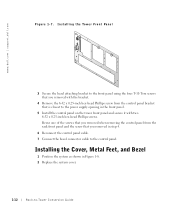
... hex-head Phillips screw from the rack front panel and the screw that is closest to the power supply opening in the front panel.
5 Install the control panel on the tower front panel and... four T-10 Torx screws that you removed in Figure 1-8. 2 Replace the system cover.
1-12
Rack-to the control panel. www.dell.com | support.dell.com
Figure 1-7.
Installing the Cover, Metal Feet, and Bezel
1...
Rack-to-Tower
Conversion Guide - Page 19
www.dell.com | support.dell.com
3 Repeat step 2 at the back of the cabinet for this slide assembly. 4 If the slide assemblies are secured with screws, ... hardware in the documentation provided with your rack cabinets.
1-16
Rack-to the procedures for the system you removed from the rack. Replacing the Rack Doors
Refer to -Tower Conversion Guide Label the box as a rack installation kit for...
1 x 2
Backplane Installation Guide - Page 43
... • 1x2
(Inter-integrated circuit) • 1x2
SCSI
1 x 2 4 SCSI
:
I2C 68
:
Installation and Troubleshooting Guide First - For You and Your Computer
Safety
:
BIOS
ESM (Embedded Server Management)
Dell | Support Web 1
support.jp.dell.com
:
2 1x2 3
4
( Installation and Troubleshooting Guide )
( Installation and Troubleshooting Guide )
1 x 2
5-1
Removing the Back Fan Assembly - Page 1
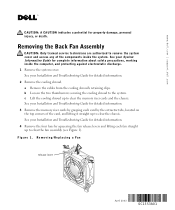
www.dell.com | support.dell.com
CAUTION: A CAUTION indicates a potential for detailed information. 2 Remove the cooling shroud....the system cover and access any of the card, and lifting it straight up to clear the chassis. Removing/Replacing a Fan
release lever
April 2003
0C1553A01 See your Installation and Troubleshooting Guide for complete information about safety precautions, working...
Removing the Back Fan Assembly - Page 2
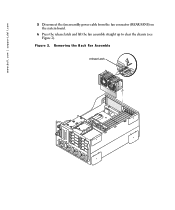
Removing the Back Fan Assembly
release latch www.dell.com | support.dell.com
5 Disconnect the fan assembly power cable from the fan connector (REAR FANS) on the system board.
6 Press the release latch and lift the fan assembly straight up to clear the chassis (see Figure 2). Figure 2.
Removing the Back Fan Assembly - Page 3
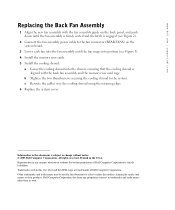
a Lower the cooling shroud into position (see Figure 2).
2 Connect the fan assembly power cable to change without the written permission of Dell Computer Corporation.
Dell Computer Corporation disclaims any manner whatsoever without notice. © 2003 Dell Computer Corporation. www.dell.com | support.dell.com
Replacing the Back Fan Assembly
1 Align the new fan assembly with the fan ...
Similar Questions


How To Replace Power Supply Dell Poweredge 2900
(Posted by cpdcjlars 10 years ago)


Dell Poweredge 4600- How To Remove And Replace The Power Button
I would appreciate step by step instructions to remove and replace a defective (collapsed) power but...
I would appreciate step by step instructions to remove and replace a defective (collapsed) power but...
(Posted by jelkes 10 years ago)

How Update A Dell Poweredge 4600 Server Please?
Hi ! 'excuse-me for my english i speak frensh)I have reinstall my server and i would like to copie d...
Hi ! 'excuse-me for my english i speak frensh)I have reinstall my server and i would like to copie d...
(Posted by marietoumari 12 years ago)