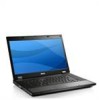
Dell Latitude E5510 Support Question
Dell Latitude E5510 Support Question
Find answers below for this question about Dell Latitude E5510.Need a Dell Latitude E5510 manual? We have 2 online manuals for this item!
Question posted by drjctob on February 28th, 2014
How Restore Latitude E5510 To Factory Default
The person who posted this question about this Dell product did not include a detailed explanation. Please use the "Request More Information" button to the right if more details would help you to answer this question.
Current Answers
Related Dell Latitude E5510 Manual Pages
Setup and Features Information Tech Sheet - Page 3
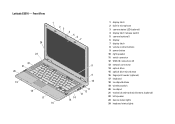
Latitude E5510 - Front View
1 23 4 5 6 7
24
23
22 21 20
19
18 17 16
8
9 10
14 15
11 12 13
1 display latch 2 built-in microphone 3 camera status ...
Setup and Features Information Tech Sheet - Page 4

.... The computer turns on the fan when the computer gets hot. Fan noise is running. Restricting the airflow can damage the computer or cause a fire. Latitude E5510 -
Service Manual - Page 1
.... All rights reserved. Trademarks used in this text: Dell, the DELL logo, Latitude, Wi-Fi Catcher, and ExpressCharge are either trademarks or registered trademarks of the Blu...is a registered trademark owned by Dell under license; Dell Inc. Dell™ Latitude™ E5510 Discrete Service Manual
Working on Your Computer Adding and Replacing Parts Specifications Diagnostics System ...
Service Manual - Page 2
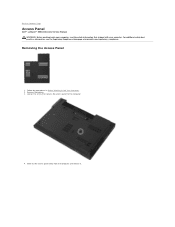
... Computer. 2. Loosen the screw that shipped with your computer, read the safety information that secures the access panel to Contents Page
Access Panel
Dell™ Latitude™ E5510 Discrete Service Manual WARNING: Before working inside your computer.
Service Manual - Page 4
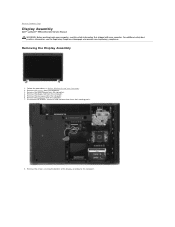
... Regulatory Compliance Homepage at www.dell.com/regulatory_compliance. Remove the screws securing the bottom of the display assembly to Contents Page
Display Assembly
Dell™ Latitude™ E5510 Discrete Service Manual WARNING: Before working inside your computer, read the safety information that shipped with your computer. Remove the battery from the computer...
Service Manual - Page 8
Follow the procedures in Before Working Inside Your Computer. 2. Back to Contents Page
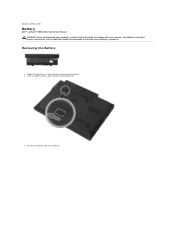
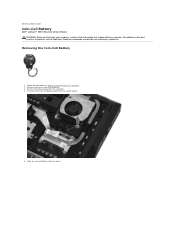
Battery
Dell™ Latitude™ E5510 Discrete Service Manual WARNING: Before working inside your computer, read the safety information that shipped with your computer. Slide the battery release latch into the ...
Service Manual - Page 10
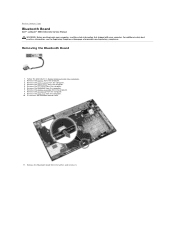
... from the computer. 9. Remove the access panel from the computer. 7. Disconnect the Bluetooth board cable.
11. Back to Contents Page
Bluetooth Board
Dell™ Latitude™ E5510 Discrete Service Manual WARNING: Before working inside your computer, read the safety information that shipped with your computer. Removing the Bluetooth Board
1. Remove the keyboard...
Service Manual - Page 12
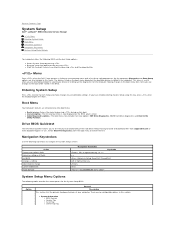
...Drive Diagnostics (90/90 hard drive diagnostics) and Boot to change Cancel modification Reset defaults
Navigation Keystrokes
, left- Select IDE Drive Diagnostics from support.dell.com or make ...Asset Tag ¡ Ownership Tag Back to Contents Page
System Setup
Dell™ Latitude™ E5510 Discrete Service Manual
Menu Entering System Setup Boot Menu Drive BIOS Quicktest Navigation Keystrokes...
Service Manual - Page 15
...LED is on by special WLAN signals. Disable the integrated touchpad when an external PS/2 mouse is Enabled.
l Minimal - The factory default setting is present.
l Disabled - The factory default setting is Enabled. Adapter Warnings
The factory default setting is Off.
l PS/2 Mouse - Leave the integrated touchpad enabled when an external PS/2 mouse is connected. Use the...
Service Manual - Page 17
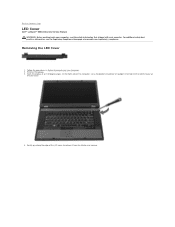
... pry along the edge of the computer, use a flat-bladed screwdriver or spudger (inserted into the notch) to Contents Page
LED Cover
Dell™ Latitude™ E5510 Discrete Service Manual WARNING: Before working inside your computer, read the safety information that shipped with your computer. Back to pry up
the LED cover...
Service Manual - Page 19
... Compliance Homepage at www.dell.com/regulatory_compliance. Follow the procedures in Before Working Inside Your Computer. 2. Back to Contents Page
Coin-Cell Battery
Dell™ Latitude™ E5510 Discrete Service Manual WARNING: Before working inside your computer, read the safety information that shipped with your computer. Removing the Coin-Cell Battery
1. Disconnect...
Service Manual - Page 21
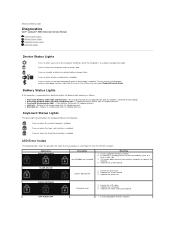
...computer reads or writes data. Battery Status Lights
If the computer is connected to your laptop. l Constantly blinking amber light - Battery in full charge mode with steady blue light ... Replace the video card/system board. Back to Contents Page
Diagnostics
Dell™ Latitude™ E5510 Discrete Service Manual
Device Status Lights Battery Status Lights Keyboard Status Lights LED Error Codes...
Service Manual - Page 23
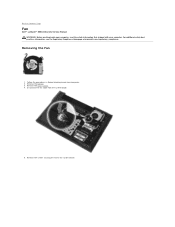
Remove the screws securing the fan to Contents Page
Fan
Dell™ Latitude™ E5510 Discrete Service Manual WARNING: Before working inside your computer, read the safety information that shipped with your computer. Removing the Fan
1. Remove the access panel. 4. ...
Service Manual - Page 25
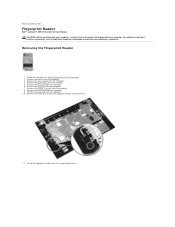
... and remove. Remove the LED cover from the computer. 7. Remove the screw that secures the fingerprint reader to Contents Page
Fingerprint Reader
Dell™ Latitude™ E5510 Discrete Service Manual WARNING: Before working inside your computer, read the safety information that shipped with your computer. Remove the optical drive from the computer...
Service Manual - Page 28
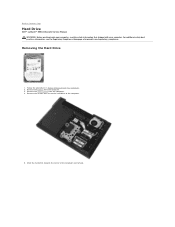
.... 3. Remove the screws that shipped with your computer, read the safety information that secure the hard drive to Contents Page
Hard Drive
Dell™ Latitude™ E5510 Discrete Service Manual WARNING: Before working inside your computer. For additional safety best practices information, see the Regulatory Compliance Homepage at www.dell.com/regulatory_compliance...
Service Manual - Page 31

Removing the Heat Sink
1. Remove the battery from the computer. 4. Loosen the screws securing the heat sink to Contents Page
Heat Sink
Dell™ Latitude™ E5510 Discrete Service Manual WARNING: Before working inside your computer, read the safety information that shipped with your computer. For additional safety best practices information, see ...
Service Manual - Page 33
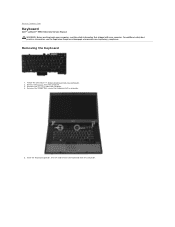
... Inside Your Computer. 2. Removing the Keyboard
1. Remove the battery from the computer. 3. Remove the screws that secure the keyboard to Contents Page
Keyboard
Dell™ Latitude™ E5510 Discrete Service Manual WARNING: Before working inside your computer, read the safety information that shipped with your computer. Back to the computer.
5.
Service Manual - Page 35
... access panel from the computer. 7. Remove the keyboard from the computer. 4.
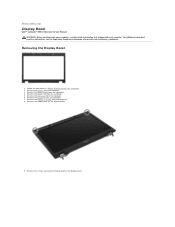
Remove the screws securing the display bezel to Contents Page
Display Bezel
Dell™ Latitude™ E5510 Discrete Service Manual WARNING: Before working inside your computer, read the safety information that shipped with your computer.
Service Manual - Page 38
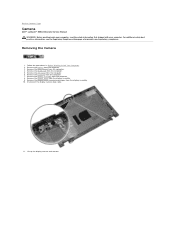
... from the computer. 7. Remove the display bezel from the computer. 3. Lift up the display camera and remove. Back to Contents Page
Camera
Dell™ Latitude™ E5510 Discrete Service Manual WARNING: Before working inside your computer, read the safety information that shipped with your computer. Remove the battery from the display assembly...
Service Manual - Page 40
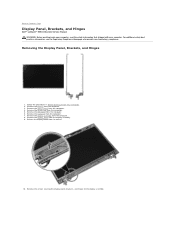
... bezel from the computer. 3. Remove the screws securing the display panel, brackets, and hinges to Contents Page
Display Panel, Brackets, and Hinges
Dell™ Latitude™ E5510 Discrete Service Manual WARNING: Before working inside your computer, read the safety information that shipped with your computer. Remove the keyboard from the computer. 5. Follow...
Similar Questions

How Do I Get The Keyboard Out Of My Dell Laptop Latitude E5510
(Posted by loCLSDIS 9 years ago)


How To Restore To Factory Default Dell Latitude E6320
(Posted by mnmam 10 years ago)
