Dell Inspiron One 2330 Support Question
Dell Inspiron One 2330 Support Question
Find answers below for this question about Dell Inspiron One 2330.Need a Dell Inspiron One 2330 manual? We have 2 online manuals for this item!
Question posted by fmhart71 on April 16th, 2015
Need Cracked Screen Fixed And To Disable The Touch Screen, Thanks
I cracked my screen while moving, where can I get it fixed? Also how can I disable the touch screen , I don't show the option on my control panel :(
Current Answers
Answer #1: Posted by BusterDoogen on April 16th, 2015 9:33 AM
BusterDoogen

Member since:
October 30th, 2011 Points: 28,565,447

Member since:
October 30th, 2011 Points: 28,565,447
Go here for TS resolutions. To enable or disable the touchscreen feature on your computer with Win 7.
- Click Start and then Control Panel
- In Control Panel, click on the Pen and Touch icon
- In the Pen and Touch Settings window, click the Touch tab
- Check or uncheck the checkbox next to Use your finger as an input device
- Click Apply and then OK
- Disabling touch input in Windows 8/8.1
- Step 1: Open Device Manager. To do this, open the Search charm, type Device Manger, change search filter to Settings (if you can't see the entry in the search result) and then tap Device Manager entry to launch the same.Step 2: In the Device Manager window, expand Tab, and then expand Human Interface Devices.
Step 3: Right-click on the second entry titled HID-complaint device, click Disable and then click Yes button when you see a warning message saying that "Disabling this device will cause it to stop functioning. Do you really want to disable it?" to disable the touch screen or touch input.
I hope this is helpful to you!
Please respond to my effort to provide you with the best possible solution by using the "Acceptable Solution" and/or the "Helpful" buttons when the answer has proven to be helpful. Please feel free to submit further info for your question, if a solution was not provided. I appreciate the opportunity to serve you!
Related Dell Inspiron One 2330 Manual Pages
Owner's Manual (PDF) - Page 1
Dell Inspiron One 2330 Owner's Manual
Computer model: Inspiron One 2330
Regulatory model: W05C
Regulatory type: W05C001
Owner's Manual (PDF) - Page 2

...® is subject to hardware or loss of data if instructions are trademarks of these materials in this text: Dell™, the DELL logo, and Inspiron™ are not followed. Notes, Cautions, and Warnings
NOTE: A NOTE indicates important information that helps you make better use of Microsoft corporation in this document...
Owner's Manual (PDF) - Page 9
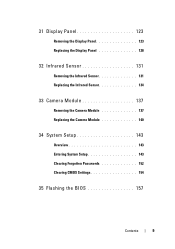
31 Display Panel 123
Removing the Display Panel 123 Replacing the Display Panel 128
32 Infrared Sensor 131
Removing the Infrared Sensor 131 Replacing the Infrared Sensor 134
33 Camera Module 137
Removing the Camera Module 137 Replacing ...
Owner's Manual (PDF) - Page 12
... and aligned. See the safety instructions for complete information about safety precautions, working inside your computer. CAUTION: Before touching anything inside the computer, replace all power sources before opening the computer cover or panels. Some cables have connectors with your computer, read the safety information that shipped with locking tabs or thumb...
Owner's Manual (PDF) - Page 75
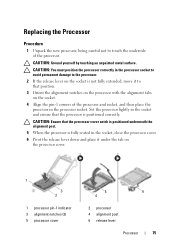
... 6 Pivot the release lever down and place it to that the processor is not fully extended, move it under the tab on the socket.
4 Align the pin-1 corners of the processor. Replacing ...the Processor
Procedure
1 Unpack the new processor, being careful not to touch the underside of the processor and socket, and then place the processor in the socket and ensure...
Owner's Manual (PDF) - Page 86
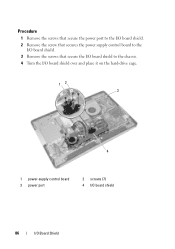
Procedure
1 Remove the screws that secure the power port to the I/O board shield. 2 Remove the screw that secures the power supply control board to the
I/O board shield. 3 Remove the screws that secure the I/O board shield to the chassis. 4 Turn the I/O board shield over and place it on ...
Owner's Manual (PDF) - Page 87

5 Slide the power port and power-supply control board through the slot on the I/O board shield.
6 Disconnect the power-supply fan cable and infrared cable from the system-board connectors.
7 Disconnect the antenna ...
Owner's Manual (PDF) - Page 88
... cable to the connector on the TV tuner card. 3 Slide the power port and the power-supply control board through the slot
on the I/O board shield. 4 Align the screw holes on the I/O board ...the screws that secure the I/O board shield to the chassis. 6 Replace the screw that secures the power-supply control board to the
I/O board shield. 7 Replace the screws that secure the power port to the I /O ...
Owner's Manual (PDF) - Page 106
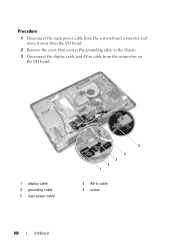
Procedure
1 Disconnect the main power cable from the system-board connector and move it away from the I/O board.
2 Remove the screw that secures the grounding cable to the chassis.
3 Disconnect the display cable and AV-in cable from the connectors on the I/O board.
1 display cable 3 grounding cable 5 main power cable
5 4 3 2 1
2 AV-in cable 4 screw
106
I/O Board
Owner's Manual (PDF) - Page 143
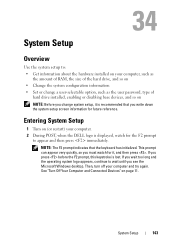
...system configuration information • Set or change a user-selectable option, such as the user password, type of
hard drive installed, enabling or disabling base devices, and so on page 11. See "Turn ...you see the Microsoft Windows desktop. If you wait too long and the operating system logo appears, continue to wait until you write down the system setup screen information for the F2 prompt...
Owner's Manual (PDF) - Page 144

...is divided into three areas: the setup item, active help screen, and key functions. Help Screen - and down -arrow keys.
System Setup Options
NOTE: Depending on the right side of the system setup...the active system setup field. This field appears on the screen is not present; As an option is highlighted, the Help Screen displays more information about your computer and make that selection ...
Owner's Manual (PDF) - Page 146
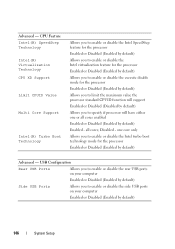
...
Multi Core Support
Intel(R) Turbo Boot Technology
Allows you to enable or disable the Intel SpeedStep feature for the processor Enabled or Disabled (Enabled by default)
Allows you to enable or disable the Intel virtualization feature for the processor Enabled or Disabled (Enabled by default)
Allows you to specify if processor will support Enabled...
Owner's Manual (PDF) - Page 147
... (AHCI Mode by default)
Auto Power On
Allows you to configure the operating mode of the integrated hard-drive controller
ATA Mode; Onboard LAN Controller Allows you to enable or disable the onboard LAN controller
Enabled or Disabled (Enabled by default)
Onboard LAN boot ROM Allows you to boot your computer from a network
Enabled or...
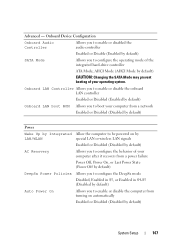
Owner's Manual (PDF) - Page 149
...Num Lock key during boot On or Off (On by default) Allows you to enable or disable the display of keyboard-related errors during boot Report or Do Not Report (Report by default) Allows you to enable...mass storage devices such as hard drive, optical drive, USB key, and so on Enable or Disable (Enabled by default) Specifies the boot sequence from the available devices Displays the first boot device ...
Owner's Manual (PDF) - Page 150
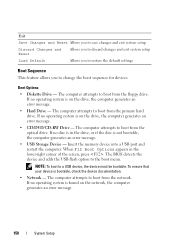
...; Diskette Drive - When F12 Boot Options appears in the drive, or if the disc is in the lower-right corner of the screen, press . The computer attempts to a USB device, the device must be bootable. If no operating system is bootable, check the ...computer generates an error message.
150
System Setup The BIOS detects the device and adds the USB flash option to the boot menu.
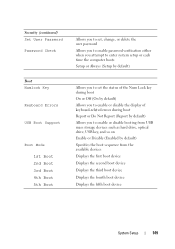
Owner's Manual (PDF) - Page 151
... down your current boot sequence in the lower-right
corner of the screen, press . System Setup
151 Then, shut down -arrow keys to move through the list of devices. 4 Press plus (+) or minus (-)...
2 Turn on page 105. 2 Use the arrow keys to highlight the Boot menu option and press
to wait until you are booting to change the current boot sequence, for example... the Microsoft Windows desktop.
Owner's Manual (PDF) - Page 152
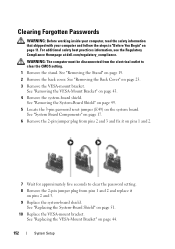
... outlet to clear the CMOS setting.
1 Remove the stand. See "System Board Components" on page 17.
6 Remove the 2-pin jumper plug from pins 2 and 3 and fix it on the system board.
Owner's Manual (PDF) - Page 154
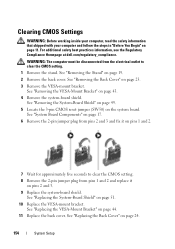
... back cover. See "Removing the Stand" on page 11. See "System Board Components" on page 17.
6 Remove the 2-pin jumper plug from pins 2 and 3 and fix it on pins 1 and 2.
7 Wait for approximately five seconds to clear the CMOS setting.
8 Remove the 2-pin jumper plug from the electrical outlet to clear...
Owner's Manual (PDF) - Page 157
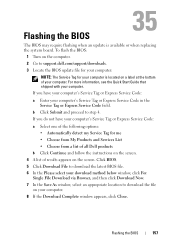
...; Choose from a list of all Dell products
b Click Continue and follow the instructions on the screen. 4 A list of your computer. For more information, see the Quick Start Guide that shipped ...a Enter your computer's Service Tag or Express Service Code:
a Select one of the following options: • Automatically detect my Service Tag for your computer is available or when replacing the system...
Owner's Manual (PDF) - Page 158
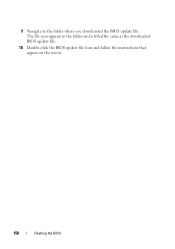
9 Navigate to the folder where you downloaded the BIOS update file. The file icon appears in the folder and is titled the same as the downloaded BIOS update file.
10 Double-click the BIOS update file icon and follow the instructions that appear on the screen.
158
Flashing the BIOS
Similar Questions

Inspiron One 2330 Touch Screen,does It Need Keyboard To Boot Up
(Posted by gitolkie 9 years ago)

Desktop Inspiron 1 2320 Black Screen When Restarting
(Posted by tmiskkevi 10 years ago)

I Need The Eithernet Drivers For My Dell 560 Desktop Computer, Is It Free
(Posted by Punaanklet 10 years ago)

Turn Off Touch Screen On Dell Inspiron One 2330
I believe the touch screen is interfering with one of my applications, to verify I like to temporary...
I believe the touch screen is interfering with one of my applications, to verify I like to temporary...
(Posted by ericdahlberg46 10 years ago)

How Do I Enable My Touch Screen On Dell Inspiron One 2330
My touch screen stopped working completely.
My touch screen stopped working completely.
(Posted by my3boys 11 years ago)