
Dell Inspiron One 2320 Support Question
Dell Inspiron One 2320 Support Question
Find answers below for this question about Dell Inspiron One 2320.Need a Dell Inspiron One 2320 manual? We have 3 online manuals for this item!
Question posted by bigGuapu on November 23rd, 2013
How To Detach Stand From Dell Inspiron 2320
The person who posted this question about this Dell product did not include a detailed explanation. Please use the "Request More Information" button to the right if more details would help you to answer this question.
Current Answers
Related Dell Inspiron One 2320 Manual Pages
Quick Start Guide (PDF) - Page 1
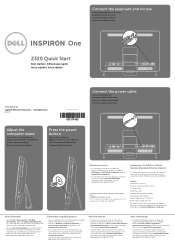
... Conecte el teclado y el mouse Conecte o teclado e o mouse
One
2320 Quick Start
Snel starten | Démarrage rapide Inicio rápido | Início rápido
Uniquely Dell support.dell.com/manuals | www.dell.com
2011 - 07
Printed in China
0GX7TPA00
Adjust the computer stand
Pas de stand van de computer aan Réglez le socle inclinable...
Owners Manual - Page 2
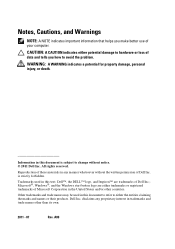
... used in this text: Dell™, the DELL™ logo, and Inspiron™ are either trademarks or registered trademarks of data and tells you make better use of Dell Inc.; A00
WARNING: A... are trademarks of your computer. Information in trademarks and trade names other countries.
Dell Inc. CAUTION: A CAUTION indicates either the entities claiming the marks and names...
Owners Manual - Page 15
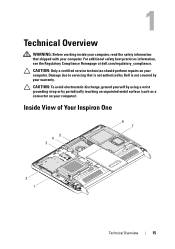
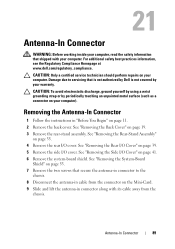
For additional safety best practices information, see the Regulatory Compliance Homepage at dell.com/regulatory_compliance. Inside View of Your Inspiron One
45 3
6 7
2 1
Technical Overview
15 Damage due to servicing that shipped with your computer).
CAUTION: Only a certified service technician should perform repairs on your computer. 1
...
Owners Manual - Page 35
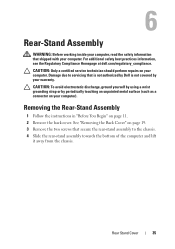
... avoid electrostatic discharge, ground yourself by using a wrist grounding strap or by your warranty. Rear Stand Cover
35
6
Rear-Stand Assembly
WARNING: Before working inside your computer, read the safety information that is not authorized by Dell is not covered by periodically touching an unpainted metal surface (such as a connector on page 19...
Owners Manual - Page 37
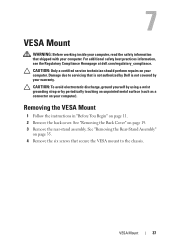
...VESA Mount
37 For additional safety best practices information, see the Regulatory Compliance Homepage at dell.com/regulatory_compliance. CAUTION: To avoid electrostatic discharge, ground yourself by using a wrist grounding...the chassis.
See "Removing the Back Cover" on your computer).
See "Removing the Rear-Stand Assembly"
on page 35. 4 Remove the six screws that secure the VESA mount to...
Owners Manual - Page 39
For additional safety best practices information, see the Regulatory Compliance Homepage at dell.com/regulatory_compliance. CAUTION: To avoid electrostatic discharge, ground yourself by using a wrist grounding...on page 35. 4 Remove the four screws that is not authorized by Dell is not covered by periodically touching an unpainted metal surface (such as a connector on page 19. 3 Remove the rear...
Owners Manual - Page 43
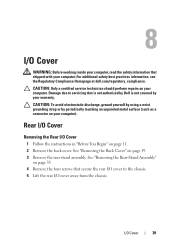
...in "Before You Begin" on page 19. 3 Remove the rear-stand assembly. See "Removing the Rear I /O cover.
See "Removing the Rear-Stand Assembly"
on page 35. 4 Remove the rear I /O Cover" ...by your computer).
For additional safety best practices information, see the Regulatory Compliance Homepage at dell.com/regulatory_compliance. See "Removing the Back Cover" on page 11. 2 Remove the back ...
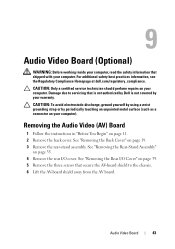
Owners Manual - Page 47
... working inside your computer, read the safety information that is not authorized by Dell is not covered by periodically touching an unpainted metal surface (such as a connector... yourself by using a wrist grounding strap or by your computer. See "Removing the Rear-Stand Assembly"
on page 19. 3 Remove the rear-stand assembly. See "Removing the Back Cover" on page 35. 4 Remove the VESA mount...
Owners Manual - Page 51
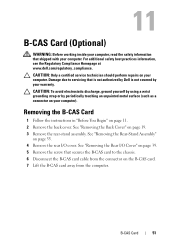
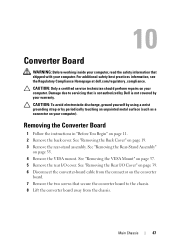
... card to the chassis. 6 Disconnect the B-CAS card cable from the connector on your warranty. See "Removing the Rear-Stand Assembly"
on page 39. 5 Remove the screw that is not authorized by Dell is not covered by periodically touching an unpainted metal surface (such as a connector on your computer.
B-CAS Card
51...
Owners Manual - Page 53
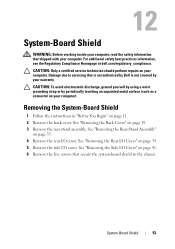
..." on page 11. 2 Remove the back cover. System-Board Shield
53 See "Removing the Rear-Stand Assembly"
on page 39. 5 Remove the side I /O cover. For additional safety best practices information, see the Regulatory Compliance Homepage at dell.com/regulatory_compliance. See "Removing the Rear I/O Cover" on page 35. 4 Remove the rear I /O cover. See...
Owners Manual - Page 57
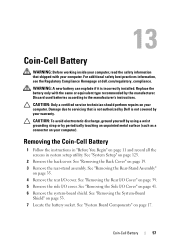
... is not authorized by Dell is incorrectly installed. Removing the Coin-Cell Battery
1 Follow the instructions in "Before You Begin" on page 19. 3 Remove the rear-stand assembly. See "Removing ... unpainted metal surface (such as a connector on page 125.
2 Remove the back cover. See "Removing the Rear-Stand Assembly"
on page 35. 4 Remove the rear I /O Cover" on page 41. 6 Remove the system-board...
Owners Manual - Page 61
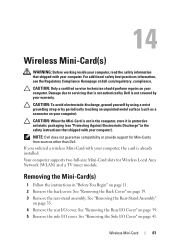
... on your computer. See "Removing the Rear-Stand Assembly"
on page 19. 3 Remove the rear-stand assembly.
NOTE: Dell does not guarantee compatibility or provide support for ...Against Electrostatic Discharge" in protective antistatic packaging (see the Regulatory Compliance Homepage at dell.com/regulatory_compliance.
CAUTION: Only a certified service technician should perform repairs on ...
Owners Manual - Page 65
...a wrist grounding strap or by their edges, and avoid touching pins and contacts.
See "Removing the Rear-Stand Assembly"
on page 35. 4 Remove the rear I /O Cover" on page 41. 6 Remove the ..." on page 19. 3 Remove the rear-stand assembly. 15
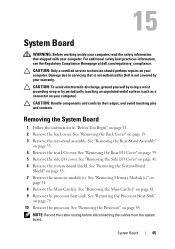
System Board
WARNING: Before working inside your computer, read the safety information that is not authorized by Dell is not covered by your warranty. See ...
Owners Manual - Page 71
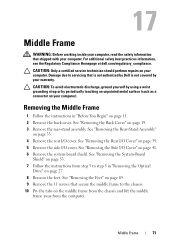
... Regulatory Compliance Homepage at dell.com/regulatory_compliance. Removing the Middle Frame
1 Follow the instructions in "Removing the Optical
Drive" on page 19. 3 Remove the rear-stand assembly. See "Removing ... I/O Cover" on page 35. 4 Remove the rear I /O cover. See "Removing the Rear-Stand Assembly"
on page 41. 6 Remove the system-board shield. Middle Frame
71 CAUTION: Only a certified...
Owners Manual - Page 75
... page 35. 4 Remove the VESA mount. See "Removing the Rear-Stand Assembly"
on page 19. 3 Remove the rear-stand assembly.
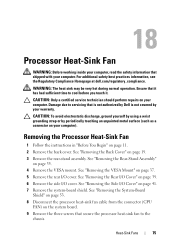
18
Processor Heat-Sink Fan
WARNING: Before working inside your computer... 37. 5 Remove the rear I /O cover. Damage due to servicing that is not authorized by Dell is not covered by periodically touching an unpainted metal surface (such as a connector on the system board...
Owners Manual - Page 79

...the heat transfer areas on page 19. 3 Remove the rear-stand assembly. See "Removing the Rear-Stand Assembly" on page 35. 4 Remove the rear I /O ...Cover" on your computer. See "Removing the Side I /O cover. Ensure that it .
See "Removing the System-Board Shield" on your computer). Damage due to servicing that is not authorized by Dell...
Owners Manual - Page 83
...dell.com/regulatory_compliance.
See "Removing the Rear-Stand Assembly"
on page 53. 7 Remove the processor heat-sink. See "Removing the System-Board
Shield" on page 35. 4 Remove the rear I/O cover.
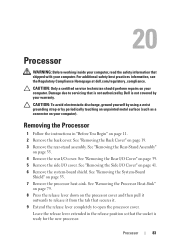
Damage due to servicing that is not authorized by Dell... the release lever down on page 19. 3 Remove the rear-stand assembly. 20
Processor
WARNING: Before working inside your computer, read the...
Owners Manual - Page 89
...the Regulatory Compliance Homepage at www.dell.com/regulatory_compliance.
See "Removing the Side I/O Cover" on page 35. 4 Remove the rear I/O cover.
See "Removing the Rear-Stand Assembly"
on page 41. ...: Before working inside your computer, read the safety information that is not authorized by Dell is not covered by periodically touching an unpainted metal surface (such as a connector on...
Owners Manual - Page 97
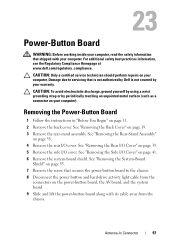
... See "Removing the Rear-Stand Assembly"
on page 35. 4 Remove the rear I /O cover. For additional safety best practices information, see the Regulatory Compliance Homepage at www.dell.com/regulatory_compliance.
See "Removing.... See "Removing the Side I/O Cover" on page 19. 3 Remove the rear-stand assembly. Damage due to the chassis. 8 Disconnect the power button and hard-drive activity...
Owners Manual - Page 132
...
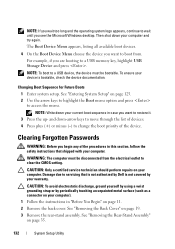
Clearing Forgotten Passwords
WARNING: Before you see the Microsoft Windows desktop. See "Entering System Setup" on your computer. See "Removing the Rear-Stand Assembly" on page 19. 3 Remove the rear-stand assembly. NOTE: To boot to restore it. 3 Press the... section, follow the safety instructions that is not authorized by Dell is bootable, check the device documentation.
Similar Questions

How To Adjust Monitor Stand Inspiron One Not Firm
(Posted by antcrow 10 years ago)

How To Adjust Monitor Display Stand Inspiron On2320
(Posted by ngjva 10 years ago)

