
Dell Inspiron One 2320 Support Question
Dell Inspiron One 2320 Support Question
Find answers below for this question about Dell Inspiron One 2320.Need a Dell Inspiron One 2320 manual? We have 3 online manuals for this item!
Question posted by Rruettore on December 18th, 2013
I Can't Get The Dell Ispirion 2320 To Stand Up
The person who posted this question about this Dell product did not include a detailed explanation. Please use the "Request More Information" button to the right if more details would help you to answer this question.
Current Answers
Related Dell Inspiron One 2320 Manual Pages
Quick Start Guide (PDF) - Page 1
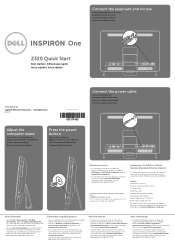
...2320 Quick Start
Snel starten | Démarrage rapide Inicio rápido | Início rápido
Uniquely Dell support.dell.com/manuals | www.dell.com
2011 - 07
Printed in China
0GX7TPA00
Adjust the computer stand
Pas de stand...die voor uw desktop beschikbaar zijn.
• Ga naar dell.com/ContactDell als u contact met Dell wilt opnemen in the United States, can call 800-WWW-DELL (800-999-...
Owners Manual - Page 35
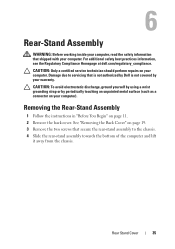
... the instructions in "Before You Begin" on your computer. See "Removing the Back Cover" on your computer).
Rear Stand Cover
35 For additional safety best practices information, see the Regulatory Compliance Homepage at dell.com/regulatory_compliance. CAUTION: To avoid electrostatic discharge, ground yourself by using a wrist grounding strap or by your computer...
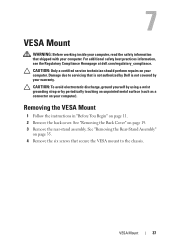
Owners Manual - Page 37
...the chassis.
For additional safety best practices information, see the Regulatory Compliance Homepage at dell.com/regulatory_compliance. Removing the VESA Mount
1 Follow the instructions in "Before You ...or by your computer. See "Removing the Rear-Stand Assembly"
on page 35. 4 Remove the six screws that is not authorized by Dell is not covered by periodically touching an unpainted metal...
Owners Manual - Page 39
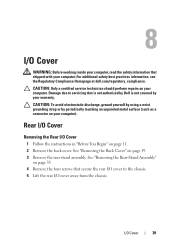
...read the safety information that secure the rear I/O cover to servicing that is not authorized by Dell is not covered by periodically touching an unpainted metal surface (such as a connector on your ... should perform repairs on page 19. 3 Remove the rear-stand assembly. Rear I/O Cover
Removing the Rear I /O Cover
39 See "Removing the Rear-Stand Assembly"
on page 11. 2 Remove the back cover....
Owners Manual - Page 43
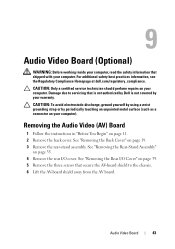
...ground yourself by using a wrist grounding strap or by your warranty. See "Removing the Rear-Stand Assembly"
on your computer).
See "Removing the Back Cover" on page 11. 2 Remove...Begin" on page 19. 3 Remove the rear-stand assembly.
For additional safety best practices information, see the Regulatory Compliance Homepage at dell.com/regulatory_compliance. 9
Audio Video Board (Optional)...
Owners Manual - Page 47
...your computer.
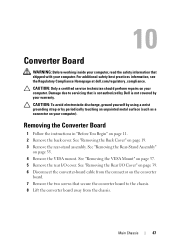
See "Removing the VESA Mount" on page 19. 3 Remove the rear-stand assembly. Main Chassis
47 CAUTION: To avoid electrostatic discharge, ground yourself by using a ... computer). For additional safety best practices information, see the Regulatory Compliance Homepage at dell.com/regulatory_compliance. Removing the Converter Board
1 Follow the instructions in "Before You Begin...
Owners Manual - Page 51
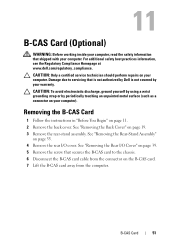
... inside your computer, read the safety information that shipped with your warranty.
See "Removing the Rear-Stand Assembly"
on page 35. 4 Remove the rear I /O Cover" on page 39. 5 Remove the screw that is not authorized by Dell is not covered by periodically touching an unpainted metal surface (such as a connector on the...
Owners Manual - Page 53
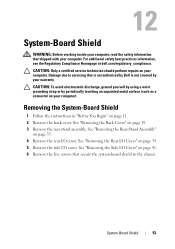
...that shipped with your warranty. For additional safety best practices information, see the Regulatory Compliance Homepage at dell.com/regulatory_compliance. Damage due to the chassis. CAUTION: To avoid electrostatic discharge, ground yourself by using...Begin" on your computer.
See "Removing the Rear-Stand Assembly"
on page 35. 4 Remove the rear I /O Cover" on page 19. 3 Remove the rear...
Owners Manual - Page 57
...on page 19. 3 Remove the rear-stand assembly.
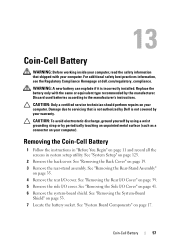
See "Removing the Back Cover" on page 53. 7 Locate the battery socket. See "Removing the Rear-Stand Assembly"
on page 17. See "...Cell Battery
WARNING: Before working inside your computer, read the safety information that is not authorized by Dell is incorrectly installed.
See "Removing the Side I/O Cover" on page 39. 5 Remove the side ...
Owners Manual - Page 61
..." on page 19. 3 Remove the rear-stand assembly.
See "Removing the Back Cover" on page 39. 5 Remove the side I /O cover.
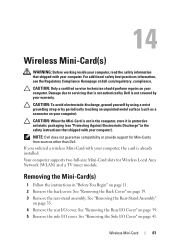
NOTE: Dell does not guarantee compatibility or provide support for ...computer). Damage due to servicing that shipped with your computer). See "Removing the Rear-Stand Assembly"
on page 41.
CAUTION: Only a certified service technician should perform repairs on ...
Owners Manual - Page 65
...4 Remove the rear I /O Cover" on page 79. 10 Remove the processor.
See "Removing the Rear-Stand Assembly"
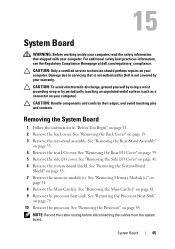
on your computer). See "Removing the System-Board
Shield" on page 83. See "Removing the Processor"... safety best practices information, see the Regulatory Compliance Homepage at dell.com/regulatory_compliance. 15
System Board
WARNING: Before working inside your computer, read the safety ...
Owners Manual - Page 71
..., ground yourself by using a wrist grounding strap or by your warranty. See "Removing the Rear-Stand Assembly"
on your computer. CAUTION: Only a certified service technician should perform repairs on page 35.... that is not authorized by Dell is not covered by periodically touching an unpainted metal surface (such as a connector on page 19. 3 Remove the rear-stand assembly. See "Removing the...
Owners Manual - Page 75
... VESA mount.
For additional safety best practices information, see the Regulatory Compliance Homepage at dell.com/regulatory_compliance. See "Removing the System-Board
Shield" on page 53. 8 Disconnect...discharge, ground yourself by using a wrist grounding strap or by your warranty. See "Removing the Rear-Stand Assembly"
on page 37. 5 Remove the rear I /O cover. See "Removing the Rear I/O...
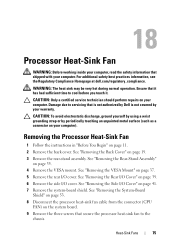
Owners Manual - Page 79

...Ensure that it .
For additional safety best practices information, see the Regulatory Compliance Homepage at dell.com/regulatory_compliance. The oils in your skin can reduce the heat transfer capability of the thermal ... 1 Follow the instructions in "Before You Begin" on page 19. 3 Remove the rear-stand assembly. See "Removing the Side I/O Cover" on the processor heat-sink. WARNING: The heat...
Owners Manual - Page 83
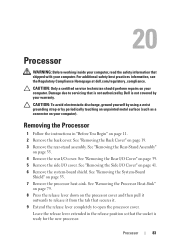
... in the release position so that secures it from the tab that the socket is not covered by Dell is ready for the new processor.
Processor
83
See "Removing the Rear I /O cover. See "... on page 53. 7 Remove the processor heat-sink. See "Removing the Rear-Stand Assembly"
on page 11. 2 Remove the back cover. For additional safety best practices information, see the Regulatory...
Owners Manual - Page 89
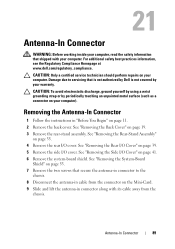
...your computer. For additional safety best practices information, see the Regulatory Compliance Homepage at www.dell.com/regulatory_compliance. Removing the Antenna-In Connector
1 Follow the instructions in cable from the...
chassis. 8 Disconnect the antenna-in "Before You Begin" on page 19. 3 Remove the rear-stand assembly. See "Removing the Side I/O Cover" on page 35. 4 Remove the rear I /O ...
Owners Manual - Page 93
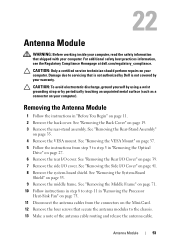
... You Begin" on page 27. 6 Remove the rear I/O cover. See "Removing the Rear-Stand Assembly"
on your computer. CAUTION: To avoid electrostatic discharge, ground yourself by using a wrist grounding...Antenna Module
93 For additional safety best practices information, see the Regulatory Compliance Homepage at dell.com/regulatory_compliance. See "Removing the VESA Mount" on page 37. 5 Follow the ...
Owners Manual - Page 101
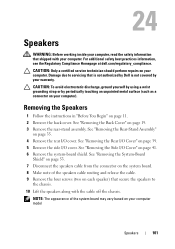
...page 19. 3 Remove the rear-stand assembly. Damage due to
the chassis. 10 Lift the speakers along with your computer. See "Removing the Rear-Stand Assembly"
on your computer model
...on your computer.
For additional safety best practices information, see the Regulatory Compliance Homepage at dell.com/regulatory_compliance.
See "Removing the Rear I /O cover. NOTE: The appearance of the ...
Owners Manual - Page 109
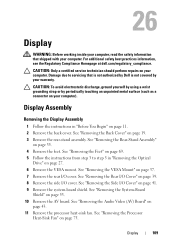
... safety information that is not authorized by Dell is not covered by periodically touching an unpainted metal surface (such as a connector on your computer. See "Removing the Rear-Stand Assembly"
on page 39. 8 Remove ..." on page 37. 7 Remove the rear I /O Cover" on page 19. 3 Remove the rear-stand assembly. See "Removing the VESA Mount" on page 53. 10 Remove the AV board. See "Removing ...
Owners Manual - Page 132
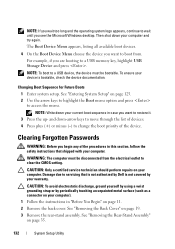
..." on page 19. 3 Remove the rear-stand assembly. NOTE: Write down your computer). 1 Follow the instructions in this section, follow the safety instructions that is not authorized by Dell is not covered by periodically touching an unpainted metal surface (such as a connector ... you begin any of the device. Clearing Forgotten Passwords
WARNING: Before you see the Microsoft Windows desktop.
Similar Questions

How To Adjust Stand Dell Inspiron One 2320 Manual
(Posted by krislizw 10 years ago)

Desktop Inspiron 1 2320 Black Screen When Restarting
(Posted by tmiskkevi 10 years ago)

How To Bypass A Bios Password On Dell Desktop Inspiron One 2320
(Posted by bexoxo 10 years ago)
