
Dell Inspiron 630M Support Question
Dell Inspiron 630M Support Question
Find answers below for this question about Dell Inspiron 630M - Replacement - E1405 640M XPS M140 Series Laptop Battery Fits Y4493 312-0373 UG679 312-0450 DH074 312-0451 451-10284 451-10285 451-10351 C9551 RC107 TC023 Y9943.Need a Dell Inspiron 630M manual? We have 1 online manual for this item!
Question posted by srirahiron on June 7th, 2014
How To Turn On Bluetooth On Dell Inspiron 630m
The person who posted this question about this Dell product did not include a detailed explanation. Please use the "Request More Information" button to the right if more details would help you to answer this question.
Current Answers
Related Dell Inspiron 630M Manual Pages
Owner's Manual - Page 2

..." on page 163. Trademarks used in this text: Dell, the DELL logo, Inspiron, Dell Precision, Dimension, DellNet, OptiPlex, Latitude, PowerEdge, PowerConnect, PowerVault, PowerApp, Dell TravelLite, ExpressCharge, and Strike Zone are not applicable.
is a registered trademark owned by Dell under license; Bluetooth is strictly forbidden. Other trademarks and trade names may...
Owner's Manual - Page 8
... System 99 Using Microsoft Windows XP System Restore 100 Using Dell PC Restore by Symantec 101 Using the Operating System CD 103
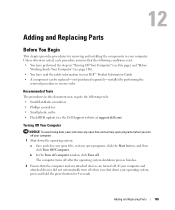
12 Adding and Replacing Parts
Before You Begin 105 Recommended Tools 105 Turning Off Your Computer 105 Before Working Inside Your Computer 106
Battery 108 Removing a Battery 108 Installing a Battery 108
Hard Drive 108 Returning...
Owner's Manual - Page 9

Keyboard 125 Removing the Keyboard 126 Replacing the Keyboard 127
Internal Card With Bluetooth® Wireless Technology 127
Coin-Cell Battery 128 Removing the Coin-Cell Battery 128 Replacing the Coin-Cell Battery 129
13 Appendix
Specifications 131
Using the System Setup Program 137 Overview 137 Viewing the System Setup Screen 137 System Setup Screen 138 Commonly...
Owner's Manual - Page 18
... only if you ordered the card with Bluetooth wireless technology is enabled.
NOTE: The card with your card.
www.dell.com | support.dell.com
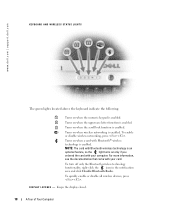
KEYBOARD AND WIRELESS STATUS LIGHTS
The green lights located above the keyboard indicate the following:
9
Turns on when the numeric keypad is enabled. Turns on when a card with your computer. To...
Owner's Manual - Page 29

... #PA1089586 (How Do I Transfer Files From My Old Computer to My New Dell Computer Using the Microsoft® Windows® XP Operating System?). Follow the instructions on the new computer, click Next. 2 On...On the Now go to your old computer screen on the screen. NOTE: Access to the Dell Knowledge Base document may arrive in the box in some countries. See the documentation that it...
Owner's Manual - Page 42

...out settings for entering standby mode, turning off the display, and turning off computer, press and hold ...battery power.
www.dell.com | support.dell.com
Hibernate Mode
Hibernate mode conserves power by pressing a key or touching the touch pad.
Keep the default Portable/Laptop... that came with your operating system. Windows XP controls the performance level of the following methods...
Owner's Manual - Page 47
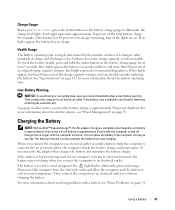
... more information about resolving problems with the computer turned on. Charge Gauge
Before you insert a battery, press the status button on the battery charge gauge to an electrical outlet. For example, if the battery has 80 percent of the charge capacity remains, and you should consider replacing the battery. Each light represents incremental degradation. Then connect...
Owner's Manual - Page 91

...Turn on page 112). • Run the Dell Diagnostics (see page 77). CHECK THE EXPRESSCA RD - I F Y O U H A V E P R O B L E M S W I D E D B Y D E L L - I F Y O U H A V E P R O B L E M S W I T H A N E X P R E S S C A R D N O T P R O V I T H A D E L L - The battery charge may be depleted.
1 Reinstall the battery...blinking, the computer has power. Replace the network cable. RESTART THE ...
Owner's Manual - Page 105
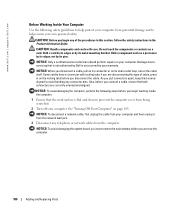
...; You have read the safety information in your Dell™ Product Information Guide. • A component can be replaced-or if purchased separately-installed by performing the
removal procedure in this page) and "Before
Working Inside Your Computer" (see the Dell Support website at support.dell.com)
Turning Off Your Computer
NOTICE: To avoid losing data...
Owner's Manual - Page 106
... metal mounting bracket.
See "Turning Off Your Computer" on a card. As you service the computer.
106
Adding and Replacing Parts NOTICE: To disconnect ...avoid damaging the system board, you must remove the main battery before you pull connectors apart, keep them evenly aligned to...flat and clean to servicing that is not authorized by Dell is not covered by its pins.
Also, before you...
Owner's Manual - Page 107

... hard drive. See "Removing a Media Memory Card or Blank" on page 72.
10 Close the display and turn the computer upside down on the bottom of the computer, and then pull the battery out of the battery bay.
1
2
1 battery
2 battery-bay latch release
6 Remove the optical drive, if installed, from their electrical outlets. 5 Remove the...
Owner's Manual - Page 108

... operating system, drivers, and utilities on page 105. 2 Turn the computer over, and loosen the two captive screws in the hard drive cover.
108
Adding and Replacing Parts
NOTE: If you remove the hard drive from the computer. www.dell.com | support.dell.com
Battery
Removing a Battery
CAUTION: Before performing these procedures, disconnect the modem from...
Owner's Manual - Page 111
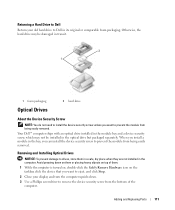
... the module bay and a device security screw, which may be installed in its original or comparable foam packaging.
Adding and Replacing Parts
111 Returning a Hard Drive to Dell
Return your display and turn the computer upside-down on them or placing heavy objects on the taskbar, click the device that you want to...
Owner's Manual - Page 112
www.dell.com | support.dell.com
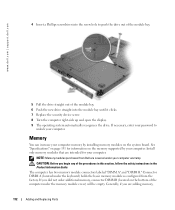
4 Insert a Phillips screwdriver into the module bay until it clicks. 7 Replace the security device screw. 8 Turn the computer right-side up and ...the computer under the keyboard) holds the basic memory module as configured from Dell are adding memory,
112
Adding and Replacing Parts Install only memory modules that are intended for information on the system ...
Owner's Manual - Page 115

...The memory module connector labeled "DIMM A" is difficult to close may damage your computer.
7 Insert the battery into the battery bay, or connect the AC adapter to the computer. To confirm the amount of memory installed in "Before.... See "Hard Drive" on page 108. 9 Turn on the back of the computer. 1
1 tab in connector slot
6 Replace the memory module cover and tighten the screws.
Owner's Manual - Page 118

...the computer boots, it . To confirm the amount of the hinge replacement procedure. 11 Insert the battery into the battery bay, or connect the AC adapter to close , remove the module...dell.com | support.dell.com
1
1 tab in the computer, click the Start button, click Help and Support, and then click Computer Information.
118
Adding and Replacing Parts
See "Hard Drive" on page 108. 13 Turn...
Owner's Manual - Page 124

.... 1 Follow the procedures in "Before You Begin" on page 105. 2 Remove the battery (see page 108). 3 Remove the two screws inside the computer. NOTICE: To avoid damaging... force is used. www.dell.com | support.dell.com
NOTICE: To avoid damaging the system board, you must remove the main battery before you begin working inside the battery bay.
1
1 screws (2) 4 Turn the computer right-side up...
Owner's Manual - Page 125
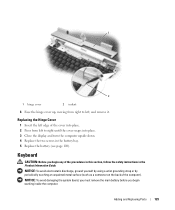
...to right until the cover snaps into place. 3 Close the display and turn the computer upside down. 4 Replace the two screws in the Product Information Guide.
NOTICE: To avoid electrostatic ...follow the safety instructions in the battery bay. 5 Replace the battery (see page 108).
Keyboard
CAUTION: Before you begin any of the computer). Adding and Replacing Parts
125 NOTICE: To avoid ...
Owner's Manual - Page 127

... board, you must remove the main battery before you begin any of the compartment so that you begin working inside the computer.
Internal Card With Bluetooth® Wireless Technology
CAUTION: Before you can disconnect the card from its cable and remove the card from the computer. 5 To replace the card, connect the card...
Owner's Manual - Page 139

... highlight the device from www.dell.com. Appendix
139
Place information such as possible, replace any devices installed in this procedure to boot the Dell Diagnostics on the diagnostics utility ...spare batteries that you plan to carry with you want to an electrical outlet.
3 Turn on your hard drive.)
1 Shut down your computer and press immediately when the blue DELL™...
Similar Questions


