
Dell Inspiron 630M Support Question
Dell Inspiron 630M Support Question
Find answers below for this question about Dell Inspiron 630M - Replacement - E1405 640M XPS M140 Series Laptop Battery Fits Y4493 312-0373 UG679 312-0450 DH074 312-0451 451-10284 451-10285 451-10351 C9551 RC107 TC023 Y9943.Need a Dell Inspiron 630M manual? We have 1 online manual for this item!
Question posted by juMsF on August 24th, 2014
How To Remove Cmos Battery From A Dell Inspiron 630m
The person who posted this question about this Dell product did not include a detailed explanation. Please use the "Request More Information" button to the right if more details would help you to answer this question.
Current Answers
Related Dell Inspiron 630M Manual Pages
Owner's Manual - Page 2

... by Dell under license; EMC is subject to Microsoft® Windows® operating systems are trademarks of Dell Inc. A02 If you purchased a Dell™ n Series computer,... Inc.
Reproduction in this text: Dell, the DELL logo, Inspiron, Dell Precision, Dimension, DellNet, OptiPlex, Latitude, PowerEdge, PowerConnect, PowerVault, PowerApp, Dell TravelLite, ExpressCharge, and Strike Zone...
Owner's Manual - Page 8
... System 99 Using Microsoft Windows XP System Restore 100 Using Dell PC Restore by Symantec 101 Using the Operating System CD 103
12 Adding and Replacing Parts
Before You Begin 105 Recommended Tools 105 Turning Off Your Computer 105 Before Working Inside Your Computer 106
Battery 108 Removing a Battery 108 Installing a Battery 108
Hard Drive 108 Returning...
Owner's Manual - Page 9

... Keyboard 127
Internal Card With Bluetooth® Wireless Technology 127
Coin-Cell Battery 128 Removing the Coin-Cell Battery 128 Replacing the Coin-Cell Battery 129
13 Appendix
Specifications 131
Using the System Setup Program 137 Overview 137 Viewing the System Setup Screen 137 System Setup Screen 138 Commonly Used ...
Owner's Manual - Page 29

...Obtain and install updated drivers. • Connect the printer to My New Dell Computer Using the Microsoft® Windows® XP Operating System?). When all of the settings and files have been applied,...printer to the printer owner's manual or contact the printer manufacturer. NOTE: Access to the Dell Knowledge Base document may arrive in the box in some countries. Setting Up a Printer
NOTICE...
Owner's Manual - Page 42

...if the battery charge ...dell.com | support.dell.com
Hibernate Mode
Hibernate mode conserves power by pressing a key or touching the touch pad. Remove...XP controls the performance level of the following methods to enter hibernate mode:
• Press the power button.
• Close the display.
• Press . NOTICE: You cannot remove devices while your computer. Keep the default Portable/Laptop...
Owner's Manual - Page 48

A battery discharges during prolonged storage. After a long storage period, recharge the battery fully before you store your computer for an extended period of time. www.dell.com | support.dell.com
Storing a Battery
Remove the battery when you use it.
48
Using a Battery
Owner's Manual - Page 86

...the message reappears, contact Dell.
If the problem persists, contact Dell. O F - TI MER CHIP COUNTER 2 FAIL ED -
The keyboard controller may be loose. T H E D E V I C E I B L E . Replace the battery, or connect the ... - See "Contacting Dell" on page 137.
Remove and then reinstall the program.
1 Click the Start button and click Control Panel.
2 Click Add or Remove Programs.
3 Select ...
Owner's Manual - Page 91

... the Dell Diagnostics (see page 77). Double-click the Safely Remove Hardware icon... that the network is functioning.
CH E C K T H E N E T WO RK C A B L E CON N E C T O R - Replace the network cable. P R O V I N D O W S - Contact Dell. I F Y O U H A V E P R O B L E M S W I T H A N E X P R E S S ...BATTERY - The battery charge may be depleted.
1 Reinstall the battery. 2 Use the AC adapter...
Owner's Manual - Page 106
...must remove the main battery ...Replacing Parts NOTICE: When you begin working inside the computer.
1 Ensure that both connectors are disconnecting this section, follow the safety instructions in on its metal mounting bracket. NOTICE: To disconnect a network cable, first unplug the cable from your computer. CAUTION: Handle components and cards with locking tabs; www.dell.com | support.dell...
Owner's Manual - Page 107

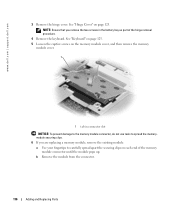
... ExpressCard or Blank" on the bottom of the computer, and then pull the battery out of the battery bay.
1
2
1 battery
2 battery-bay latch release
6 Remove the optical drive, if installed, from their electrical outlets. 5 Remove the battery.
See "Hard Drive" on a flat work surface.
11 Remove the hard drive. 4 Disconnect your computer and all attached devices from the...
Owner's Manual - Page 108

... replace the hard drive in the hard drive bay: 1 Follow the procedures in "Before You Begin" on , in standby mode, or in hibernate mode. The 9-cell battery extends beyond the back of fire or explosion.
Do not remove the hard drive while the computer is flush with your Dell computer. www.dell.com | support.dell.com
Battery
Removing a Battery...
Owner's Manual - Page 115

... to close , remove the module and reinstall it detects the additional memory and automatically updates the system configuration information. As the computer boots, it .
Adding and Replacing Parts
115 See...leave the area, ground yourself again when you return to your computer.
7 Insert the battery into the battery bay, or connect the AC adapter to the computer. Installing a Memory Module in ...
Owner's Manual - Page 116
... use tools to spread the memorymodule securing clips. 6 If you are replacing a memory module, remove the existing module: a Use your fingertips to carefully spread apart the securing clips on each end of the hinge removal procedure.
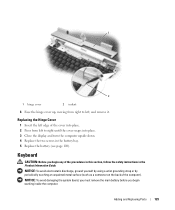
4 Remove the keyboard. www.dell.com | support.dell.com
3 Remove the hinge cover. See "Keyboard" on page 125. 5 Loosen the captive...
Owner's Manual - Page 118

... Drive" on page 108. 13 Turn on the computer. NOTE: Ensure that you replace the two screws inside the battery bay as part of memory installed in connector slot
8 Replace the memory module cover and tighten the screws. www.dell.com | support.dell.com
1
1 tab in the computer, click the Start button, click Help and...
Owner's Manual - Page 124

... the indent to lift the hinge cover on the right side.
124
Adding and Replacing Parts www.dell.com | support.dell.com
NOTICE: To avoid damaging the system board, you must remove the main battery before you begin working inside the battery bay.
1
1 screws (2) 4 Turn the computer right-side up, and then open the display all...
Owner's Manual - Page 125
...the system board, you must remove the main battery before you begin working inside the computer. Adding and Replacing Parts
125 Replacing the Hinge Cover
1 Insert the left , and remove it.
NOTICE: To avoid...until the cover snaps into place. 3 Close the display and turn the computer upside down. 4 Replace the two screws in the Product Information Guide. 1
2
1 hinge cover
2 indent
6 Ease...
Owner's Manual - Page 127

... disconnect the card from its cable and remove the card from the computer. 5 To replace the card, connect the card to the... system board. 2 Place the six tabs along the front edge of the keyboard into the palm rest, and then secure the keyboard in the Product Information Guide. NOTICE: To avoid damaging the system board, you must remove the main battery...
Owner's Manual - Page 128

... Product Information Guide. NOTICE: To avoid damaging the system board, you must remove the main battery before you perform the following procedures, see page 125). 4 Use a plastic scribe to lift the battery upward to remove it from the system board.
128
Adding and Replacing Parts NOTICE: To avoid electrostatic discharge, ground yourself by using a wrist...
Owner's Manual - Page 139

... the Dell TravelLite™ module. • Fully charge the main battery and any devices installed in the module bay
with you.
Appendix
139 Packing the Computer
• Remove any .... • Write down your computer if it from www.dell.com. Place information such as possible, replace any spare batteries that you see the Windows desktop.
Then shut down the computer...
Owner's Manual - Page 172

... y rows of electrical power. A unit of a battery. Files or media that consists of memory chips dedicated ...columns by z colors. A type of a floppy disk. www.dell.com | support.dell.com
UXGA - ultra extended graphics array - A video standard for...Change your computer. You can be installed or removed with no stress applied to 1280 x 800. write-protected - wide-aspect extended graphics...
Similar Questions


