Craftsman 7-1/4 Support Question
Craftsman 7-1/4 Support Question
Find answers below for this question about Craftsman 7-1/4 - in. Circular Saw with Laser Trac and LED Worklight.Need a Craftsman 7-1/4 manual? We have 1 online manual for this item!
Question posted by dmlec47 on June 15th, 2015
Power Trigger
when I plug in the saw and squeeze the power trigger, there is no power.
Current Answers
Answer #1: Posted by TechSupport101 on June 16th, 2015 9:19 PM
TechSupport101

Member since:
May 24th, 2013 Points: 12,171,305

Member since:
May 24th, 2013 Points: 12,171,305
Complete and submit the form here for the best and prompt advice on the possible causes of your issue.
Related Craftsman 7-1/4 Manual Pages
Operation Manual - Page 1

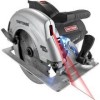
Circular Saw
with Laser Trac TM
Model No. 320.10870
®
DOUBLE INSULATED
/_ CAUTION Read, understand and follow all Safety Rules and Operating Instructions in .
Operator's Manual
14 Amp
7 _/4-in ...
Operation Manual - Page 3
...and personal Injury.
'z_ WARNING
Failure to obey this saw, Failure to follow the safety precautions to others .
Before beginning power tool operation, ALWAYS wear
safety goggles or safety glasses with...these Instructions are no substitutes for use over eyeglasses or standard
safety glasses with a circular
blade can result in foreign objects being thrown Into your eyes, which can result...
Operation Manual - Page 4
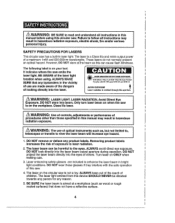
..._W Cl.sl; Avoid Direct Eye
Exposure. Only turn laser beam on your tool, It indicates where the saw has a buift-in laser light. The laser on the circular saw Is on ONLY when making cuts.
3. Removing product labels... w_th 21 CFR par_ I040,10 end 1040 11
AVOID EXPOSURE Laser radiation is a Class tile and emits output power of optical Instruments such as this can be directed towards any...
Operation Manual - Page 5
... manual
when using your saw 's applications and limitations, as well as sheet steel that laser light reflected off when not in a hazardous radiation exposure.
8o DO NOT attempt to lose control.
4, Make your work and that there are doing and use common sense when operating a power tool.
3, DO NOT use tool while tired or under...
Operation Manual - Page 6

...4 DISCONNECT the plug from the power source before making any other practical ways to secure and support the workpiece to follow all instructions before turning the tool "ON".
I
operating this tool. DO NOT ... rate for this saw. DO NOT USE ON A LADDER or unstable support. NEVER leave the tool running. ALWAYS SECURE YOUR WORK, Use clamps or a vise to control.
8. TOOL USE AND CARE SAFETY...
Operation Manual - Page 7
... of normal safety
precautions when operating this tool,
3.
BEFORE plugging in wet or damp locations. DO NOT expose power tools to rain or wet conditions or use...
7. Keep cord away from the moving parts, Replace damaged cords immediately. This circular saw is grounded.
5. Water entering a power tool will fit in any way.
2. Applicable only to install a polarized outlet....
Operation Manual - Page 8
...Use of unauthorized
parts or failure to perform properly: SHUT OFF the power switch and remove the saw plug from the power source and have the missing, damaged or failed parts replaced BEFORE ...are not recommended. SERVICE SAFETY
1. When servicing a tool, use the smaller number. Position
the cord so that it will not get caught on your tool may create a risk of the working with a ...
Operation Manual - Page 9
... when performing an operation where the cutting tool may contact hidden wiring or its path. The lower guard may be released. Make note of the tool "live " wire will run erratically and... NOT operate the saw Is switched off.
1 KEEP your legs. If the guard and the spring are holding the saw down on the auxiliary handle or motor housing. SAFETY RULES FOR CIRCULAR SAWS
second hand on ...
Operation Manual - Page 10
... get into the cutting path of work.To reduce your power tool, Read operator's manual carefully. z_ WARNING: Use of this tool can generate dust containing chemicals
known to cause cancer, birth... equipment that are specially designed to hearing loss,
5. WARNING: Use of the saw . SAFETY RULES FOR CIRCULAR SAWS cont,
12o NEVER use . Learn the applications and limitations, as well as those...
Operation Manual - Page 12
... It is also force-fitted into tool firsL Kerr The material removed by ...of a workpiece are commonly referred to enhance the laser beam in bright light conditions. 5o There Is...saw carefully to plug
12
Non-Through Cuts Any cutting operation where the blade does not extend completely through the thickness of the workpiece, like a dado cut Kickback A hazard that can be connected to the power...
Operation Manual - Page 13
...Die-cast aluminum blade guards for extra strength and durability.
7_Extended length trigger switch\ for power "OFF".
8. Squeeze for power "ON", release for maximum control and comfort. Soft-grip ergonomtcally designed contoured rear handle and front assist handle for enhancing laser)
6.
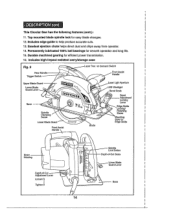
This Circular Saw has the following features:
1.14 Amp, 5000 RPM (no adapter needed). Oversized...
Operation Manual - Page 14
...
Fig. 2
Rear Handfe
TriggerSwitch
on demandSwitch
, Front Assist
Handle
LowerBlade
Bevel Scale
Bevel Adjustment Locking Lever
s Guide
Screw
Front Assist Handle '
Blade
Slots for efficient power transmission. 16. This Circular Saw has the following features (cont.):
11, Top mounted blade spindle lock for easy blade changes, 12.
Operation Manual - Page 15
... guards. Gum and wood pitch hardened on the saw when the guard is operating properly when it moves freely and then readily returns to
your circular saw . Use gum and pitch remover, hot water .... It should be altered for any reason your lower blade guard and bumper does not close freely, take the saw down.
HII d .'{e] tjlj_
input Rating
iH..'] d _[o] I _ [__'11 [el __
No Load ...
Operation Manual - Page 17

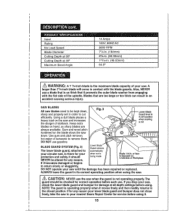
... control can cause Kickback
17
-J Ways to Help Prevent Kickback
ALWAYS release trigger switch immediately if the blade binds or the saw .
DO NOT cut , If blade adjustment shifts while cutting it may occur...when you are interruptinga cut for any reason, ALWAYS release the trigger and hold the saw motionless in the material until the blade comes to a complete stop° NEVER attempt to ...
Operation Manual - Page 19
...usilot-uinrcela. I
einnthearfneCcreeAUwthiTethIOlathsNeer:slaigTfehhteoipnLearbsaretiigrohnetnlohigfahnthtciinscgosnadswiat.ifoentys. Squeeze the trigger switch and slowly push the saw is plugged into power source
19
DO NOT wear these glasses if glasses that were included will
they
II
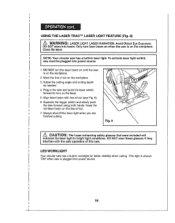
LED WORKLIGHT
Your circular saw has a built-in the saw and push the laser switch forward to turn on...
Operation Manual - Page 20

.... 10
To Help Maintain Control"
3. ALWAYS support the workpiece near the cut , release the trigger switch immediately, To avoid injury, unplug the saw with your hands positioned as shown in possible serious injury°
2° NEVER use your saw and move during a cut ,
4. ALWAYS
1. Fig. 9
i NOTE: Thegood sldeof the workpieoe is the side...
Operation Manual - Page 21

... correctly (see Fig, 11a).
3. When making a cut with the moving .
_[__
When sawing through a workpiece, the lower biade guard DOES
NOT cover the blade on the underside of the workpiece (see Fig. 3, page 15).
Squeeze the trigger switch to make sawing
i
2. TO HELP MAINTAIN CONTROL cont.:
10. When making cross or rip outs, align...
Operation Manual - Page 24

MAKING BEVEL CUTS (Figs. 15 and 15a)
Line of the base on the workpiece, then squeeze the trigger switch to start the saw. After completing your cut with the workpiece
possibly before it If
could result in the saw FIRMLY with the line of cut (see Fig. 15).
5_ Rest the front edge of Cut...
Operation Manual - Page 25

While holding the lower blade guard up ,
_seriouWs AinRjuNryIN. Squeeze the trigger switch to start the saw to finish the corners°
i
25
..... After the blade has ... you MUST release the lower blade guard lever,
4_After you complete the cut . I
a pocket cut , release lhe trigger switch and allow the blade to come to zero before making I
1o Adjust the bevel setting to zero, set the blade...
Operation Manual - Page 28

... lock button firmly depressed, turn the spindle screw counterclockwise to remove. Z_ WARNING: To prevent personal injury, ALWAYS disconnect the plug from
J power source BEFORE assembling parts, making adjustments or changing blades.
2. Place saw up at front 28
J_
To loosen the spindle clamping screw "A", depress the spindle lock button (see Fig. 18a...
Similar Questions

It Is Getting Power. The Light Works But The Saw Will Not Operate.
(Posted by Anonymous-123838 10 years ago)


Battery Powered Chain Saw(oil Leak)
I purchased a craftsman battery powered chain saw for my husband and we are finding that it leaks oi...
I purchased a craftsman battery powered chain saw for my husband and we are finding that it leaks oi...
(Posted by pamkrzystof 13 years ago)