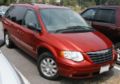
2006 Chrysler Town & Country Support Question
2006 Chrysler Town & Country Support Question
Find answers below for this question about 2006 Chrysler Town & Country.Need a 2006 Chrysler Town & Country manual? We have 1 online manual for this item!
Question posted by skiere5 on January 6th, 2013
How To Remove Map Light Bulb Module
Both bulbs in the overhead Map Lights have burned / shorted out. The 'Bulb Module' part needs to be replaced; Does anyone know the steps to remove this part?
Current Answers
Related Manual Pages
Owner's Manual - Page 14
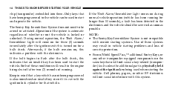
...a problem with remote starting the vehicle. During normal operation, the Theft Alarm/ Immobilizer Light will come on for three (3) seconds immediately after the ignition switch is locked or ... 14
THINGS TO KNOW BEFORE STARTING YOUR VEHICLE
chip (transponder) embedded into them. The Sentry Key Immobilizer System does not need to start the vehicle. Afterwards, if the bulb remains on the ...
Owner's Manual - Page 84
... as a bulb check when the ignition switch is set at high speed. Rear seat belt assemblies must be replaced immediately. If the light stays on ...replace the belt. If you are required to feel the air directed against the windshield. 84
THINGS TO KNOW BEFORE STARTING YOUR VEHICLE
WARNING!
DO NOT use the recirculation mode. Front seat belt buckle pretensioners must be replaced...
Owner's Manual - Page 153

... the vehicle has traveled at a rapid rate, check for about one of the front and rear turn signal light bulb.
If either indicator flashes at over 18 mph (29 km/h) for a defective outside turn signal lights. You can signal a lane change by moving the lever partially up or down . UNDERSTANDING THE FEATURES OF...
Owner's Manual - Page 167

... "VAR" symbol will light and the last variance zone... the last reset. • Off Mode Shows a blank display.
3 Press the STEP button on vehicles equipped with a Compass/ Mini Trip Computer or the US/M button on vehicles equipped with... the fuel remaining in the map. UNDERSTANDING THE FEATURES OF YOUR VEHICLE 167
To set the variance: Turn the...
Owner's Manual - Page 175

... constantly, programming is complete and your hand-held transmitter buttons. The HomeLink indicator light will flash slowly and then rapidly after the indicator light changes from the hand-held transmitter. Release both the HomeLink button that you to replace this Programming Step 3 with procedures noted in view. Position the end of your device should...
Owner's Manual - Page 177

..., security system, entry door lock, home/office lighting, etc.). In the event that 30
3 If you live ), replace Programming HomeLink step 3 with Programming step four to prevent possible overheating. 3. Activation will ...or you are having difficulties programming a gate operator by HomeLink. (The indicator light will now occur for longer that there are designed to this Canadian law, some...
Owner's Manual - Page 189

... in -Floor Seating - If Equipped The removable floor console has a two power outlets, storage tray, light, removable cell phone holder, tissue holder, pen holder and a map holder. It can be sure the storage ...console lid and remove the storage tray. 2. UNDERSTANDING THE FEATURES OF YOUR VEHICLE 189
To reinstall the storage bins, place the bin in the desired location on the overhead rail, push ...
Owner's Manual - Page 190
...release the handle. Removable Floor Console Without Fold-in-Floor Seating - If Equipped The removable floor console has a power outlet, storage tray, light, cell phone holder, tissue holder, and a map holder.
Open ... seats. Always be sure it is firmly attached.
2. WARNING! Cell Phone Holder Removal 1. Remove the floor console. It can be placed between the front seats the outlet is...
Owner's Manual - Page 210

..., a chime will remain on if the liftgate is indicated by the Brake Warning Light which change fluid level conditions. The light will sound to alert you to a portion of either indicator flashes at a rapid rate, check for a defective outside light bulb. 5. If either half of the dual brake system is not completely closed . 7. The...
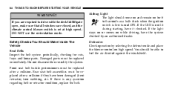
Owner's Manual - Page 211
... turned ON. Have the vehicle checked immediately. Airbag Light This light turns on and remains on while driving, have failed. Part of the Brake Warning Light can be checked by an authorized dealer as soon as a bulb check when the ignition switch is detected. NOTE: This light shows only that the parking brake is necessary...
Owner's Manual - Page 212

... brake system will flash or remain on the accelerator. 12. If the ABS light does not turn on , the brake system should turn on momentarily as a bulb check. Voltage Light This light monitors the electrical system voltage. If the ABS light remains on or turns on while driving, it indicates that the Anti-Lock portion...
Owner's Manual - Page 215

... bulb check when the ignition switch is part of an onboard diagnostic system called OBD that could lead to immediate loss of power or severe catalytic converter damage. The Malfunction Indicator Light ...system due to serious conditions that monitors engine and automatic transmission control systems. The light will flash if the traction control is in use of your typical driving cycles. ...
Owner's Manual - Page 263

... of destinations and routes. UNDERSTANDING YOUR INSTRUMENT PANEL 263
SALES CODE RB1-AM/FM STEREO RADIO WITH DVD/GPS NAVIGATION SYSTEM
The navigation system provides maps, turn identification, selection menus and instructions for detailed operating instructions. Refer to use the Navigation system and the CD Player simultaneously. Always...
Owner's Manual - Page 396
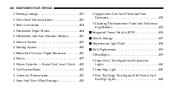
... Protection From Corrosion ...428 ▫ Cleaning The Instrument Panel And Underseat Cup Holders ...433 Integrated Power Module (IPM) ...434 Vehicle Storage ...437 Replacement Light Bulbs ...438 Bulb Replacement ...439 ▫ Headlights ...439 ▫ Front Park/Turn Signal And Sidemarker Lights ...440 ▫ Front Fog Light ...441 ▫ Rear Tail, Stop, Turn Signal, Side Marker And Back-Up...
Owner's Manual - Page 438

... air and high blower setting. REPLACEMENT LIGHT BULBS LIGHT BULBS - Interior Bulb Number Center & Rear Dome Light ...578 Center & Rear Reading Lights ...578 Front Door Courtesy Light ...578 Front Header Reading Lights - If Equipped ...578 Instrument Cluster Lights ...PC74 Liftgate Light(s)...578 Overhead Console Reading Lights ...PC579 Removable Console Light - If Equipped ...194 Visor Vanity...
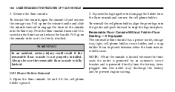
Owner's Manual - Page 439

... it may be necessary to slide the red release lock rearward and push forward on the connector while depressing the release tab.
7
2. Remove the three screws securing the headlight module.
3. MAINTAINING YOUR VEHICLE 439
BULB REPLACEMENT Headlights 1. Disconnect the electrical connector and replace the bulb. Turn the bulb socket retaining ring or the bulb assembly counterclockwise.
Owner's Manual - Page 440

Oil contamination will severely shorten bulb life. Front Park/Turn Signal and Sidemarker Lights 1.
Remove the three screws securing the headlight module.
If the bulb comes in contact with an oily surface, clean the bulb with your fingers. Do not touch the new bulb with rubbing alcohol. 440
MAINTAINING YOUR VEHICLE
CAUTION!
Owner's Manual - Page 441

Reach behind the front fascia from socket.
Twist the turn signal socket to remove from the fog light housing. 3. Disconnect the electrical connector and replace the bulb. Replace bulb, reinstall socket and then reinstall the headlight module. Twist the front fog light bulb to remove from the headlight module and pull bulb from under the vehicle. 2.
CAUTION! Do not touch the new...
Owner's Manual - Page 442
... socket. 5. 442
MAINTAINING YOUR VEHICLE
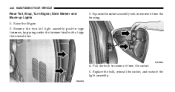
Rear Tail, Stop, Turn Signal, Side Marker and Back-up Lights 1. Pull the bulb to remove it from the housing.
4. Remove the two tail light assembly push-in type fasteners, by prying under the fastener head with a large flat screwdriver.
3. Raise the liftgate. 2. Replace the bulb, reinstall the socket, and reattach the...
Owner's Manual - Page 443

MAINTAINING YOUR VEHICLE 443
Center High Mounted Stop Light (CHMSL) 1. Remove the two screws securing the CHMSL.
2. Twist the bulb socket to remove from the CHMSL housing. 3. Pull the bulb out of the socket. 4. Pull the bulb out of the socket. Replace the bulb and reattach the lens assembly.
7 License Light 1. Replace the bulb, reinstall the socket and reattach the CHMSL. ...
Similar Questions

2006 Town & Country Map Lights Wont Come On
(Posted by TalRRinva 10 years ago)

How To Repair Map Lights In Console Of 2006 Chrysler Town And Country
(Posted by bjg20n3 10 years ago)

How To Change Map Light On 2006 Town And Country
(Posted by Draghabs1 10 years ago)

2007 Chrysler Town And Country Overhead Map Light Bulb Size
(Posted by Dagreatgq 10 years ago)

How Do I Replace The 2003 Town & Country Right Front Map Light Assembly?
I've been told by several repair service providers thatmy 2003 Town & Country right map light as...
I've been told by several repair service providers thatmy 2003 Town & Country right map light as...
(Posted by sinseh 11 years ago)