Canon PIXMA MX892 Support Question
Canon PIXMA MX892 Support Question
Find answers below for this question about Canon PIXMA MX892.Need a Canon PIXMA MX892 manual? We have 11 online manuals for this item!
Question posted by luaviva on June 20th, 2014
How Do I Scan From The Canon 890 To My Mac
The person who posted this question about this Canon product did not include a detailed explanation. Please use the "Request More Information" button to the right if more details would help you to answer this question.
Current Answers
Related Canon PIXMA MX892 Manual Pages
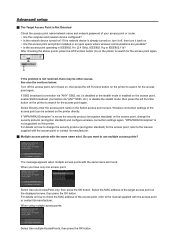
Guide for Printer Setup for Network - Page 14
... back on, then press the left Function button on the printer to use multiple access points? For details on how to check the MAC address of the access point, refer to change the security...not supported on the displayed screen, then press the OK button. Select the MAC address of the target access point on this printer. After checking the above points, press the left Function button on . &#...
Guide for Printer Setup for Network - Page 16
... : If the access point is configured to communicate using an access point that the MAC address of the printer. 1. Select Device settings, then press the OK button. 4. If the problem is not resolved...on how to change the settings of the access point, refer to check the MAC address of the printer will be other than TKIP or change the communication standard to the manual supplied with...
Guide for Printer Setup for Network - Page 17
... button. 4. Select Setup, then press the OK button. 3. For details on the access point, change the settings of the printer will be accepted. Press the MENU button. 2. Use the
buttons (B) to check MAC address. Select LAN settings > Confirm LAN settings > WLAN setting list to select Wireless LAN setup, then press...
Guide for Printer Setup for Network - Page 19
..., then press the OK button. After checking the above points, press the left Function button on this printer.
Wireless connection settings of the access point, refer to search for the access point again. Select the MAC address of your access point or router. • Are the computer and network device confi...
Guide for Printer Setup for Network - Page 20
... button. 4. For details on how to check or change the settings of the access point, refer to check the MAC address of the printer. 1.
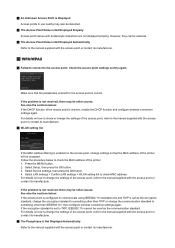
Follow the procedure below : If the DHCP function of the printer will be selected.
The Access Point Name is inactive, enable the DHCP function and configure...
Guide for Printer Setup for Network - Page 21
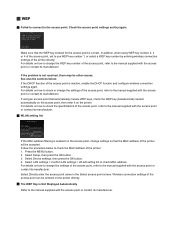
... WEP key number 1, or select a WEP key number by entering wireless connection settings of the access point, refer to check MAC address. Follow the procedure below : If the DHCP function of the printer. 1. Press the MENU button. 2. Select LAN settings > Confirm LAN settings > WLAN setting list to the manual supplied...
MX890 series Specifications - Page 1
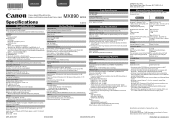
...• Windows: Uninstall software bundled with the Canon inkjet printer before upgrading from Mac OS X 10.6 to Mac OS X Lion 10.7, install software bundled with ...13 * Frequency bandwidth and available channels differ depending on ISO 14473. *2 Increasing the scanning resolution will limit the maximum possible
scanning area.
External dimensions Approx. 19.4 (W) X 17.7 (D) X 8.6 (H) inches ...
MX890 series Especificaciones [Spanish Version] - Page 1

... mm (ADF)
Scanning resolution Optical resolution (horizontal X vertical) max: 2400 X 4800 dpi *1 Interpolated resolution max: 19200 X 19200 dpi *2 *1 Optical Resolution represents the maximum sampling rate based
on a computer with Windows 7, Windows Vista or Windows XP pre-installed.
• Windows: Uninstall software bundled with the Canon inkjet printer before upgrading from Mac OS X 10.6 to...
Setup Guide - Page 4
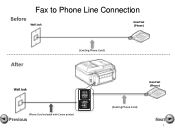
Fax to Phone Line Connection
Before
Wall Jack
Hand Set (Phone)
After
Wall Jack
(Existing Phone Cord)
Hand Set (Phone)
(Phone Cord included with Canon printer)
Previous
(Existing Phone Cord)
Next
4
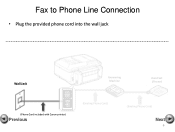
Setup Guide - Page 5
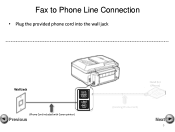
Fax to Phone Line Connection
• Plug the provided phone cord into the wall jack
Wall Jack
(Phone Cord included with Canon printer)
Previous
Hand Set (Phone)
(Existing Phone Cord)
Next
5
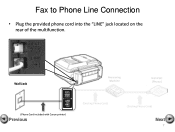
Setup Guide - Page 6
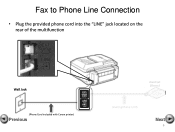
Fax to Phone Line Connection
• Plug the provided phone cord into the "LINE" jack located on the rear of the multifunction
Wall Jack
(Phone Cord included with Canon printer)
Previous
Hand Set (Phone)
(Existing Phone Cord)
Next
6
Setup Guide - Page 7
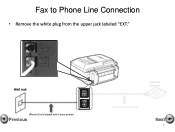
Fax to Phone Line Connection
• Remove the white plug from the upper jack labeled "EXT." Wall Jack
(Phone Cord included with Canon printer)
Previous
Hand Set (Phone)
(Existing Phone Cord)
Next
7
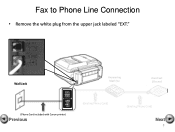
Setup Guide - Page 8

jack located on the rear of the multifunction
Wall Jack
(Phone Cord included with Canon printer)
Previous
Hand Set (Phone)
(Existing Phone Cord)
Next
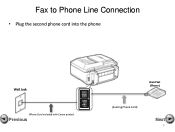
8 Fax to Phone Line Connection
• Plug the second phone cord into the "EXT."
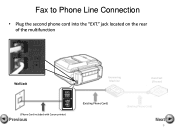
Setup Guide - Page 9
Fax to Phone Line Connection
• Plug the second phone cord into the phone
Wall Jack
(Phone Cord included with Canon printer)
Previous
Hand Set (Phone)
(Existing Phone Cord)
Next
9
Setup Guide - Page 5
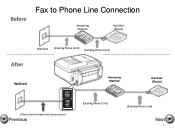
Before
Fax to Phone Line Connection
Answering Machine
Hand Set (Phone)
Wall Jack (Existing Phone Cord) (Existing Phone Cord)
After
Wall Jack
Answering Machine
Hand Set (Phone)
(Phone Cord included with Canon printer)
Previous
(Existing Phone Cord)
(Existing Phone Cord)
Next
5
Setup Guide - Page 6
Fax to Phone Line Connection
• Plug the provided phone cord into the wall jack
Wall Jack
Answering Machine
Hand Set (Phone)
(Phone Cord included with Canon printer)
Previous
(Existing Phone Cord)
(Existing Phone Cord)
Next
6
Setup Guide - Page 7
Wall Jack
Answering Machine
Hand Set (Phone)
(Phone Cord included with Canon printer)
Previous
(Existing Phone Cord)
(Existing Phone Cord)
Next
7 Fax to Phone Line Connection
• Plug the provided phone cord into the "LINE" jack located on the rear of the multifunction.
Setup Guide - Page 8
Wall Jack
Answering Machine
Hand Set (Phone)
(Phone Cord included with Canon printer)
Previous
(Existing Phone Cord)
(Existing Phone Cord)
Next
8 Fax to Phone Line Connection
• Remove the white plug from the upper jack labeled "EXT."
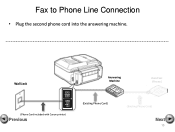
Setup Guide - Page 9
Fax to Phone Line Connection
• Plug the second phone cord into the "EXT." jack located on the rear of the multifunction
Wall Jack
Answering Machine
Hand Set (Phone)
(Phone Cord included with Canon printer)
Previous
(Existing Phone Cord)
(Existing Phone Cord)
Next
9
Setup Guide - Page 10
Wall Jack
Answering Machine
Hand Set (Phone)
(Phone Cord included with Canon printer)
Previous
(Existing Phone Cord)
(Existing Phone Cord)
Next
10 Fax to Phone Line Connection
• Plug the second phone cord into the answering machine.
Similar Questions


