Canon PIXMA MX892 Support Question
Canon PIXMA MX892 Support Question
Find answers below for this question about Canon PIXMA MX892.Need a Canon PIXMA MX892 manual? We have 11 online manuals for this item!
Question posted by audioEMR on April 23rd, 2014
How To Connect To The Router Canon Pixma 892
The person who posted this question about this Canon product did not include a detailed explanation. Please use the "Request More Information" button to the right if more details would help you to answer this question.
Current Answers
Related Canon PIXMA MX892 Manual Pages
Guide for Printer Setup for Network - Page 2
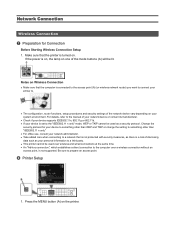
... prepare an access point. Make sure that the printer is connected to the access point (A) (or wireless network router) you want to connect your printer to.
• The configuration, router functions, setup procedures and security settings of the network device vary depending on . Notes on Wireless Connection
• Make sure that the computer is turned...
Guide for Printer Setup for Network - Page 3
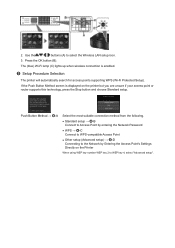
... Point by entering the Network Password
• WPS → d-C Connect to WPS-compatible Access Point
• Other setup (Advanced setup) → d-D Connecting to the Network by Entering the Access Point's Settings Directly on the printer but you are unsure if your access point or router supports this technology, press the Stop button and choose...
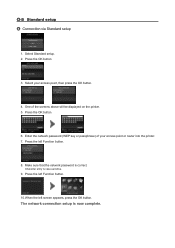
Guide for Printer Setup for Network - Page 5
....
Select Standard setup. 2. Enter the network password (WEP key or passphrase) of the screens above will be displayed on the printer. 5. Make sure that the network password is now complete. The network connection setup is correct. Press the left Function button.
10.When the left Function button.
8. Press the OK button.
3.
d-B Standard...
Guide for Printer Setup for Network - Page 10
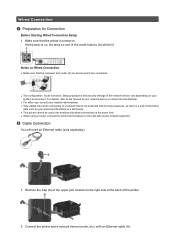
...). If the power is turned on the right side at the same time. • When using a router, connect the printer and computer to a third party. • This printer cannot be lit. b Cable Connection
You will be used over wireless and wired connections at the back of the upper port located on .
Remove the Cap (A) of the...
Guide for Printer Setup for Network - Page 14
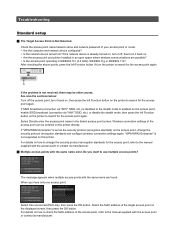
...SSID broadcast (connection via "ANY" SSID, etc.) or disable the stealth mode, then press the left Function button on the printer to check the MAC address of your access point or router. •...be entered on the displayed screen, then press the OK button. Wireless connection settings of the target access point on the printer directly.
Select Use one access point. If the problem is set ...
Guide for Printer Setup for Network - Page 19
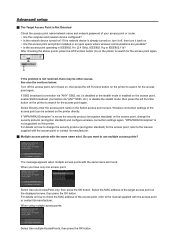
...password of the access point, refer to check the MAC address of your access point or router. • Are the computer and network device configured? • Is the ...Function button on the printer to search for the access point, refer to change the security protocol (encryption standard) and configure wireless connection settings again. Wireless connection settings of the target ...
MX890 series Specifications - Page 1
...install the bundled software again.
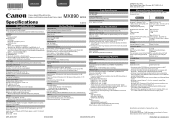
• Windows: Some functions may be available with the Canon inkjet printer before upgrading from Mac OS X 10.6 to 0.16 inches/4 mm in height Other ... *5 Setup possible through Standard setup, WPS (Wi-Fi Protected Setup) or WCN (Windows Connect Now).
Specifications are subject to the operating system's requirements when higher than those given here....
MX890 series Especificaciones [Spanish Version] - Page 1

... Since the Hi-Speed USB interface is fully upwardly compatible with the Canon inkjet printer. Print Head/Ink Total 4608 nozzles (PgBK 512 nozzles, Y/DyeBK each...Windows XP pre-installed.
• Windows: Uninstall software bundled with the Canon inkjet printer before upgrading from Mac OS X 10.6 to setup the Wi-Fi connection if the push button method is not used at minimum. Specifications are...
Setup Guide - Page 4
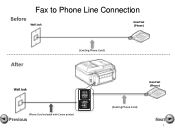
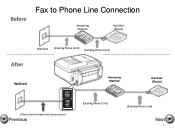
Fax to Phone Line Connection
Before
Wall Jack
Hand Set (Phone)
After
Wall Jack
(Existing Phone Cord)
Hand Set (Phone)
(Phone Cord included with Canon printer)
Previous
(Existing Phone Cord)
Next
4
Setup Guide - Page 5
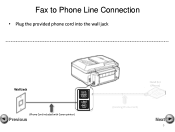
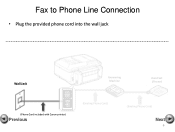
Fax to Phone Line Connection
• Plug the provided phone cord into the wall jack
Wall Jack
(Phone Cord included with Canon printer)
Previous
Hand Set (Phone)
(Existing Phone Cord)
Next
5
Setup Guide - Page 6
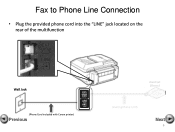
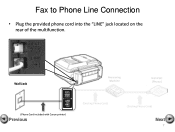
Fax to Phone Line Connection
• Plug the provided phone cord into the "LINE" jack located on the rear of the multifunction
Wall Jack
(Phone Cord included with Canon printer)
Previous
Hand Set (Phone)
(Existing Phone Cord)
Next
6
Setup Guide - Page 7
Wall Jack
(Phone Cord included with Canon printer)
Previous
Hand Set (Phone)
(Existing Phone Cord)
Next
7
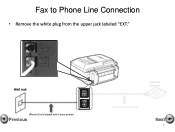
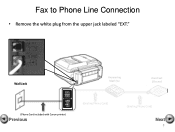
Fax to Phone Line Connection
• Remove the white plug from the upper jack labeled "EXT."
Setup Guide - Page 8

jack located on the rear of the multifunction
Wall Jack
(Phone Cord included with Canon printer)
Previous
Hand Set (Phone)
(Existing Phone Cord)
Next
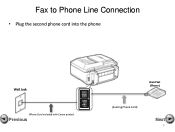
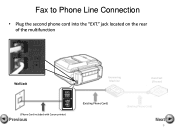
8 Fax to Phone Line Connection
• Plug the second phone cord into the "EXT."
Setup Guide - Page 9
Fax to Phone Line Connection
• Plug the second phone cord into the phone
Wall Jack
(Phone Cord included with Canon printer)
Previous
Hand Set (Phone)
(Existing Phone Cord)
Next
9
Setup Guide - Page 5
Before
Fax to Phone Line Connection
Answering Machine
Hand Set (Phone)
Wall Jack (Existing Phone Cord) (Existing Phone Cord)
After
Wall Jack
Answering Machine
Hand Set (Phone)
(Phone Cord included with Canon printer)
Previous
(Existing Phone Cord)
(Existing Phone Cord)
Next
5
Setup Guide - Page 6
Fax to Phone Line Connection
• Plug the provided phone cord into the wall jack
Wall Jack
Answering Machine
Hand Set (Phone)
(Phone Cord included with Canon printer)
Previous
(Existing Phone Cord)
(Existing Phone Cord)
Next
6
Setup Guide - Page 7
Wall Jack
Answering Machine
Hand Set (Phone)
(Phone Cord included with Canon printer)
Previous
(Existing Phone Cord)
(Existing Phone Cord)
Next
7 Fax to Phone Line Connection
• Plug the provided phone cord into the "LINE" jack located on the rear of the multifunction.
Setup Guide - Page 8
Fax to Phone Line Connection
• Remove the white plug from the upper jack labeled "EXT." Wall Jack
Answering Machine
Hand Set (Phone)
(Phone Cord included with Canon printer)
Previous
(Existing Phone Cord)
(Existing Phone Cord)
Next
8
Setup Guide - Page 9
Fax to Phone Line Connection
• Plug the second phone cord into the "EXT." jack located on the rear of the multifunction
Wall Jack
Answering Machine
Hand Set (Phone)
(Phone Cord included with Canon printer)
Previous
(Existing Phone Cord)
(Existing Phone Cord)
Next
9
Setup Guide - Page 10
Wall Jack
Answering Machine
Hand Set (Phone)
(Phone Cord included with Canon printer)
Previous
(Existing Phone Cord)
(Existing Phone Cord)
Next
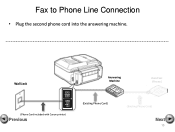
10 Fax to Phone Line Connection
• Plug the second phone cord into the answering machine.
Similar Questions

How Do I Connect The Pixma Mx472 To My Tablet?
How do I connect the PIXMA MX472 to my tablet?
How do I connect the PIXMA MX472 to my tablet?
(Posted by pooterda 2 years ago)


How Do I Print Envelopes On My Canon Pixma 892 Printer?
(Posted by capoes 10 years ago)
How To Connect Canon Pixma Mp500 Printer To Wireless Router
(Posted by ballixo 10 years ago)

Can You Use Usb And Wireless Connection On Pixma Mx892 At The Same Time
(Posted by RANDSea 10 years ago)