Canon PIXMA MX882 Support Question
Canon PIXMA MX882 Support Question
Find answers below for this question about Canon PIXMA MX882.Need a Canon PIXMA MX882 manual? We have 3 online manuals for this item!
Question posted by nannRena on August 28th, 2013
How Do I Scan Using Mx882
The person who posted this question about this Canon product did not include a detailed explanation. Please use the "Request More Information" button to the right if more details would help you to answer this question.
Current Answers
Related Canon PIXMA MX882 Manual Pages
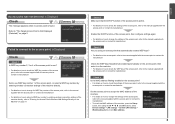
MX882 series Getting Started - Page 61
...botón Configuración (Setup) (A). 2.
Pulse el botón OK.
A
C
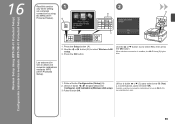
1. Wireless Setup Using WPS (Wi-Fi Protected Setup) Configuración inalámbrica mediante WPS (Wi-Fi Protected Setup)
16
...Read this section only when setting
1
up a wireless
connection by using
2
B
D
the WPS (Wi-Fi
Protected Setup). Lea esta sección sólo...
MX882 series Getting Started - Page 65

...intensity (AE copy)
Reduction/Enlargement 25 % - 400 % (1 % unit)
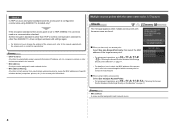
Scan Specifications
Scanner driver TWAIN/WIA (for Windows 7/Windows Vista/Windows XP)
Maximum scanning size
A4/Letter, 8.5" X 11.7"/216 X 297 mm (Platen Glass) ...buttons) Automatic redialing Manual redialing (with Hi-Speed USB standard is for standby cannot be used at minimum. Weight Approx. 11.7 kg (Approx. 25.7 lb) * With the ...
Network Setup Troubleshooting - Page 2
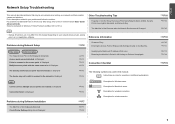
...Detected after setup, refer to the network is Displayed
P.5
The following symbols are used in this manual depending on the Machine
Easy setup
Advanced setup
The Target Access... your problem and follow the solution.
P.7
The Machine is Not Displayed (Detected)
P.7
Check Printer Settings dialog box is Displayed Connection failed. Other Troubleshooting Tips
Forgotten or Do Not Know the...
Network Setup Troubleshooting - Page 3
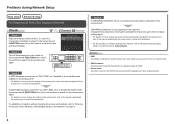
... 1 Make sure that you follow Check 1, 2, 3 and 4 of "Connection Checklist" on page 15, then press the left FUNCTION button (A) on the machine to "Wireless Setup Using Easy Setup" in the printed manual: Getting Started. Enable SSID broadcast (connection via "ANY" SSID, etc.) disabled or is the stealth mode enabled on the...
Network Setup Troubleshooting - Page 4
... to connect to the manual supplied with the access point or contact its manufacturer. Set to use ? • For details on how to the manual supplied with
the access point or contact...Check 2 Make sure that automatically creates WEP keys?
• For details on page 2.
Check 3 Are you using the { } [ ] and OK buttons, select Device settings > LAN settings > Confirm LAN settings > WLAN...
Network Setup Troubleshooting - Page 5
... the Access
Point's Wireless LAN Settings Directly on the Machine" on how to change the settings of specific wireless devices (computers, printers, etc.) to TKIP, IEEE802.11n cannot be used as an encryption standard when the access point is Displayed
Check
The message appears when multiple access points with the same name...
Network Setup Troubleshooting - Page 6
... on the Machine" on page 11.
• For details on . • After that you follow Check 1, 2, 3 and 4 of the machine, press the Setup button, then using the { } [ ] and OK buttons, select Device settings > LAN settings > Confirm LAN settings > WLAN setting list to the manual supplied with the setup from
in "Entering...
Network Setup Troubleshooting - Page 7
...8226; For details on how to specify the IP address of the machine, refer to "Wireless Setup Using WPS (Wi-Fi Protected Setup)" in "Entering the Access Point's Wireless LAN Settings Directly on the ... Check 1 Make sure that the DHCP function of specific wireless devices (computers, printers, etc.) to the access point beforehand.
• DHCP function A function to automatically assign required information (IP...
Network Setup Troubleshooting - Page 8
...connection only)
For the procedure to Active.
ENGLISH
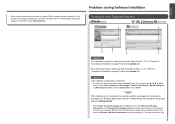
Problems during Software Installation
• When using the { } [ ] and OK
buttons, select Device settings > LAN settings > Confirm...Setup Using Easy Setup" in the printed manual: Getting Started.
• Check Check the printer settings (B), click Next (C), then click Wireless LAN Setup Information on the Check Printer ...
Network Setup Troubleshooting - Page 9
...function A function to automatically assign required information (IP address, etc.) to computers, printers or other devices connected to the network.
• Privacy separator feature A function to prevent ...its manufacturer.
• To check the IP address of the machine, press the Setup button, then using the { } [ ] and OK buttons, select Device settings > LAN settings > Confirm LAN settings ...
Network Setup Troubleshooting - Page 10
...manual: Getting Started.
• Click Wireless LAN Setup Information (B) on the Check Printer Settings dialog box to the manual supplied with the network device or contact its ...(such as computers and printers) connected to an access point.
ENGLISH
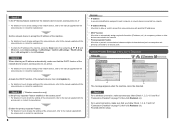
Check 2
Is the machine connected to a network? • To confirm the connection status, press the Setup button, then using the { } [ ...
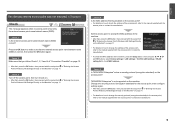
Network Setup Troubleshooting - Page 17
... software active?
If the Ethernet cable is not lit, press the Setup button, then using a router, are the Ethernet cables of the printer and computer connected to the LAN side of the router? • For details on ...Check 5
Is the Wi-Fi lamp (A) lit blue?
Glossary
• Firewall A system to use computers connected to the manual supplied with the router or contact its manufacturer.
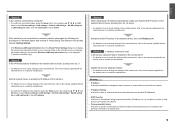
Network Key - Page 2
>
Obtaining Your Network Key
PIXMA MX882 Windows OS
Introduction
3
Download the Canon PIXMA Wireless Setup Assistant
4
Using the Canon PIXMA Wireless Setup Assistant
6
Troubleshooting
10
2
Network Key - Page 3
Introduction
>
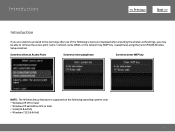
Introduction
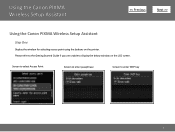
If you are unable to proceed to retrieve the access point name / network name (SSID), or the network key (WEP key / passphrase) using the Canon PIXMA Wireless Setup Assistant. Screen to select an Access Point
Screen to enter passphrase
Screen to enter WEP key
NOTE: The Wireless Setup Assistant is supported...
Network Key - Page 4
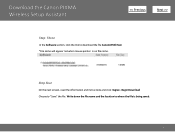
... Drivers & Software for your model
Step Two
Select your operating system in the Select OS dropdown menu.
4 Download the Canon PIXMA Wireless Setup Assistant
>
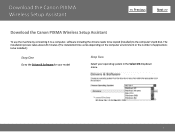
Download the Canon PIXMA Wireless Setup Assistant
To use the machine by connecting it to a computer, software including the drivers needs to be installed.)
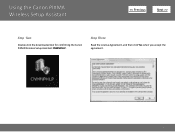
Step One
Go to the...
Network Key - Page 5
... appear red when mouse pointer is being saved.
5 Step Four
On the next screen, read the information and instructions and click I Agree - Download the Canon PIXMA Wireless Setup Assistant
>
Step Three
In the Software section, click the link to "Save" the file. Write down the file name and the location to...
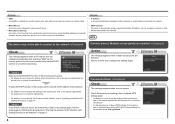
Network Key - Page 6
Screen to select Access Point
Screen to enter passphrase
Screen to display the below window on the printer. Please refer to the Getting Started Guide if you are unable to enter WEP key
6
Using the Canon PIXMA Wireless Setup Assistant
>
Using the Canon PIXMA Wireless Setup Assistant
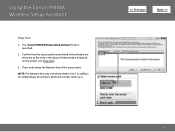
Step One
Display the window for selecting access point using the buttons on the LCD screen.
Network Key - Page 7
Step Three
Read the License Agreement, and then click Yes when you accept the agreement.
7 Using the Canon PIXMA Wireless Setup Assistant
>
Step Two
Double-click the downloaded tool for confirming the Canon PIXMA Wireless Setup Assistant CNMNPHLP.
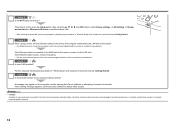
Network Key - Page 8
Using the Canon PIXMA Wireless Setup Assistant
Step Four
1. Then, write down as the ones in the Access Points window displayed on the printer unit (Step One).
3. Confirm that the access point names listed in addition to numbers(base 16 number). Write the number down the Network Key of ...
Network Key - Page 9

Using the Canon PIXMA Wireless Setup Assistant
Step Five
1. In the window for entering the network key is displayed, enter the key you copied in the step 4.
2. Press the left function key (End setup).
>
Step Six
When the completion screen appears, press the OK button.
9 When the window for selecting access point of the printer unit, select the access point specified in Step Four.
3.
Similar Questions


