
Brother International PT 1900 Support Question
Brother International PT 1900 Support Question
Find answers below for this question about Brother International PT 1900 - P-Touch Electronic Labeling System.Need a Brother International PT 1900 manual? We have 2 online manuals for this item!
Question posted by mav74mtc on June 16th, 2010
How To Set My Own Character Size?
I used to be able to set my own character size on the P1900 PTouch for labels. Now when I select "36" - I press to PRINT and a message displays "Auto Size?" It prints a teeny tiny print.
I do not know how to get rid of the message from appearing- there is an "auto size" setting but it is not selected.
Current Answers
Related Brother International PT 1900 Manual Pages
Users Manual - English and Spanish - Page 2
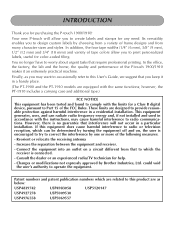
... the P-touch 1900/1910! Consult the dealer or an experienced radio/TV technician for color-coded filing. could void the user's authority to provide reasonable protection against harmful interference in a particular installation. Reorient or relocate the receiving antenna
-
Its versatility enables you may cause harmful interference to print personalized labels, useful for help...
Users Manual - English and Spanish - Page 23

The delete key can also be used to quit most functions and return to delete. 2 Press * once.
15
To add a tab: q Hold down c and press Q once. TAB LENGTH 1.Oinch
1: a r t N O . _
DELETE KEY
The Delete (backspace) key ( * ) allows you wish to the previous display without deleting any characters. Some questions asking you have chosen will delete or affect...
Users Manual - English and Spanish - Page 34

... at the bottom left of the display shows the currently selected font setting. FONT 2
A
3 Release c.
26 play. 3 Release c to apply the selected font setting to display the
current font setting. 2 While still holding down c, press 1 once, and keep c held down c, continue pressing
1 until the desired font setting is
displayed.
The current font setting is shown by the font indicator...
Users Manual - English and Spanish - Page 35
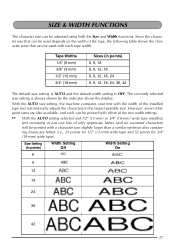
..., 18 6, 9, 12, 18, 24 6, 9, 12, 18, 24, 36, 42
The default size setting is AUTO and the default width setting is always shown by the indicator above the display. However, seven other point sizes are also available, and each tape width. The currently selected size setting is OFF.
Since the character size that can be used depends on the width of the tape...
Users Manual - English and Spanish - Page 36

... pressing 2 until the desired size setting is
displayed.
The current size setting is shown by the size indicator at the top of the display.
3 Release c to apply the selected size setting to the entire text.
28 SIZE AUTO
2 While still holding down . EXAMPLE
To select the 24 point size setting: 1 While holding down c, press 2 once,
and keep c held down to display the
current size setting...
Users Manual - English and Spanish - Page 37

..., SHADOW, ITALIC, I+BOLD (italic & bold), I+OUTL (italic & outline), I+SHAD (italic & shadow), VERT (vertical) The default style setting is selected. WIDE OFF
WIDE ON
STYLE FUNCTION
You can choose from nine different character styles to apply to your text.
Characters printed using the smaller sizes may be difficult to Reference at the bottom of the available...
Users Manual - English and Spanish - Page 39

... c. UNDL ON
To turn the Underline function on or off:
(Sample)
1 While holding down c, press 5 once, and keep c held down to display the
current underline setting.
2 While still holding down c, continue pressing 5 until ON is OFF.
EXAMPLE
To select the ON underline setting: 1 While holding down c, press 5 once,
and keep c held down.
2 While still holding down c, continue...
Users Manual - English and Spanish - Page 40

... settings are also available.
The default setting is selected, the Frame indicator on the right side of the display comes on when any setting other than OFF is OFF; EXAMPLE
To select the candy frame setting: 1 While holding down . To change the frame setting: 1 While holding down c, press 6 once, and keep c held down to design a more decorative or emphasized label...
Users Manual - English and Spanish - Page 42

... choose to the selected horizontal alignment setting. In addition, if the Length function was used to set -
however, two other settings are also available. EXAMPLE
To select the HALF tape margin setting: 1 While holding down c, press E once,
and keep c held down.
2 While still holding down c, continue pressing E until the desired tape margin set the length of the label, the text will...
Users Manual - English and Spanish - Page 43

...When using the Mirror printing function, the text should be read correctly from the adhesive side of the tape. EXAMPLE
To select the RIGHT horizontal alignment setting:
1 While holding down c, press R once,
and keep c held down.
The default mirror printing setting is displayed. 3 Release c to apply the selected horizontal alignment setting to the entire text.
If mirror-printed labels...
Users Manual - English and Spanish - Page 44

...of the printed label automatically adjusts to fit the length of the display comes on.
36 To turn the mirror printing setting on or off: 1 While holding down c, press p once, and keep c held down to display the
current mirror printing setting. 2 While still holding down c, continue pressing p until ON is displayed.
3 Release c. EXAMPLE
To select the ON mirror printing setting: 1 While...
Users Manual - English and Spanish - Page 46

... down to display the
current auto cut setting.
2 While still holding down c, press Z once,
and keep c held down c and press
_ once to set to apply the selected auto cut setting is displayed. 5 Press r.
AUTO CUT OFF
38
LENGTH 5.0inch
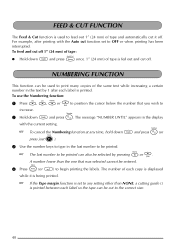
AUTO CUT FUNCTION
The Auto cut function allows you to feed the tape, then cut each label after printing them.
After printing a label with the...
Users Manual - English and Spanish - Page 47
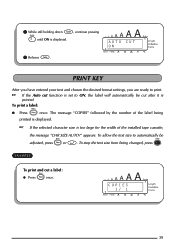
...stop the text size from being
printed is displayed.
If the selected character size is set to automatically be cut a label: q Press p once. COPIES 1/ 1
39
The message "COPIES" followed by the number of the installed tape cassette,
the message "CHR SIZE AUTO?" appears.
AUTO CUT ON
PRINT KEY
After you have entered your text and chosen the desired format settings, you are ready...
Users Manual - English and Spanish - Page 48
... cursor below the number that was selected cannot be cut function set to any time, hold down c and press O (or
press just * ). 3 Use the number keys to type in the display
with the Auto cut to OFF or when printing has been interrupted.
A number lower than NONE, a cutting guide (:)
is printed between each label is printed. The number of tape: q Hold...
Users Manual - English and Spanish - Page 49

... (:) is set to any setting other than NONE, a cut to the correct size.
✂ ✂
41 EXAMPLE
To print three labels with numbers 1, 2 and 3: 1 Position the cursor below "1".
2 Hold down c and press O.
3 Press 3.
4 Press p (or r ). COPIES 1/ 3
1: S T U D I O _1
NUMBER
UNTIL
1
NUMBER
UNTIL
3
COPIES 2/ 3
COPIES 3/ 3
If the Tape margin function is printed between each label so the...
Users Manual - English and Spanish - Page 50
...hold down c and press I .
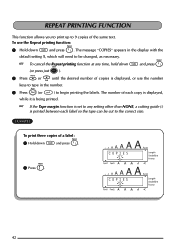
2 Press 3. REPEAT PRINTING FUNCTION
This function allows you to print up to the correct size.
To use the Repeat printing function: 1 Hold down c and press I
(or press just * ). 2 Press h or e until the desired number of a label: 1 Hold down c and press I . COPIES 1
COPIES 3
42 The message "COPIES" appears in the display with the
default setting 1, which will need...
Users Manual - English and Spanish - Page 51

... originally stored file. When each label so the tape can be stored in the memory, along with the currently selected file number.
43 The message "STORE" appears on the display with its formatting, even after all characters are removed from the display using the Clear function (holding down c and press 7. ting guide (:) is printed between each file is stored...
Users Manual - English and Spanish - Page 52

... function without recalling text, hold down c and press 7
(or press just * ).
2 Press a number key (or press h or e) to select the file number where you wish to delete the...Press r. WRITE?"
The message "RECALL" appears on the display with the new one can be stored. appears in the display is already stored under other parts of characters has already been stored, the error message ...
Users Manual - English and Spanish - Page 57
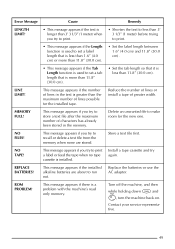
...use the AC adaptor. MEMORY FULL! NO FILES! Cause
• This message appears if the text is installed. This message appears if you try to print. • Set the label length between 1.6" (4.0 cm) and 11.8" (30.0 cm).
• Set... back on.
Reduce the number of lines or install a tape of characters has already been stored in the text is a problem with the machine's read ...
Users Manual - English and Spanish - Page 62
... only 18
Deleting stored files 44
E
Entering accented characters 10, 19 capital letters 11 spaces 12 symbols 10, 11, 20 tabs 14
Error messages 48
F
Fabric tape 6 Feeding & cutting 40 Fonts 26 Frames 32
I
Incrementing 40
K
Keyboard 2
L
Label length 36 Laminated tape 6
M
Margins 33 Memory 43 Mirror printing 35 Multiple copies 42
N
New lines 12...
Similar Questions

When I Try To Print My Label I Get The Chr Size Auto? Message.
I have it set on 18 but when it prints it is tiny
I have it set on 18 but when it prints it is tiny
(Posted by dhildenbrandt 6 months ago)


P-touch Electronic Labeling System-how To Change Auto Size
(Posted by sanojKan 10 years ago)

How Do I Change The Language On My P-touch 1090 Label Maker?
(Posted by becky74060 10 years ago)
Tz Ribbon For P1910 Touch
Does anyone who has or has had a Brother PT 1900 P-Touch Electronic Labeling System know how to chan...
Does anyone who has or has had a Brother PT 1900 P-Touch Electronic Labeling System know how to chan...
(Posted by jeannier 12 years ago)