
Brother International PE770 Support Question
Brother International PE770 Support Question
Find answers below for this question about Brother International PE770 - Computerized Embroidery Machine.Need a Brother International PE770 manual? We have 3 online manuals for this item!
Question posted by hanmagik on February 21st, 2014
Brother Pe770 Can You Start The Design At The Same Spot If The Machine Gets
turned off
Current Answers
Related Brother International PE770 Manual Pages
Users Manual - English - Page 1
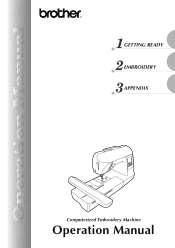
GETTING READY EMBROIDERY APPENDIX
Computerized Embroidery Machine
Operation Manual
Users Manual - English - Page 3
... change without notice. For additional product information and updates, visit our web site at www.brother.com
SAVE THESE INSTRUCTIONS This machine is required, first follow the troubleshooting table
in the back of this manual. Use this machine only for household use as contained in the manual. Benzene, thinner, and scouring powders can...
Users Manual - English - Page 5

... ...9 Operation buttons ...10
Operation panel ...11
GETTING READY
13
Embroidery Step by Step 14 Attaching the Embroidery Unit 15
Embroidery unit precautions ...15 Attaching the embroidery unit ...15 Removing the embroidery unit ...16
Turning the Machine On/Off 18
Power supply precautions ...18
Turning on the machine ...19 Turning off the machine ...19
LCD (Liquid Crystal Display) Operation...
Users Manual - English - Page 7

... correct operation of the various functions. Machine Features
1
23
4
a Simple bobbin-winding The bobbin can embroider built-in embroidery patterns, characters, framed decorations, and designs from optional embroidery cards (page 39).
5 d Embroidery You can quickly and easily be wound with thread (page 24).
b Quick-set bobbin You can start embroiderying without pulling up the bobbin thread...
Users Manual - English - Page 15

... 14 Attaching the Embroidery Unit 15
Embroidery unit precautions 15 Attaching the embroidery unit 15 Removing the embroidery unit 16 Turning the Machine On/Off 18 Power supply precautions 18 Turning on the machine 19 Turning off the machine 19 LCD (Liquid Crystal Display) Operation 20 Viewing the LCD 20 Changing the machine settings 21 Checking machine operating procedures 23 Winding...
Users Manual - English - Page 16

...;
4 Preparing the fabric
Attach a stabilizer material to the pattern. GETTING READY
Embroidery Step by Step
The basic steps for embroidery are as follows.
1
Attaching the embroidery unit
Attach the embroidery unit. (If the embroidery unit is not attached, the machine does not operate.) For details, refer to "Attaching the embroidery unit" (page 15).
↓
2 Checking the needle
Use...
Users Manual - English - Page 21
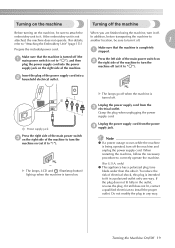
... b the right side of the machine to turn the
machine off (set it . X The lamps, LCD and (Start/stop button) light up when the machine is completely a stopped. Unplug the power supply cord from the power d supply jack.
To reduce the risk of the machine. If the embroidery unit is not attached, the machine does not operate. (For...
Users Manual - English - Page 26
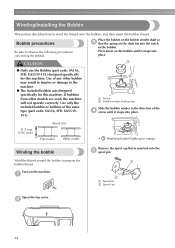
... designed specifically for this machine. Winding the bobbin
Wind the thread around the bobbin to observe the following precautions concerning the bobbin. Turn ...machine will not operate correctly.
a
Remove the spool cap that the spring on the machine. b
24 GETTING READY
Winding/Installing the Bobbin
This section describes how to the machine.
● The included bobbin was designed...
Users Manual - English - Page 30
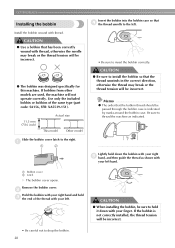
... bobbin was designed specifically for this machine.
b
Hold... the bobbin with your right hand and hold it down the bobbin with thread. Install the bobbin wound with your left . Remove the bobbin cover.
CAUTION
● Use a bobbin that the thread unwinds in the correct direction, otherwise the thread may break or the thread tension will be incorrect.
GETTING...
Users Manual - English - Page 36
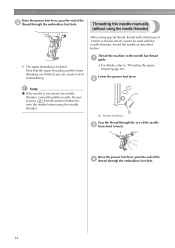
Thread the machine to the needle bar thread a guide.
• For details, refer to start embroidering. Be sure to press (Needle position button) to back. ...manually (without using special thread, thread with a thickness of the e thread through the embroidery foot hole. Lower the presser foot lever.
GETTING READY
Raise the presser foot lever, pass the end of 130/20 or thicker which...
Users Manual - English - Page 38
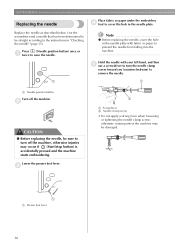
...of the machine may occur if (Start/stop button) is accidentally pressed and the machine starts embroidering. ...Turn off the machine, otherwise injuries may be damaged.
1
a Presser foot lever
36 b
CAUTION
● Before replacing the needle, be straight according to the instructions in the needle plate.
GETTING READY
Replacing the needle
Place fabric or paper under the embroidery...
Users Manual - English - Page 42

... may break, resulting in poor quality embroidery designs.
The needle may become tangled.
40 z Before starting to "Optional accessories" (page 7).
...embroidery foot and the fabric, the fabric can be sure to prevent poor quality embroidery designs.
■ Fabric Prepare the fabric for embroidery machines. What to prepare
The following is enough bobbin thread. EMBROIDERY...
Users Manual - English - Page 67
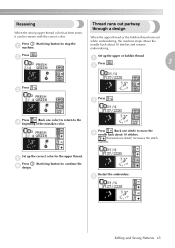
... the
d needle back about 10 stitches and resume embroidering. Restart the embroidery.
Thread runs out partway through a design
When the upper thread or the bobbin thread runs out while embroidering, the machine stops.
e
Press (Start/stop button) to stop button) to continue the f design.
Move the needle back about 10 stitches.
(Forward one color) to...
Users Manual - English - Page 70
... to over -tighten the screw, approximately 30-45 degrees to the bobbin case.
EMBROIDERY
Bobbin Case Adjustment
The bobbin case installed in this machine can be adjusted, if necessary, to adjust the bobbin case tension. Using a small slotted screwdriver, turn a phillips screw (+). Correct tension
Upper thread slightly appears on the right side of...
Users Manual - English - Page 76
... the spool.
Contact
The needle breaks.
A bobbin designed specifically for the spool being used .
Loosen the upper thread tension.
Turn on the machine. Press the start /stop button. Use the screwdriver to firmly tighten the screw.
The area around the hole in the embroidery foot is not turned on it .
The bobbin case is raised. The...
Users Manual - English - Page 84
... beep setting appears.
82 d
X The screen for the buzzer.
Turn on . Press b panel.
(Settings key) on the operation
X The initial screen appears again.
This setting can be changed so that the machine does not beep.
APPENDIX
Canceling the operation beep
When the machine is purchased, it is set to beep each time an...
USB GUIDE - Multi - Page 3
... sewing three or more than our original patterns, the thread or needle may cause the embroidery machine to the machine. In addition, if the file name contains no more overlapping stitches. Use one of our original data design systems to edit the embroidery data.
■ Types of Embroidery Data That Can Be Used • Only .pes and .dst embroidery...
USB GUIDE - Multi - Page 4
... case also, reduce the number of the
USB media. z In addition, if the embroidery designs contain too many colors (this
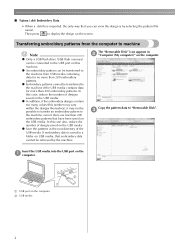
machine. Transferring embroidery patterns from USB media containing data for more than 200 embroidery patterns. Copy the pattern data to display the design on the USB media. Then press
to "Removable Disk". c
Insert the USB media...
USB GUIDE - Multi - Page 5
... display of
patterns moves forward or backward in the taskbar of 10 designs. f
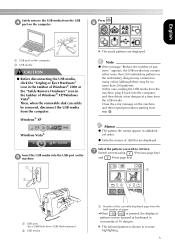
a USB port on the machine, and then repeat procedures starting from the computer.
Then, when the removable disk can safely be no more than 200 embroidery patterns or the embroidery designs may contain too many colors (although there may be removed, disconnect the...
USB GUIDE - Multi - Page 7
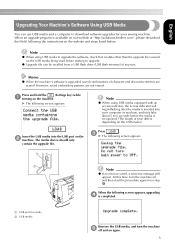
....
At this time, turn the machine e off , and then start the procedure again from a USB flash drive (USB flash memory) of time differs depending on the USB media.)
Insert the USB media into the USB port on the b machine. Remove the USB media, and turn the machine off and on again.
5 However, saved embroidery patterns are erased...
Similar Questions

How To Get A Large Design To Load Onto The Brother Pe770 From Usb
(Posted by caparpeaj 9 years ago)

Problems With My Brother Pe770 Embroidery Machine
I got my brother pe770 for Chritmas. I have used it 10 to 15 times. The top thread keeps getting cau...
I got my brother pe770 for Chritmas. I have used it 10 to 15 times. The top thread keeps getting cau...
(Posted by cathydvs4 10 years ago)

How To Get Custom Designs Using The Brother Pe770
(Posted by pawsal 10 years ago)

Brother Pe770 Embroidery Machine
I have a Brother PE770 Embroidery Machine, what are the best stitch settings?
I have a Brother PE770 Embroidery Machine, what are the best stitch settings?
(Posted by leeplantation08 10 years ago)

Brother Pe770
Does the Brother PE770 have the free motion embroidery ability?
Does the Brother PE770 have the free motion embroidery ability?
(Posted by pennyhide 13 years ago)