
Brother International LX2500 Support Question
Brother International LX2500 Support Question
Find answers below for this question about Brother International LX2500.Need a Brother International LX2500 manual? We have 2 online manuals for this item!
Question posted by fennsway on January 6th, 2014
Automatic Gathering Foot
What Automatic Gathering Foot Would I Use On My Brother Lx2500
Current Answers
Related Brother International LX2500 Manual Pages
Users Manual - English and Spanish - Page 2
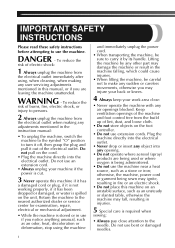
...instructions
before attempting to use bent or damaged needles.
1 Keep ventilation openings of the machine and foot control free from the build up of electric shock:
1 Always unplug the machine from
the electrical ...Do not place this machine if it has
a damaged cord or plug, if it is not working properly, if it has been dropped or damaged, or water is required when
sewing:
• Always ...
Users Manual - English and Spanish - Page 4

... ATTACHMENTS AND APPLICATIONS 30
Zipper insertion 30 Gathering 31 Darning 31 Appliqués 32 OPTIONAL ACCESSORIES 33 Using the walking foot 33 Using the quilting guide 34 Using the quilting foot 34 Using the 1/4-inch quilting foot 35 Using the narrow hemmer foot 35 Using the blind stitch foot 37
6. KNOWING YOUR SEWING MACHINE 4
ACCESSORIES 4 Optional accessories 4
THE MAIN PARTS...
Users Manual - English and Spanish - Page 5
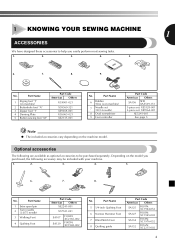
...: XA5539-151
3-piece set: XE5328-001 2-piece set: XE7064-001
XE5241-001
See page 5
Note
● The included accessories vary depending on machine)
2 Buttonhole foot "A"
3 Zipper foot "I"
4 Darning Plate
5 Button sewing foot "M"
Part Code Americas Others
XC4901-021
X59369-321 XE9369-001 XC6063-021 XE2137-001
No. Part Name
1 Extra spool pin
2
Twin needle (2.0/75...
Users Manual - English and Spanish - Page 6

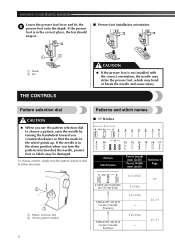
Contact your dealer or the nearest authorized service center. E Presser foot lever (Page 14) Used to choose the stitch you want.
KNOWING YOUR SEWING MACHINE
THE MAIN PARTS
43 2
1
5 A
6 0
7
9
8
1 Bobbin winder (Page 11) This winds the thread onto the bobbin for 220/240V area
The foot controller part code differs depending on and off. B Buttonhole fine...
Users Manual - English and Spanish - Page 7

...many other ). Connecting plugs
Connect the foot controller plug to heat. Electric shock may result in fire, electric shock, or damage to the machine.
● Make sure that the ...the plug. USING YOUR SEWING MACHINE
1
WARNING
● Use only regular household electricity for a long period of electric shock, this machine. ● Do not use . ● Unplug the power cord if the machine is not...
Users Manual - English and Spanish - Page 8

...is accidentally pressed and the machine starts sewing.
● Only use sewing machine needles for smooth sewing.
1 2
1 Turn on (toward the 'I' mark) 2 Turn off .
Turn off the foot controller, the machine will stop.
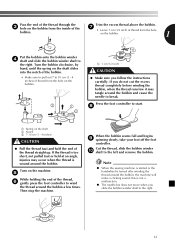
■ Checking the needle correctly Put the flat side of the needle on a flat surface. Lower the presser foot lever.
3
1
1 Presser foot lever
7 When you
(counterclockwise...
Users Manual - English and Spanish - Page 9

... turning the 2 handwheel toward the 5 back of the sewing machine may be damaged.
● Always turn the
needle clamp screw counterclockwise to
Changing the presser foot
remove the needle. CAUTION
21
1 Use an oval screwdriver 2 Needle clamp screw
• Do not use an oval screwdriver to sew and how. If you insert the needle until it...
Users Manual - English and Spanish - Page 10
... correct place, the bar should snap in.
■ Presser foot installation orientation
1
2
1 Shank 2 Bar
THE CONTROLS
CAUTION
● If the presser foot is in the down position when you (counterclockwise) so that the mark on the wheel points up. KNOWING YOUR SEWING MACHINE
Lower the presser foot lever and fix the 5 presser foot onto the shank.
Users Manual - English and Spanish - Page 11
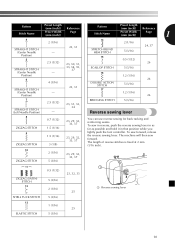
...use reverse sewing for back tacking and reinforcing seams. To sew in reverse, push the reverse sewing lever in as far as possible and hold it in that position while you lightly push the foot...) 5 (3/16) 2 (1/16)
23, 32, 33 25
1
1 Reverse sewing lever
SHELL TUCK STITCH
5 (3/16)
13 1 (1/16) 25
ELASTIC STITCH
5 (3/16)
10 The machine will then sew forward. To sew forward, release the reverse...
Users Manual - English and Spanish - Page 12

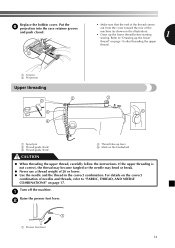
...: SA156, SFB: XA5539-151). KNOWING YOUR SEWING MACHINE
THREADING THE MACHINE
Winding the bobbin
CAUTION
● We designed the bobbin that comes with this machine or bobbins of thread is set incorrectly, the thread may cause damage to the machine. Using other models, the machine will not work properly. Only use bobbins from other bobbins may tangle on...
Users Manual - English and Spanish - Page 13
... straight up.
When the bobbin seems full and begins 9 spinning slowly, take your foot off the foot
controller.
this is turned after winding the thread around the bobbin.
Pass the end of... bobbin winder 4 shaft and slide the bobbin winder shaft to break. Note
● When the sewing machine is started or the handwheel is not a malfunction.
● The needle bar does not move...
Users Manual - English and Spanish - Page 14

...SEWING MACHINE
CAUTION
● Not winding the bobbin properly may cause the thread tension to loosen, and may cause the thread tension to sew, you could be incorrect or break the needle. CAUTION
● Make sure you turn off the machine... it may break the needle.
If you accidentally step on the foot controller and the machine starts to be injured. Put the bobbin in so the thread...
Users Manual - English and Spanish - Page 15
...; Use the needle and the thread in the illustration). • Draw up lever 5 Mark on the correct
combination of the
machine (as shown in the correct combination. For details on the handwheel
CAUTION
● When threading the upper thread, carefully follow the instructions.
Turn off the machine.
1
Raise the presser foot lever.
2
1
1 Presser foot lever...
Users Manual - English and Spanish - Page 16
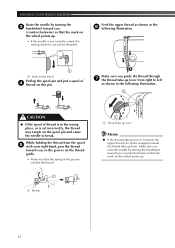
... of 4 thread on the wheel points up.
• If the needle is not correctly raised, the sewing machine can not be wrapped around the thread take -up lever from the spool 5 with your right hand, pass...points up.
15 Make sure you
(counterclockwise) so that the mark on this pin. KNOWING YOUR SEWING MACHINE
Raise the needle by turning the handwheel toward you , in the wrong place, or is in...
Users Manual - English and Spanish - Page 17
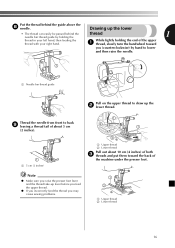
... the upper
thread with your left hand, then feeding the
While lightly holding the end of
the machine under the presser foot. Thread the needle from front to draw up lever before you feed the upper thread.
●...
1
2
1 Upper thread 2 Lower thread
Pull out about 10 cm (4 inches) of both 3 threads and put them toward
you may cause sewing problems.
1 2
1 Upper thread 2 Lower thread
16
Users Manual - English and Spanish - Page 18
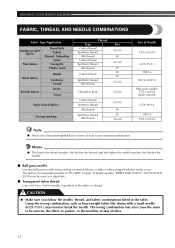
..., thread, and fabric combinations listed in the table. The factory recommended needle is "HG-4BR" (Organ).
Using the wrong combination, such as a substitute.
■ Transparent nylon thread Use a 90/14 to skip stitches.
17 KNOWING YOUR SEWING MACHINE
FABRIC, THREAD, AND NEEDLE COMBINATIONS
Fabric Type/Application
Medium weight fabrics
Thin fabrics
Broadcloth Taffeta
Flannel...
Users Manual - English and Spanish - Page 32
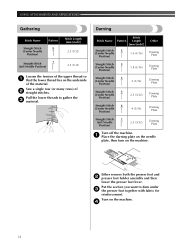
Sew a single row (or many rows) of the material. Put the section you want to gather the 3 material.
USING ATTACHMENTS AND APPLICATIONS
Gathering
Darning
Stitch Name
Pattern
Straight...3 the presser foot together with fabric for
reinforcement.
Turn on the machine. Either remove both the presser foot and 2 presser foot holder assembly and then
lower the presser foot lever. Stitch ...
Users Manual - English and Spanish - Page 35
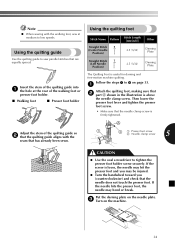
... quilting guide so 2 that the quilting guide aligns with the walking foot, sew at the rear of the walking foot or
presser foot holder.
■ Walking foot
■ Presser foot holder
The Quilting Foot is useful for darning and free-motion machine quilting. If the needle hits the presser foot, the needle may be injured.
● Turn the handwheel toward...
Users Manual - English and Spanish - Page 39
... risk getting an electric shock or being injured.
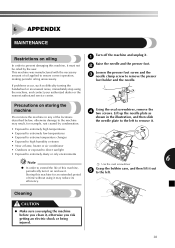
38 Turn off the machine and unplug it must not be oiled by condensation. 6 APPENDIX
MAINTENANCE
Restrictions on and use it.
Storing this machine, it .
1
Raise the needle and the presser foot.
2
Loosen the presser foot screw and the 3 needle clamp screw to the left to remove...
Users Manual - English and Spanish - Page 44
...controller 7 Free-arm style 20
G Gathering 31
H Handwheel 14
L Light switch 7 Lower threading 13
M Main parts 5 Main power 7 Maintenance 38
N Narrow hemmer foot 35 Needle
checking 7 combinations with fabric and thread ......... 17 replacing 7
P Pattern selection dial 9 Patterns 9 Presser foot changing 8
Q Quilting foot 34
R Race cleaning 38 Reverse sewing lever 10
S
, Shell tuck...
Similar Questions

Brothers Sewing Machine Lx2500 What Are The 4 Quick Change Presser Foots
(Posted by LegMegha 9 years ago)

Videos On How To Thread A Sewing Machine Lx2500
(Posted by FayKadfgs 9 years ago)
Brother 17-stitch Free-arm Sewing Machine Lx2500 How To Set Tension
(Posted by laptoprustar 10 years ago)

How To Oil Brother Sewing Machine Lx2500
(Posted by beralfie2 10 years ago)

How To Load Bobbin On A Brother Sewing Machine Lx2500
(Posted by vjupau 10 years ago)