
Brother International LX2500 Support Question
Brother International LX2500 Support Question
Find answers below for this question about Brother International LX2500.Need a Brother International LX2500 manual? We have 2 online manuals for this item!
Question posted by FayKadfgs on May 24th, 2014
Videos On How To Thread A Sewing Machine Lx2500
The person who posted this question about this Brother International product did not include a detailed explanation. Please use the "Request More Information" button to the right if more details would help you to answer this question.
Current Answers
Related Brother International LX2500 Manual Pages
Users Manual - English and Spanish - Page 4

... bed attachment 5
USING YOUR SEWING MACHINE 6 Connecting plugs 6 Main power and sewing light switch 7 Foot controller 7 Checking the needle 7 Replacing the needle 7 Changing the presser foot 8
THE CONTROLS 9 Pattern selection dial 9 Patterns and stitch names 9 Reverse sewing lever 10
THREADING THE MACHINE 11 Winding the bobbin 11 Lower threading 13 Upper threading 14 Drawing up the...
Users Manual - English and Spanish - Page 5
1 KNOWING YOUR SEWING MACHINE
1
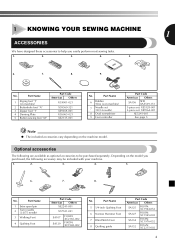
ACCESSORIES
We have designed these accessories to be included with your machine.
1.
2.
3.
4.
5.
6.
7.
8. Part Name
1
Zigzag foot "J" (on the machine model. Part Name
6
Bobbin (One is on machine)
7
Needle set (90/14 needle)
8 Oval screwdriver
9 Foot controller
Part Code
Americas Others
SA156
SFB: XA5539-151
3-piece set: XE5328-001 2-piece set...
Users Manual - English and Spanish - Page 6

... flat bed attachment to the left to start and stop sewing.
B
FC
D
E
F Foot controller (Page 7) You can turn the main power and sewing light switch on the country or region. KNOWING YOUR SEWING MACHINE
THE MAIN PARTS
43 2
1
5 A
6 0
7
9
8
1 Bobbin winder (Page 11) This winds the thread onto the bobbin for 220/240V area
The foot...
Users Manual - English and Spanish - Page 7

... the main power and remove the plug in the following circumstances:
• When you are away from the outlet.
When restarting the sewing machine, follow the necessary procedure to the 1 machine. only) ● This appliance has a polarized plug (one way. Do not modify the plug in the outlet, reverse the plug. Always grasp...
Users Manual - English and Spanish - Page 8

... the 'I' mark) 2 Turn off the foot controller, the machine will run at a low speed. KNOWING YOUR SEWING MACHINE
Main power and sewing light switch
This switch turns the main power and sewing light on the machine with a bent needle.
The product code is not in use sewing machine needles for smooth sewing.
1 2
1 Turn on a flat surface.
CAUTION
● Do...
Users Manual - English and Spanish - Page 9

... excessive force when loosening or tightening the needle clamp screw, otherwise certain parts of the sewing machine may be injured.
● Always use an oval screwdriver to
Changing the presser foot
remove...may be damaged.
● Always turn the
needle clamp screw counterclockwise to turn off the machine. 1 Raise the presser foot lever. With the flat side of the needle toward you
(...
Users Manual - English and Spanish - Page 10
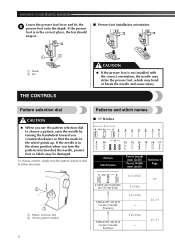
... BUTTONHOLE 2
STRAIGHT STITCH (Center Needle Position) 3
STRAIGHT STITCH (Center Needle Position)
Preset Length (mm (inch)) Preset Width (mm (inch))
0.5 (1/32)
5 (3/16) 1.6 (1/16)
-
1.8 (1/16)
- KNOWING YOUR SEWING MACHINE
Lower the presser foot lever and fix the 5 presser foot onto the shank.
Users Manual - English and Spanish - Page 12

KNOWING YOUR SEWING MACHINE
THREADING THE MACHINE
Winding the bobbin
CAUTION
● We designed the bobbin that comes with this machine. Then, pass the thread around the pre-tension disk and pull the thread in completely.
11
1
1 Pre-tension disk
CAUTION
● If the spool of thread is in the wrong place, or is set incorrectly, the thread may cause...
Users Manual - English and Spanish - Page 13
... up. If you slide the bobbin winder shaft to the right.
12 Turn on the machine.
5
While holding the end of thread from the hole
bobbin. Note
● When the sewing machine is started or the handwheel is too short, not pulled taut or held at an angle, injuries may tangle around the bobbin...
Users Manual - English and Spanish - Page 14

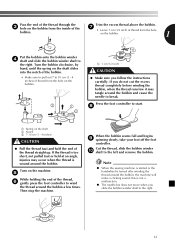
If you accidentally step on the foot controller and the machine starts to sew, you
(counterclockwise) and raise the presser foot lever.
Hold the end of the thread, push the 5 bobbin down with thread.
Raise the needle by turning the 2 handwheel toward you. KNOWING YOUR SEWING MACHINE
CAUTION
● Not winding the bobbin properly may cause the...
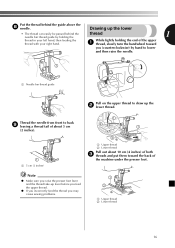
Users Manual - English and Spanish - Page 15
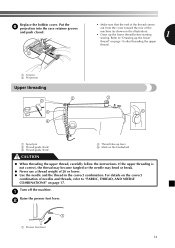
... Mark on the correct
combination of the
machine (as shown in the correct combination. Refer to "FABRIC, THREAD, AND NEEDLE COMBINATIONS" on page 16 after threading the upper
thread.
1 Groove 2 Projection
Upper threading
2
2
3 4
1 5
1 Spool pin 2 Thread guide (back) 3 Thread guide (front)
4 Thread take-up the lower thread before starting
1
sewing. Put the 6 projection into the race...
Users Manual - English and Spanish - Page 16
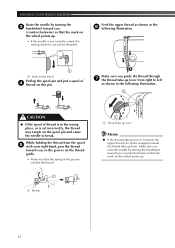
... turning the handwheel toward you
(counterclockwise) so that the mark on the wheel points up.
• If the needle is not correctly raised, the sewing machine can not be threaded. Make sure you , in the groove on the spool pin and cause the needle to left
as shown in the 6 following illustration.
1
1 Mark...
Users Manual - English and Spanish - Page 17
... to draw up lever before you feed the upper thread.
● If you incorrectly feed the thread you (counterclockwise) by holding the
thread
1
thread in your right hand.
1 thread, slowly turn the handwheel toward
you may cause sewing problems.
1 2
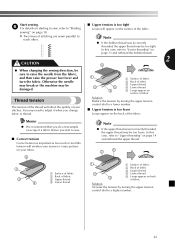
1 Upper thread 2 Lower thread
16 Drawing up the lower
• The thread can easily be passed behind the guide above...
Users Manual - English and Spanish - Page 18
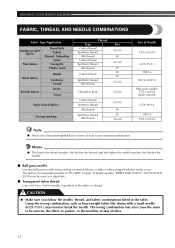
...YOUR SEWING MACHINE
FABRIC, THREAD, AND NEEDLE COMBINATIONS
Fabric Type/Application
Medium weight fabrics
Thin fabrics
Broadcloth Taffeta
Flannel, Gabardine Lawn
Georgette Challis, Satin
Thick fabrics Stretch fabrics
Denim
Corduroy Tweed Jersey
Tricot
Easily frayed fabrics
For top-stitching
Thread Type Cotton thread Synthetic thread Silk thread Cotton thread Synthetic thread Silk thread...
Users Manual - English and Spanish - Page 19
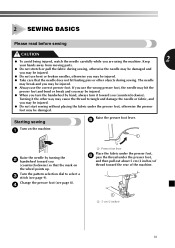
...
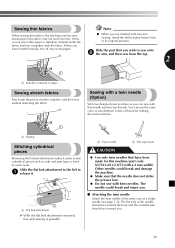
Place the fabric under the presser foot, 6 pass the thread under the presser foot, otherwise the presser
foot may be injured.
● Take care that the mark on the machine.
1
1
Raise the needle by hand, always turn it the other objects during sewing, otherwise the needle may be damaged and
you may be...
Users Manual - English and Spanish - Page 20
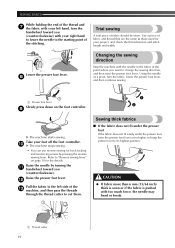
... the needle in the fabric at the point where you want to "Reverse sewing lever" on the foot controller.
9
1 2
X The machine starts sewing. Refer to change the sewing direction, and then raise the presser foot lever.
Use a piece of fabric and thread that are the same as a pivot, turn the
handwheel toward you
(counterclockwise). Take...
Users Manual - English and Spanish - Page 21
... the needle does not strike the presser foot.
● Do not sew with a twin needle (Option)
We have designed your machine so you can use the same color or two different colors of the... could break and injure you wish to sew cylindrical pieces such as a single needle (see page 7-8). The flat side of thread for this needle and two top threads.
Slide the part that you .
■...
Users Manual - English and Spanish - Page 22
SEWING BASICS
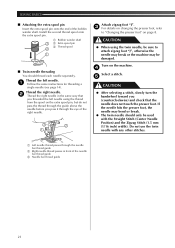
■ Attaching the extra spool pin Insert the extra spool pin onto the end of the right needle.
3
2
1
Attach zigzag foot "J". 3 For details on changing the presser foot, refer
to attach zigzag foot "J", otherwise the needle may break or the machine may bend or break.
● The twin needle should thread each...
Users Manual - English and Spanish - Page 23
... from the fabric, and then raise the presser foot lever and turn the fabric. Otherwise the needle may break or the machine may be damaged. In this case, refer to "Lower threading" on back
of fabric
Solution Increase the tension by turning the upper tension control dial to a lower number.
■ Upper...
Users Manual - English and Spanish - Page 30

..., and then tie it hits, see step 1. X Use scissors to the wrong side of the stitching.
Turn off the machine.
2
Change the foot to the Zigzag Stitch with the bobbin thread. SEWING BUTTONHOLES AND BUTTONS
Sewing buttons
Stitch Name
Pattern
Zigzag 8 Stitch
Zigzag 9 Stitch
Zigzag 10 Stitch
Stitch Length [mm (inch)]
0.7 (1/32)
1.5 (1/16)
2 (1/16...
Similar Questions

How To Thread A Brother Lx2500 Sewing Machine Video
(Posted by ritasBillH1 10 years ago)

How To Thread A Broyhers Lx2500 Sewing Machine
(Posted by nandtr 10 years ago)

How To Thread Sewing Machine Brother 2125
(Posted by morsiLi 10 years ago)
How To Thread A Brother Lx2500 Sewing Machine
(Posted by R1CHidle 10 years ago)

How Do I Thread My Machine
How do i thread my brother sewing machine model xl5130
How do i thread my brother sewing machine model xl5130
(Posted by elelvr79 11 years ago)