
Brother International LS-2125i Support Question
Brother International LS-2125i Support Question
Find answers below for this question about Brother International LS-2125i - Basic Sewing And Mending Machine.Need a Brother International LS-2125i manual? We have 2 online manuals for this item!
Question posted by gabgobind on March 28th, 2014
Why Does The Foot On My Sewing Machine Fall Off
The person who posted this question about this Brother International product did not include a detailed explanation. Please use the "Request More Information" button to the right if more details would help you to answer this question.
Current Answers
Related Brother International LS-2125i Manual Pages
Users Manual - Multi - Page 2

... from the accumulation of the sewing machine and foot controller free from all instructions before using and before changing the light bulb. This sewing machine is intended for use the ...17. Do not operate this machine outdoors. 7. Do not pull or push the fabric while stitching. "IMPORTANT SAFETY INSTRUCTIONS"
When using the sewing machine, basic safety precautions should always be ...
Users Manual - English - Page 3

... cleaning.
2. Replace bulb with any of electric shock:
1. Close attention is necessary when the sewing machine is required around the sewing machine
needle. 11. Use only accessories recommended by or near children.
2. Keep the ventilation openings of the sewing machine and foot controller free from all instructions before using and before changing the light bulb. Keep fingers...
Users Manual - English - Page 6

... 32
USEFUL STITCHES ...32
Zigzag stitches ...32 Basic stitching ...33 Blind hem stitching ...33 Darning ...35
BUTTONHOLE SEWING 36
Making the buttonhole ...36 Adjusting buitching stitching ...38 Button sewing ...38
4 KNOWING YOUR SEWING MACHINE 6
NAMES OF MACHINE PARTS AND THEIR FUNCTIONS 6
The main parts ...6 Needle and presser foot section ...8 Flat bed attachment ...8
ACCESSORIES ...9 USING...
Users Manual - English - Page 10
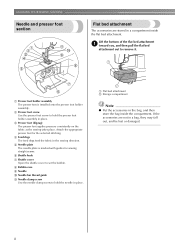
...Needle plate The needle plate is installed onto the presser foot holder assembly.
KNOWING YOUR SEWING MACHINE
Needle and presser foot section
Flat bed attachment
The accessories are not in the ...Note
● Put the accessories in a bag, they may fall out, and be lost or damaged.
8
Attach the appropriate presser foot for sewing straight seams.
f Shuttle hook
g Shuttle cover Open the ...
Users Manual - English - Page 12
... YOUR SEWING MACHINE
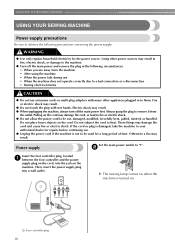
Power supply precautions
Be sure to be used for the power source. Otherwise a fire may damage the cord and cause fire or electric shock. b
Insert the foot controller plug, located a between the foot controller and the power
supply plug on the cord, into a wall outlet. These things may result. Pulling on...
Users Manual - English - Page 13
... it still does not fit, contact a qualified
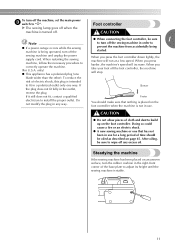
Faster
electrician to correctly operate the machine. (For U.S.A. Steadying the machine
If the sewing machine has been placed on page 45. To turn off the foot controller, the machine will stop. When you press harder, the machine's speed will increase. CAUTION
● Do not allow pieces of electric shock, this...
Users Manual - English - Page 15
...
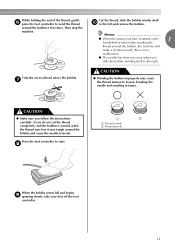
● Winding the bobbin improperly may tangle around the bobbin a few times. Press the foot controller to the left and remove the bobbin. Memo
● When the sewing machine is started or the
1
handwheel is wound, when the thread runs low it may cause the thread tension to break. CAUTION
● Make sure...
Users Manual - English - Page 16

... thread. If you accidentally step on the foot controller and the machine starts to its latch c toward you (counterclockwise)
and raise the presser foot lever. CAUTION
● Make sure you... (part code: SA156, SFB: XA5539-151). KNOWING YOUR SEWING MACHINE
Lower threading
Install the bobbin wound with this sewing machine.
CAUTION
● Winding the bobbin improperly may cause the ...
Users Manual - English - Page 18
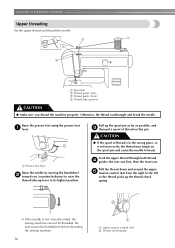
... c then put a spool of thread is in the wrong place, or is not correctly raised, the sewing machine can not be threaded. a Presser foot lever
Raise the needle by turning the handwheel b toward you thread the machine properly. Pull the thread down and around the upper e tension control dial from the right to its...
Users Manual - English - Page 20
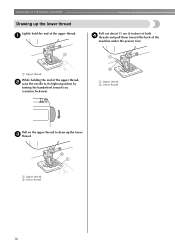
... needle to draw up the lower thread
Lightly hold the end of the upper thread.
KNOWING YOUR SEWING MACHINE
Drawing up the lower c thread.
a Upper thread
While holding the end of the
machine under the presser foot.
a
Pull out about 15 cm (6 inches) of both d threads and pull them toward you (counterclockwise). a Upper thread...
Users Manual - English - Page 22
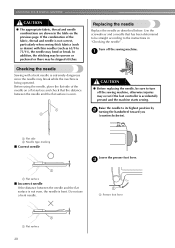
... surface is bent.
In addition, the stitching may be uneven or puckered or there may occur if the foot controller is being operated.
Do not use a bent needle.
Lower the presser foot lever. KNOWING YOUR SEWING MACHINE
CAUTION
● The appropriate fabric, thread and needle combinations are shown in the table on a flat surface...
Users Manual - English - Page 23
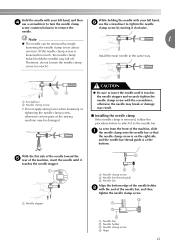
...Do not apply strong force when loosening or tightening the needle clamp screw, otherwise certain parts of the sewing machine may fall off. a Needle bar b Needle holder c Needle clamp screw d Align
21
CAUTION
● Be...Needle clamp screw b Needle bar thread guide c Needle bar
Align the bottom edge of the machine, slide a the needle clamp onto the needle bar so that
the needle clamp screw is on...
Users Manual - English - Page 24
... back. KNOWING YOUR SEWING MACHINE
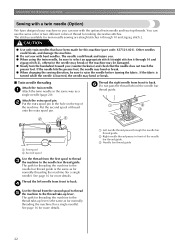
Sewing with a twin needle (Option)
We have been made for this machine (part code: X57521-021). You can sew with bent needles. The needle could break, and damage the machine. ● Do not sew with the optional twin needle and two top threads. If the needle hits the presser foot, the needle may...
Users Manual - English - Page 25
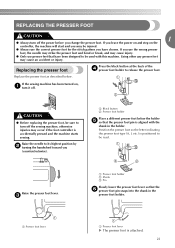
... at the back of the d presser foot holder to turn off the sewing machine, otherwise injuries may cause an accident or injury.
Position the presser foot so the letter indicating the presser foot type (A, I, etc.) is aligned with this machine.
If the sewing machine has been turned on the
controller, the machine will start and you may be sure...
Users Manual - English - Page 26
... with the lower-
a
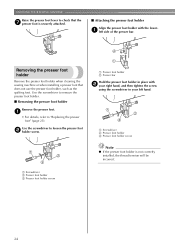
• For details, refer to remove the presser foot holder. ■ Removing the presser foot holder
Remove the presser foot.
Removing the presser foot holder
Remove the presser foot holder when cleaning the sewing machine or when installing a presser foot that the g presser foot is not correctly installed, the thread tension will be incorrect.
Use the...
Users Manual - English - Page 27
....
p
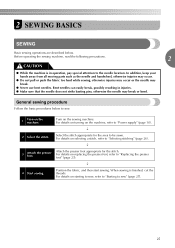
4 Start sewing. Before operating the sewing machine, read the following precautions.
2
CAUTION
● While the machine is finished, cut the threads. General sewing procedure
Follow the basic procedures below .
p
2 Select the stitch. For details on starting to sew, refer to "Starting to sew" (page 27).
25 For details on replacing the presser foot, refer to...
Users Manual - English - Page 29
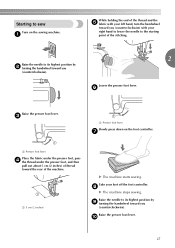
Take your left hand, turn the handwheel
toward you
(counterclockwise). h
X The machine stops sewing. j
27 f
Raise the presser foot lever.
c
a Presser foot lever
Slowly press down on the sewing machine.
Lower the presser foot lever. a 5 cm (2 inches)
X The machine starts sewing.
Raise the needle to its highest position by i turning the handwheel toward the rear of the ...
Users Manual - English - Page 32
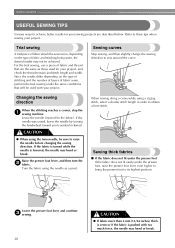
... stitching reaches a corner, stop the a sewing machine. If the fabric is turned while the needle is pushed with your project.
Sewing curves
Stop sewing, and then slightly change the sewing direction to these tips when sewing your project. Sewing thick fabrics
■ If the fabric does not fit under the presser foot If the fabric does not fit...
Users Manual - English - Page 40
...16 inches)
Number of the sewing machine, and then sew them in the direction.
...foot and d the fabric.
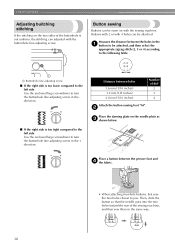
• When attaching four-hole buttons, first sew the two holes closest to turn the buttonhole fine-adjusting screw in the same way.
38
Buttons with 2 or with 4 holes can be sewn on with the buttonhole fine-adjusting screw. Button sewing
Buttons can adjusted with the sewing machine...
Users Manual - English - Page 52
...41 page 28
- -
-
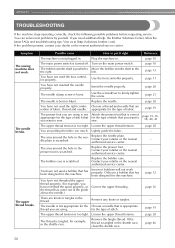
- Symptom The sewing machine does not work properly. Contact your retailer or the nearest ...machine stops operating correctly, check the following possible problems before requesting service.
You have not used a bobbin that has been designed for example, you want to firmly tighten the screw. Insert the needle properly. Use the screwdriver to sew.
The presser foot...
Similar Questions

Video On How To Use Brother Sewing Machine Ls-590
(Posted by reza7ge 9 years ago)

Presser Foot Sewing Machine Button Won't Lower Presser Foot
(Posted by sentrobe 9 years ago)
How To Put A Pressure Foot Back Together On A Brother Sewing Machine Ls-2125
(Posted by bigboshorel 10 years ago)

How To Place The Needle On A Brother Sewing Machine Ls 2125
(Posted by alhinLaszl 10 years ago)