Brother International CS-8060 Support Question
Brother International CS-8060 Support Question
Find answers below for this question about Brother International CS-8060.Need a Brother International CS-8060 manual? We have 3 online manuals for this item!
Question posted by cherylramsey on July 13th, 2012
Machine Wont Run
When I press on the foot pedal, nothing happens and I get a beep tone and an error to the side of the stich line bar that reads, "E1".........can you assist me?
Current Answers
Related Brother International CS-8060 Manual Pages
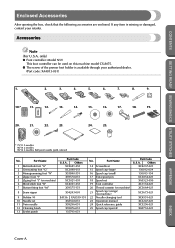
Accessory Catalog - Page 2

ZZ3-B820
ZZ3-B894
QuattroTM 6000D
Chain-stitch sewing machine for the production of straw hats
Contents
02
FZ2-B1
Brother Sewing Machine Lineup
03-04
Brother General Sewing Accessories
05-16
Brother Embellishment Feet
17-24
Brother Quilting Feet
25-28
Brother Embroidery Accessories
29-66
Brother Sewing Machine Attachments
for PQ Series
0637-0740
Brother Serger...
Accessory Catalog - Page 3

SA accessory number
Models for which the shown accessory is not only incredibly sophisticated and innovative but powerful sewing and quilting machines. This machine is compatible. Advanced Sewing & Embroidery Combination Machines
The ultimate in sewing, quilting, embroidery and even crafting capability! Create 12" x 7" or 10-1/4" x 6-1/4" embroidery, edit and size designs, and make your...
Accessory Catalog - Page 4

...-use sewing machines
www.brother.com
Its position can be adjusted exactly on the edge of zipper/piping, avoiding the non-flat parts of the presser foot and slide the presser foot so that
the needle fits on the opening on the presser foot. 4. Loosen the clamp screw at the back of zipper/piping, and presses...
Accessory Catalog - Page 5

... sewing machines
Ring Bearer Pillow & Hankerchief
Innov-is perfect for both embellishing and utility use sewing machines
Concealed Zipper Foot
Allows you to the seam allowance where the zipper will be used to line ...fabric and lower the needle
and the presser foot. 3. Press iron-on both sides of fabrics, using the adjustable guide on this presser foot. Position the needle at the left side...
Accessory Catalog - Page 6

... feeding with the wrong side facing up under the presser foot. 3. Overlock Foot
For vertical bobbin machines only. Attach the presser foot. 3. Continue to sew to the end of the fabric. Position the edge of the fabric behind the needle and lower the presser foot. 7. Continue to sew to the end of the fabric. Lower the presser...
Accessory Catalog - Page 7

...foot. Available in the seam line of fabrics.
Slip the left side under the presser foot. 5. Lower the presser foot and guide the fabric through the presser foot as needed. 3. Sew the stitches keeping a certain seam allowance. Brother General Sewing...selected machines. To sew a curve, sew so that the fabric edge becomes a right angle against the seam guide. 3. Use this presser foot ...
Accessory Catalog - Page 9

... lifter that offers 3 positions to adjust the bar to conform to your leg as you are ...,8130,8120,8080,8070,8060,80
SE-270D,HE-120/HE120PKG
Wide Tables
Useful for hands-free lifting of your sewing machine with a new Bobbin Clip... mechanism that is 80, 40)
Expand the work area of the Presser Foot as you added control and visibility for your machine...
Accessory Catalog - Page 38

... needle moves down at 3 mm, stitch length to stretch fabrics.
1. SA210
Party Bag
SA212
Piping Foot Taping Foot
Brother Serger/ Overlock
Feet
74
Piping Foot
Sews piping tapes with two pieces of fabric. Ideal for elastic tape attaching.
2. Set the machine setting: 3 thread overlock, stitch width at 5 mm, or 4 thread overlock, stitch width at the...
Users Manual - English - Page 2
...050
19 Foot controller
XC1154-021
20 Thread cassette (on machine)
XC3664-021
21
Spool cap (orange) (on this machine model CS-8075. ● The screw of the presser foot holder is... SEWING BASICS UTILITY STITCHES
Enclosed Accessories
After opening the box, check that the following accessories are enclosed. only) ● Foot controller: Model N5V
This foot controller can be used on machine)...
Users Manual - English - Page 4
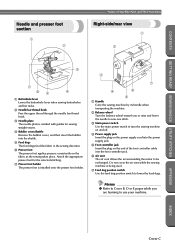
... The feed dogs feed the fabric in the sewing direction.
6 Presser foot The presser foot applies pressure consistently on the end of Machine Parts and Their Functions
Needle and presser foot section
1 2
Right-side/rear view
1
2
3
7
65
4
1 Buttonhole lever Lower the buttonhole lever when sewing buttonholes and bar tacks.
2 Needle bar thread hook Pass the upper thread through...
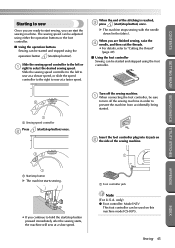
Users Manual - English - Page 41

... pressed and the machine starts sewing.
CAUTION
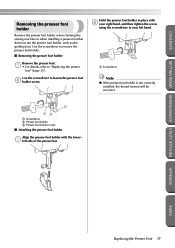
● Before replacing the presser foot, be sure to turn off the sewing machine. 2
1
1 Presser foot lever X The presser foot is raised.
Replacing the presser foot
Replace the presser foot as described below. APPENDIX
INDEX
Replacing the Presser Foot 35 CAUTION
● Use the presser foot appropriate for this sewing machine. Press...
Users Manual - English - Page 42

... (A, G, I, J, M, N or R) is positioned to be read.
1
Note
● For details on the presser foot that should be used with the
notch in the
presser foot holder.
CONTENTS
2
1 Black button 2 Presser foot holder X The presser foot holder releases the presser
foot. GETTING READY SEWING BASICS UTILITY STITCHES
GETTING READY
Press the black button at the back of the 4 presser...
Users Manual - English - Page 43
... details, refer to loosen the presser foot 2 holder screw. Use the screwdriver to "Replacing the presser
foot" (page 35). APPENDIX
INDEX
Replacing the Presser Foot 37 CONTENTS
GETTING READY SEWING BASICS UTILITY STITCHES
Removing the presser foot holder
Remove the presser foot holder when cleaning the sewing machine or when installing a presser foot that does not use the presser...
Users Manual - English - Page 44

... previous page). CAUTION
● Be sure to securely tighten the screw with the walking foot, sew at a speed between slow and medium.
■ Removing the walking foot
Press (needle position button) once or 1 twice to raise the needle. Note
● When sewing with the screwdriver, otherwise the needle may bend or break.
■ Attaching the...
Users Manual - English - Page 45

... READY SEWING BASICS UTILITY STITCHES
Raise the presser foot lever.
3
1 1 Presser foot lever X The presser foot is raised.
Memo
● Only the straight stitch (with reinforcement stitching) and the zigzag stitch can be used with the walking foot.
For details on the stitches, refer to "Removing the presser
foot holder" (page 37). Replacing the Presser Foot 39...
Users Manual - English - Page 51
... 2 the side of the stitching is reached,
3 press
(start /stop button).
only) ● Foot controller: Model N5V
This foot controller can be started and stopped using the foot controller.
1
1 Sewing speed controller
Press
2
(start the sewing machine. Slide the sewing speed controller to the left or 1 right to prevent the machine from accidentally being started and stopped using the...
Users Manual - English - Page 52

.... Once you are ready to "Cutting the thread" (page 49).
APPENDIX
Slower
Faster • Slowly press down on the foot controller decreases the sewing speed. GETTING READY SEWING BASICS UTILITY STITCHES
SEWING BASICS
Turn on the sewing machine.
3
When you are finished sewing, raise the 7 needle, and then cut the threads.
• For details, refer to start or...
Users Manual - English - Page 77
... then slide the 2 drop feed lever, located at the top end of the
buttonhole.
Attach button-sewing foot "M".
3
Use a handsewing needle to pull the gimp 7 thread to the right as seen from the front of the machine)
X The feed dogs are lowered.
Trim off any slack.
1
1 Drop feed lever (as seen from the...
Users Manual - English - Page 87

... allowance of the 1 fabric that you wish to "Replacing the presser foot" (page 35). Sew with the side of the presser foot aligned 4 with the edge of the fabric.
■ For a... allowance on the right side Align the right side of the presser foot with a 6.5 mm (1/4 inch) seam allowance. CONTENTS
GETTING READY SEWING BASICS UTILITY STITCHES
Patchwork (crazy quilt) stitching
Fold the edge of the...
Users Manual - English - Page 95

...mm (3/16 inch), onto thin paper or a
sheet of water-soluble stabilizer.
3
1
Sew with the center of the presser foot 6 aligned along the center of the two pieces of
fabric.
2
1 Thin paper ...or water soluble stabilizer 2 Basting stitching 3 4 mm (3/16 inch)
Attach zigzag foot "J".
3
J
After sewing is called "fagoting". Select stitch
4
or .
• For details, refer to "Adjusting ...
Similar Questions

Brother Vs8060
Sewing machine is throwing the code f4 what does it mean it's a cs8060
Sewing machine is throwing the code f4 what does it mean it's a cs8060
(Posted by leezajane01 9 years ago)

Cs8060 F4
What does it mean when my Brother CS8060 sewing machine has F4 in the stitch indicator window?
What does it mean when my Brother CS8060 sewing machine has F4 in the stitch indicator window?
(Posted by jandlkerns2 9 years ago)

Presser Foot Sewing Machine Button Won't Lower Presser Foot
(Posted by sentrobe 9 years ago)
Does Sewing Machine Without Foot Pedal Have Optional Foot Pedal?
(Posted by micPoetaL 10 years ago)
