
Brother International CS6000i Support Question
Brother International CS6000i Support Question
Find answers below for this question about Brother International CS6000i - Computerized Sewing Machine.Need a Brother International CS6000i manual? We have 1 online manual for this item!
Question posted by corrolla44 on May 16th, 2013
Hand Wheel Tight
Tight hand wheel, need struggles to go down, grinding noise, error E1 and E6
Current Answers
Related Brother International CS6000i Manual Pages
User Guide - Page 3
... manual and specifications of the most advanced computerized household sewing machines. Do not drop or hit the machine. 4. PLEASE READ BEFORE USING THIS MACHINE
For safe operation 1. Be sure to clean the case. Do not use extension cords. Plug the machine directly into the wall. Do not touch the hand wheel, thread take- up lever, needle, or other...
User Guide - Page 9

...
* May be able to help you be included with some models.
NCBC2000.book Page 8 Thursday, October 21, 2004 4:32 PM
KNOWING YOUR SEWING MACHINE
ACCESSORIES
The following machine models: CS-6000, CS-5100, CS-4000, BC-2500, BC-2300, BC-2100, ES-2400, ES-2200, ES-2000, ES-2410, ES-2210, ES-2010, ES-2420, ES...
User Guide - Page 10
...
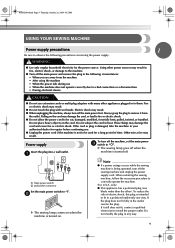
Insert the plug into a wall outlet.
Note
● If a power outage occurs while the sewing machine is damaged, take the machine to your authorized dealer for repairs before continuing use extension cords or multi-plug adapters with wet hands. If the plug does not fit fully in any way.
9
Pulling on the cord may...
User Guide - Page 12
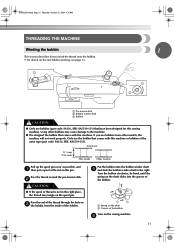
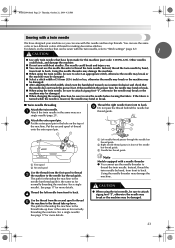
...hand, until the spring on the shaft slides into the groove of the bobbin.
1
2
a Spring on the shaft b Groove of the thread through the hole on c the bobbin from other bobbins may tangle on this sewing machine. Using other models, the machine... to wind the thread onto the bobbin. • For details on the sewing machine. Actual size
11.5 mm (7/16 inch)
This model
Other models
Pull up...
User Guide - Page 14
...your foot off the foot controller or press
(start /stop button) (for models equipped with your
right hand to wind the free end of the procedure in
a "Winding the bobbin" to pass the thread around ...in cutter)
X The thread is cut the thread as described.
Note
● If the sewing machine is to be operated using the cutter built into the
notch in , the start/stop button cannot be ...
User Guide - Page 17
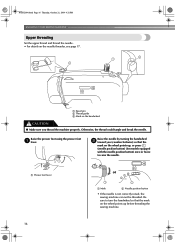
... models equipped with the needle position button) once or twice to turn the handwheel so that the mark on the wheel points up before threading the sewing machine.
16 Raise the needle by turning the handwheel b toward you thread the machine properly. a Spool pin b Thread guide c Mark on the needle threader, see page 17.
User Guide - Page 18
...with the needle threader)
CAUTION
a Thread take -up lever
Put the thread behind the needle bar thread guide by hand. Feed the upper thread as shown in the wrong place, or is in the figure d on this pin.... If you may tangle on page 20 for models equipped with home sewing machine needles size 75/11100/16.
b
While lowering the needle threader lever, c hook the thread onto the guide.
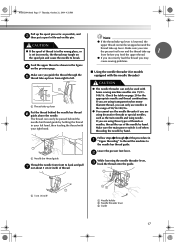
User Guide - Page 20
...for models equipped with the quick-set bobbin You can begin sewing immediately without
cutting it.
• The bobbin cover should ....
or
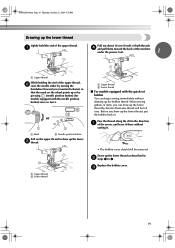
a Mark
b Needle position button
Pull on the wheel points up or by hand so that the mark on the upper thread to 4. Pass...) of both threads
d and pull them toward the back of the machine under the presser foot.
1
a Upper thread
While holding the end ...
User Guide - Page 22
... and the flat surface is even.
1 2
a Mark
b Needle position button
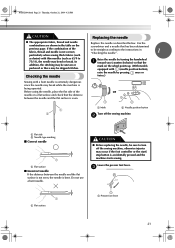
Turn off the sewing machine, otherwise injuries may occur if the foot controller or the start/ stop button is
being operated. ...counterclockwise) so that the
mark on the wheel points up. (With models equipped with (needle position button), raise the needle by pressing once or twice.)
Sewing with thin needles (such as 65/9 to...
User Guide - Page 23

... turn the needle clamp
screw counterclockwise to remove the needle.
NCBC2000.book Page 22 Thursday, October 21, 2004 4:32 PM
KNOWING YOUR SEWING MACHINE
Hold the needle with your left hand, f use a screwdriver to turn . (If the needle clamp screw is loosened too much .)
Install the twin needle in the same way. a Needle...
User Guide - Page 24
...break or the machine may be damaged. ● When changing the sewing direction, be ...hand, from front to raise the needle before turning the fabric. b Right needle thread passes in the hole on the stitches that can be damaged.
23 CAUTION
● When using the twin needle, be damaged. ● Select a stitch width of
the machine. Other needles
could break and injure you can sew...
User Guide - Page 25
... holder b Shank c Pin
Note
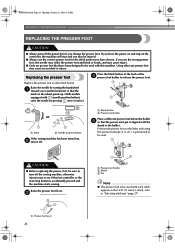
● The presser foot to turn off the sewing machine, otherwise injuries may occur if the foot controller or the start and you may be...sewing machine has been turned on the controller, the machine will start /stop button is accidentally pressed and the machine starts sewing. Replace the presser foot as described below the holder e so that the
mark on the wheel...
User Guide - Page 26
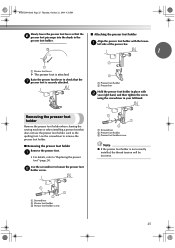
Removing the presser foot holder
Remove the presser foot holder when cleaning the sewing machine or when installing a presser foot that the g presser foot is securely ...Presser foot holder screw
25
a Presser foot holder b Presser bar
Hold the presser foot holder in your right hand, and then tighten the screw
using the screwdriver in place with the lower-
Use the screwdriver to remove ...
User Guide - Page 27

..., otherwise the needle may break.
● Never use bent needles.
Before operating the sewing machine, read the following precautions. General sewing procedure
Follow the basic procedures below . For details on replacing the presser foot, refer to sew.
1
Turn on starting to sew, refer to "Starting to "Power supply" (page 9).
↓
2 Select the stitch. Select the...
User Guide - Page 29
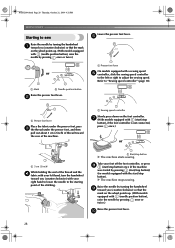
...Raise the presser foot lever. a Start/stop button). Take your right hand to lower the needle to adjust the sewing speed.
j
28 e
Raise the needle by turning the handwheel a toward...foot lever. X The machine stops sewing. a Sewing speed controller
Slowly press down on the wheel points up . (With models equipped with a sewing speed f controller, slide the sewing speed controller
to the ...
User Guide - Page 30
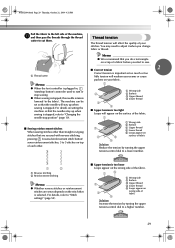
... thread
d Lower thread
3 4
■ Upper tension is too tight Loops will appear on the surface of the fabric.
1
2 3...sewing is plugged in the fabric).
The machine can be used to start or stop position" (page 10).
■ Sewing reinforcement stitches When sewing...sews reinforcement stitches, 3 to 5 stitches on scrap of a fabric before you change fabric or thread. You may need...
User Guide - Page 38
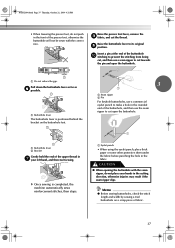
... buttonhole.
1
a Buttonhole lever b Bracket
Gently hold the end of the upper thread in g your hands in the cutting direction, otherwise injuries may result if the seam ripper slips. a Buttonhole lever
The buttonhole lever is completed, the machine automatically sews reinforcement stitches, then stops.
NCBC2000.book Page 37 Thursday, October 21, 2004 4:32 PM...
User Guide - Page 45

... foot, sew at a the rear of the machine to "Removing the presser foot holder" (page 25).
NCBC2000.book Page 44 Thursday, October 21, 2004 4:32 PM
UTILITY STITCHES
Quilting
Sandwiching batting between slow and medium.
■ Using the optional quilting guide Use the quilting guide to the presser bar. Place one hand on...
User Guide - Page 46

.... The pin on the sewing machine, and then select a e stitch.
a Presser foot holder screw
CAUTION
● Be sure to securely tighten the screws with the lower-left hand. The optional quilting foot ...is positioned at the beginning and end of the machine).
a Pin on the base, to
(to "Removing the presser foot holder" (page 25).
Use both hands to ...
User Guide - Page 48

... length. Memo
● If the fabric does not feed, for example, because it is completed, the machine automatically sews reinforcement stitches, then stops.
a Do not reduce the gap.
Raise the buttonhole lever to "Selecting stitching"... lowering the presser foot, do not push
in f your left hand, and then start sewing. NCBC2000.book Page 47 Thursday, October 21, 2004 4:32 PM
Select stitch .
Similar Questions

Brother Sewing Machine Cs6000i Problems Presser Foot
I have a new brother cs-6000i . The pressure foot falls off all the time. I am an experienced sewer ...
I have a new brother cs-6000i . The pressure foot falls off all the time. I am an experienced sewer ...
(Posted by jude1950 9 years ago)

My Sewing Machine Keeps Jamming And Gives Me An Error Code E6. Can Not Find My
Error 6 code. Jamming in bobbining area.
Error 6 code. Jamming in bobbining area.
(Posted by Anonymous-142963 9 years ago)

Hand Wheel Wont Turn Freely On Brother Cs6000i
(Posted by bzflaninur 9 years ago)

Brother Cs-6000i Computer Sewing Machine Needle Will Not Lower
(Posted by briatheres 9 years ago)

Removing Case Cover From A Brother Cs80 Sewing Machine - International Cs 80
(Posted by rzainc 10 years ago)