
Bosch HDS8055U Support Question
Bosch HDS8055U Support Question
Find answers below for this question about Bosch HDS8055U.Need a Bosch HDS8055U manual? We have 2 online manuals for this item!
Question posted by clynch6322 on August 14th, 2022
How To Refit The Hook-in Racks
cleaned the oven and removed the racks that hold the sliding food racks. Now I can't get them back in the oven
Current Answers
Answer #1: Posted by SonuKumar on August 14th, 2022 9:14 PM
SonuKumar

Member since:
May 9th, 2021 Points: 16,617,810

Member since:
May 9th, 2021 Points: 16,617,810
Please respond to my effort to provide you with the best possible solution by using the "Acceptable Solution" and/or the "Helpful" buttons when the answer has proven to be helpful.
Regards,
Sonu
Your search handyman for all e-support needs!!
Related Bosch HDS8055U Manual Pages
Installation Instructions - Page 1
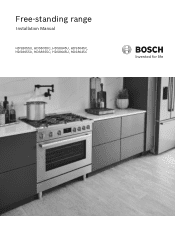
Free-standing range
Installation Manual
HDS8055U, HDS8055C, HDS8045U, HDS8045C, HDS8655U, HDS8655C, HDS8645U, HDS8645C
Installation Instructions - Page 3
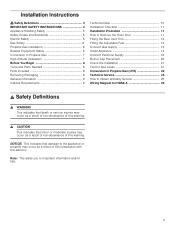
... 6 Conversion to Propane Gas 7 High Altitude Installation 7 Before You Begin 8 Tools and Parts Needed 8 Parts Included 8 Removing Packaging 8 General Information 9 Cabinet Requirements 9
Technical Data 10 Installation Checklist 11 Installation Procedure 11 How to Remove the Oven Door 11 Fitting the Rear Vent Trim 12 Fitting the Adjustable Feet 12 Connect Gas Supply 13...
Installation Instructions - Page 5
...edition or, in this manual for easier handling and installation See the section "Removing/Replacing the Oven Door".
All other servicing should not move . Unit is properly installed and ... shock. The range should be plugged into a matching grounding type receptacle to follow the instructions in Canada, the Canadian Electric Code, CSA C22.1-02. Remove the oven door for guidance...
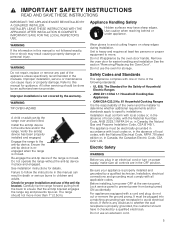
Installation Instructions - Page 6
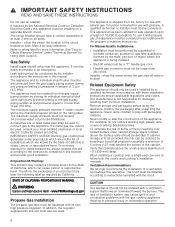
...remove leveling legs, panels, wire covers or anti-tip brackets/screws. The appliance must be 1" water column above the surface units should have a contact separation of California, which are known by reaching over a single oven... appliance resulting in an emergency.
The manufacturer is located. Remove all applicable regulations and codes. For example, do the conversion...
Installation Instructions - Page 8
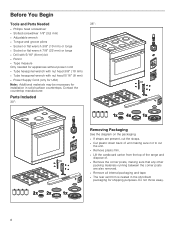
... the straps.
▯ Cut plastic down back of unit making sure not to cut the unit.
▯ Remove plastic film.
▯ Lift the cardboard carton from the top of the range and dispose of.
▯ Remove the corner posts, making sure that any other packing materials running between the corner posts are also...
Installation Instructions - Page 11

... the pages following for complete installation instructions. Failure to the oven has been turned off before removing the door. Fitting the adjustable feet.
Move the range (2 people needed) into place, making sure to avoid damaging flooring. Protect the flooring from damage, then slide the unit all the way into place in front of the...
Installation Instructions - Page 12
... location for door removal. Refit the door in the reverse order in the styrofoam packaging. Close the oven door until the ...oven.
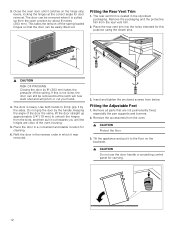
9 CAUTION Protect the floor.
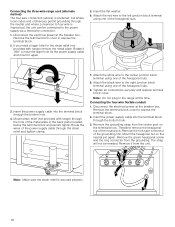
3. Place the rear vent trim into the holes intended for carrying.
12 The rear vent trim is pulled up approximately 3/4" (19 mm) to the floor on the hinge stop levers, locking the hinges at the correct angle for cleaning...
Installation Instructions - Page 14

... for leaks using a soap solution or non-corrosive leak detection fluid. Carefully tip the range forward pulling from the back to all soap solution or detection fluid residue. Assemble the ... individual gas shutoff valve must be easily accessible in an emergency.
1. Do not operate the range without the anti-tip device in the correct position.
2.
Check supply line connections for details....
Installation Instructions - Page 15
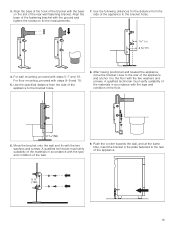
... distance from the side of the appliance.
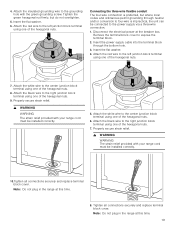
15 Align the base of the bracket with the two washers and screws. 3. Align the base of the hook of the fastening bracket with the two washers and screws. Move the bracket onto the wall and fix with the base on the slot of...
Installation Instructions - Page 16

Connect Electrical Supply
The Dual Fuel slide in the lower right-hand corner of the range back panel.
9 WARNING
ELECTRICAL GROUNDING INSTRUCTIONS This appliance (HDS8..5C) is...the appliance slightly off of Electric Shock or Fire. The length must be connected by removing the cover in range may be cut or removed under any doubt as to be at the terminal block.
When the appliance is to...
Installation Instructions - Page 17
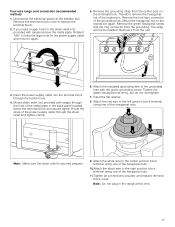
... have the lager hole for the strain relief (not provided with range) remove the metal plate. Remove the green hexagonal screw and the ring connector from the unit.
3. Remove it again.
5. Route the wires of the groundling link. Insert the flat washer.
8.
Remove the fork type connector of the power supply cable through the strain...
Installation Instructions - Page 18
...° to expose the terminal block.
2. Mount strain relief (not provided with range) remove the metal plate. Tighten all connections securely and replace terminal block cover. Remove the fork type connector of the metal plate in the range at the breaker box.
Remove the terminal block cover to have the lager hole for the strain...
Installation Instructions - Page 19
... Tighten all connections securely and replace terminal block cover. 4. Insert the flat washer.
6. Remove the terminal block cover to the right junction block terminal using one of the hexagonal nuts... The strain relief provided with the green grounding screw. Note: Do not plug in the range at this time. 19 Disconnect the electrical power at the breaker box. Insert the flat ...
Installation Instructions - Page 20
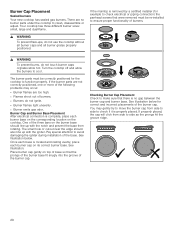
... groove of the following problems may gently try to move the burner cap from side to clean, disassemble or adjust. Your cooktop has three different burner sizes: small, large and dual-...20 Pay special attention to check electrical or piping connection) the panhead screws that there is removed by a certified installer (for example to avoid damaging the igniter during installation of burners....
Installation Instructions - Page 22
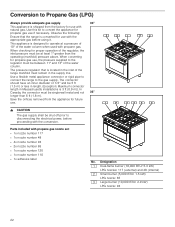
The pressure regulator that the range is converted for use if necessary. Save the orifices removed from the factory for use .
9 CAUTION
The gas supply shall ...it.
Parts included with propane gas.
Use a flexible metal appliance connector or rigid pipe to connect the range to the regulator must remain in the supply line. Observe the following:
Ensure that is located in Massachusetts...
Installation Instructions - Page 23

... the plastic regulator stem from the burner C.
$
% &
4. Remove the grates.
2. Remove the nozzle D and replace it in W.C.P.
5"
Burner Type
Dual-flame...-flame burner internal Large burner
Small burner
Setting the pressure regulator for propane gas use, the pressure supplied to remove regulator cap D.
2. Replace cover cap D and tighten with an appropriate nozzle for the new type of the...
Installation Instructions - Page 24

...appliance is approx. 1/8" (3 to 8 until it to 4 mm).
7. Adjust the minimum gas flow. Refit the grates. Light each burner individually and check for the gas burner.
8. Repeat steps 2 to 4 ..."Setting the minimum gas flow". Double-ring high-output burner
Dual-flame burner:
4. Remove the control knob and knob ring. 2. Replace the control knobs.
4. Ensure that the flame does not ...
Product Spec Sheet - Page 1

... 2 standard racks
Accessories: To...Oven cavity size (cu.
Stainless Steel HDS8055U
HDS8055U Stainless Steel
Also available in:
Black Stainless Steel
HDS8045U
First 30" Bosch Industrial Style Range with bull nose)
Required cutout size (HxWxD)(in.)
36" x 30" x 25"
Adjustable range height 35 3/8" Min.
(in inches. All rights reserved.
Genuine European Convection for easy cleaning...
Product Spec Sheet - Page 2
Stainless Steel HDS8055U
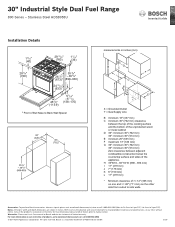
Installation Details
1 9/16" (40)
29 15/16" (760)
1 7/16" (36)
28 3/8" (720)
35 3/8"
26 1/2" (...of Robert Bosch GmbH.
5/20 BSH reserves the absolute and unrestricted right to 3 pm PST).
All rights reserved.
30" Industrial Style Dual Fuel Range
800 Series - Notes: All height, width and depth dimensions are shown in inches (mm)
B
D C
F *
G
H
J x
I...
Similar Questions

Bosch Hdi8054u Insufficient Flame/btus On Range Top Burners - Low Gas Flow?
Purchased an open-box HDI8054U dual-fuel range, floor model looked never to have been used, but with...
Purchased an open-box HDI8054U dual-fuel range, floor model looked never to have been used, but with...
(Posted by applemailaccnt 3 years ago)

Bosch Convection Range And Oven Combo How To Reset A Fault Code Of Er22
We own a Bosch range and oven combo HES7252U. The stove top module keeps displaying the following er...
We own a Bosch range and oven combo HES7252U. The stove top module keeps displaying the following er...
(Posted by nmcbncr20 8 years ago)

Bosch Dual Fuel Range/oven Model # Hd17152u/03
The oven will not heat up after trying several different heating settings.
The oven will not heat up after trying several different heating settings.
(Posted by dellga01 9 years ago)

Bosch Hgs7052uc/01 Problems With Oven Broiler And Self-cleaning
In my BOSCH HGS7052UC/01 model oven broiler and sel-cleaning are not working. What part or parts cou...
In my BOSCH HGS7052UC/01 model oven broiler and sel-cleaning are not working. What part or parts cou...
(Posted by iapanasyuk 10 years ago)

Why Oven Does Not Heat? Gas Range Model Hgs7052
The top burners are Ok but the oven does not heat
The top burners are Ok but the oven does not heat
(Posted by fdemita 12 years ago)