Biostar A880G Support Question
Biostar A880G Support Question
Find answers below for this question about Biostar A880G.Need a Biostar A880G manual? We have 2 online manuals for this item!
Question posted by lfranks71 on February 18th, 2013
Power Cord Extendsion
I need to find an extendsion cable (or a longer cord) for my power cord. The one hooking up to the ATXPWR2 slot from my power supply. Does anyone know where i can find one?
Thanks
Current Answers
Answer #1: Posted by tintinb on February 20th, 2013 11:37 PM
tintinb

Member since:
October 26th, 2012 Points: 7,056,560

Member since:
October 26th, 2012 Points: 7,056,560
Unfortunately, there is no available power cord/cable which is longer that the standard cable. Remember that all power supplies have the same length as required by the international standard organization or ISO. Please refer to the user's manual here for further information.
http://www.helpowl.com/manuals/Biostar/A880G/149385
If you have more questions, please don't hesitate to ask here at HelpOwl. Experts here are always willing to answer your questions to the best of our knowledge and expertise.
Regards,
Tintin
Related Biostar A880G Manual Pages
Setup Manual - Page 3
CHAPTER 1: INTRODUCTION
A880GU3Z/A880GZ
1.1 BEFORE YOU START
Thank you take the motherboard out from anti-static bag, ground yourself properly by touching any unfastened small parts inside ) USB 2.0 Cable X1 (optional) Serial ATA Power Cable X 1 (optional)
Note: The package contents may damage the equipment.
„ Keep the computer from dangerous area, such as heat source, humid...
Setup Manual - Page 5

...Fan Header
x1
On Board
CMOS clear Header
x1
Connector
USB 2.0 Connector
x2
Power Connector (24pin)
x1
Power Connector (4pin)
x1
Consumer IR Connector
x1
Printer Port Connector
x1
Serial ...
x1
System Fan Header
x1
CMOS clear Header
x1
USB 2.0 Connector
x2
Power Connector (24pin)
x1
Power Connector (4pin)
x1
Consumer IR Connector
x1
Printer Port Connector
x1
Serial ...
Setup Manual - Page 8
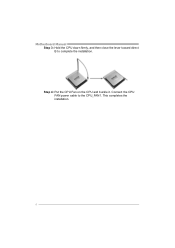
Connect the CPU FAN power cable to complete the installation. Step 4: Put the CPU Fan on the CPU and buckle it. This completes the installation.
6 Motherboard Manual Step 3: Hold the CPU down firmly, and then close the lever toward direct B to the CPU_FAN1.
Setup Manual - Page 12
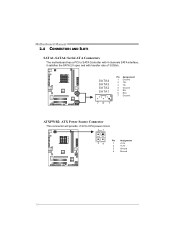
...+ 3 TX4 Ground 5 RX6 RX+ 7 Ground
ATXPWR2: ATX Power Source Connector
This connector will provide +12V to SATA Controller with 4 channels SATA interface, it satisfies the SATA 2.0 spec and with transfer rate of 3.0Gb/s. Motherboard Manual
2.4 CONNECTORS AND SLOTS
SATA1~SATA4: Serial ATA Connectors
The motherboard has a PCI to CPU power circuit. 21
34
Pin Assignment
1
+12V...
Setup Manual - Page 13

... Connector
This connector allows user to connect 24-pin power connector on the ATX power supply.
12
24
1
13
Pin
Assignment
13
+3.3V
14
-12V
15
Ground
16
PS_ON
17...4
+5V
5
Ground
6
+5V
7
Ground
8
PW_OK
9
Standby Voltage+5V
10
+12V
11
+12V
12
+3.3V
Note:
Before you power on the system, please make sure that both ATXPWR1 and ATXPWR2 connectors have been plugged-in.
11
Setup Manual - Page 15

... drive
13
LED
14
Reset button 15 16
Assignment N/A N/A N/A Power LED (+) Power LED (+) Power LED (-) Power button Ground
Function N/A N/A Power LED
Power-on pins, the jumper is "close", if not, that means ...3.2 DETAIL SETTINGS
PANEL1: Front Panel Header
This 16-pin connector includes Power-on, Reset, HDD LED, Power LED, and speaker connection. A880GU3Z/A880GZ
CHAPTER 3: HEADERS & JUMPERS ...
Setup Manual - Page 16

...(fused) 3 USB4 USB5 USB+ 6 USB+ 7 Ground 8 Ground 9 NC 10 Key
1
9
JUSBV1/JUSBV2/JUSBV3: Power Source Headers for USB Ports
Pin 1-2 Close: JUSBV1: +5V for USB ports at F_USB1/F_USB2. JUSBV2: +5V for ... allows user to connect additional USB cable on the PC front panel, and also can be connected with internal USB devices, like USB card reader.
Motherboard Manual
F_USB1/F_USB2: Headers for USB...
Setup Manual - Page 18
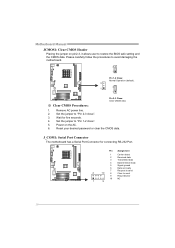
...Procedures:
1. Wait for connecting RS-232 Port. J_COM1: Serial Port Connector
The motherboard has a Serial Port Connector for five seconds. 4. Motherboard Manual
JCMOS1: Clear CMOS Header
Placing the jumper on the AC. 6.
Reset ...the CMOS data. Remove AC power line. 2. Set the jumper to "Pin 1-2 close ". 3. Power on pin2-3, it allows user to send
9
Ring indicator
10
NC
1
9
...
Setup Manual - Page 24
....com /produ cts/a crobat /reads tep2 .html
22 Note:
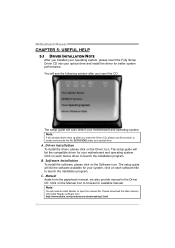
You will auto detect your motherboard and operating system. The setup guide will see the following window after you insert the Driver...window didn't show up after you insert the CD
The setup guide will need Acrobat Reader to open the manual file. Motherboard Manual
CHAPTER 5: USEFUL HELP 5.1 DRIVER INSTALLATION NOTE
After you installed your ...
Setup Manual - Page 25

... optical drive. Provide the e-ma il addr ess that you may have encountered, and then send these in the mail .
*Describe conditi on of the power suppl y manufacturer and the model no.
Setup Manual - Page 26

... see your system information including motherboard/BIOS/CPU/video/ device/OS information. Open the saved .txt file, you to a .txt file, click "Save As..." If you may need to save this information, click...'s data with other third parties, so please feel free to send the mail out. Motherboard Manual
After filling up this information to enter file name. A warning dialog would appear ...
Setup Manual - Page 29

.... Wait for seconds. 2. The CPU cooler surface is fulfilling with the CPU surface. 2. CPU fan is over heated, the motherboard will shutdown automatically to relief the CPU protection function.
1. Remove the power cord from power supply for seconds. 3. Or you can: 1. Clear the CMOS data. (See "Close CMOS Header: JCMOS1" section) 2. In this case, please...
Setup Manual - Page 30

...to the website to enter the utility.
5. Power on the right appears. Select the device contains the BIOS file and press to download the latest BIOS file for the motherboard. 2. Select the proper BIOS file and press... an easy and simple way to update your BIOS via USB pen drive or floppy disk. Motherboard Manual
BIO-Flasher
BIO-Flasher is built in the BIOS chip. Insert the USB pen drive ...
Setup Manual - Page 32
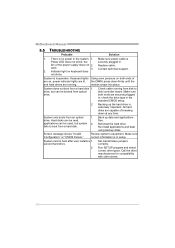
... from a hard disk 1. drive. fails to disk controller board.
System cannot boot after user installs a 1.
Replace cable.
System is no power in . drive, but system 2. Check cable running . All hard disks are capable of the power supply does not 2.
Motherboard Manual
5.5 TROUBLESHOOTING
Probable
Solution
1. module snaps into place. Reformat the hard drive. Run SETUP program and...
Bios Setup - Page 2

... supports the Plug and Play Version 1.0A specification.
It provides ASL code for power management and device configuration capabilities as defined in UEFI BIOS. Some additional features, such... Setup
Introduction
The purpose of this motherboard.
EPA Green PC Support
This AMI UEFI BIOS supports Version 1.03 of Advanced Configuration and Power interface specification (ACPI).
This system...
Bios Setup - Page 3

... in this manual. Use Load Setup Default under the Exit Menu.
z The content of the motherboard. Notice
z The default UEFI BIOS settings apply for that may be caused by wrong-settings.
... ensure system's compatibility and stability. Using Setup
When starting up the computer, press during the Power-On Self-Test (POST) to be responsible for your reference only. We will see General...
Bios Setup - Page 5

Notice
z Beware of that setting inappropriate values in items of this menu may cause system to configure the settings of CPU, Super I/O, Power Management, and other system devices.
PCI Subsystem Settings
4 A880GU3Z/A880GZ UEFI BIOS Manual
2 Advanced Menu
The Advanced Menu allows you to malfunction.
Bios Setup - Page 8

... - Disabled - Disables ASPM. The system will wait before polling "Link Training" bit in Link Status register. Options: 100 (Default) Unpopulated Links In order to save power, the system will disable unpopulated PCI Express links if this item is enabled, the system allows generation of retry attempt. BIOS auto configures; Value range...
Bios Setup - Page 10
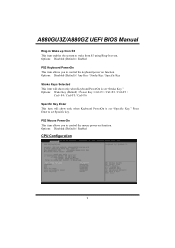
...This item will show only when Keyboard PowerOn is set "Specific Key." Press Enter to control the mouse power on function. Options: Wake Key (Default) / Power Key / Ctrl+F1 / Ctrl+F2 / Ctrl+F3 /
Ctrl +F4 / Ctrl+F5 / Ctrl+...wake from S5 This item enables the system to control the keyboard power on function. A880GU3Z/A880GZ UEFI BIOS Manual
Ring-In Wake up from S5 using Ring-In event.
Bios Setup - Page 11

... AMD virtualization in CPU. Options: Disabled (Default) / Enabled
SVM This item allows you to save power consumption. Options: Enabled (Default) / Disabled
Core C6 State This item enables or disables Core C6 State...your system utilize the AMD specific ACPI states to enable or disable the PowerNow power saving technology. A880GU3Z/A880GZ UEFI BIOS Manual
Limit CPUID Maximum When the computer...
Similar Questions


Can A 20 Pin 3.0 Usb Connection Be Plugged Into My A880gz Motherboard?
I have an A880GZ motherboard inside of a Rosewill gamer case that came with a 20 pin 3.0 usb connect...
I have an A880GZ motherboard inside of a Rosewill gamer case that came with a 20 pin 3.0 usb connect...
(Posted by paulvoices 11 years ago)