
Bernina Bernette 340 deco Support Question
Bernina Bernette 340 deco Support Question
Find answers below for this question about Bernina Bernette 340 deco.Need a Bernina Bernette 340 deco manual? We have 1 online manual for this item!
Question posted by viJg on January 2nd, 2014
How Do You Make An Applique On A Deco 340 Embroidery Machine
The person who posted this question about this Bernina product did not include a detailed explanation. Please use the "Request More Information" button to the right if more details would help you to answer this question.
Current Answers
Related Bernina Bernette 340 deco Manual Pages
User Guide - Page 2

... as a toy.
If you no circumstances should a means for use , it to the product. Do not allow to the off ) when making any openings on the sewing computer.
12. This sewing and embroidery computer is not intended for grounding be left
unattended when using and before pulling. 16.
Do not use only. Under no...
User Guide - Page 3
..., to welcome you in order to keep you even further. In order to enhance your BERNINA dealer;
he will help , ideas and embroidery essentials, to buy the bernette Deco 340. These features combined with your decision to make your sewing experience easier and even more satisfactory. Please visit your creativity to customize your designs on the...
User Guide - Page 5
...
26 27 28
23 24
29 30
31
32
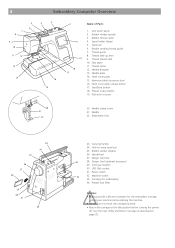
23. Design Card slot
34
28. Power switch
33
32. Carriage (for the embroidery carriage
behind your machine before starting the machine. • Do not force to move the carriage by hand. • Return the carriage to the idle position before turning the power...
User Guide - Page 8
...sewing is finished (refer to prevent overheating when the machine is running , and green when it happens.
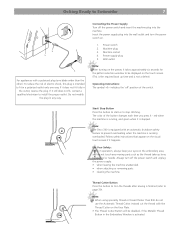
Follow safety instructions that appear on .
1.
Do not modify
the plug in
the outlet, reverse the plug. Note: The Deco 340... safety feature to page 39).
Wall outlet
Note: After turning on the embroidery area, and do not
use the Automatic Thread Cutter. If it - The...
User Guide - Page 9
... holder
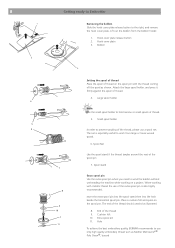
Note: Use the small spool holder to wind the bobbin without unthreading the machine while working with the thread coming off the spool as illustrated.
8. Spool Net
...1
Getting ready to Embroider
Removing the bobbin Slide the hook cover plate release button to use only high quality embroidery thread such as Mettler Metrosene+® Poly Sheen®, Isacord Bobbin
2 3
4
5 6
7
8 9...
User Guide - Page 18
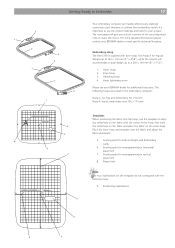
... on the fabric and place the fabric on the fabric with the reference lines.
9.
The following hoops are preset in horizontal placement 7. Embroidery Hoop The Deco 340 is important to use the template to make this choice. However, to Embroider
17
3 1
2
1
4 3
2 4
7
Your embroidery computer can handle almost every materials commonly used. Attaching knob 4.
User Guide - Page 19
...
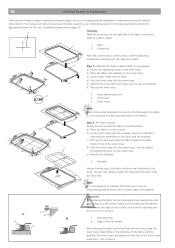
1 Fabric
2 Centerlines
1
Place the outer hoop on a flat surface.
Make sure the attaching mechanism extends over the edge the surface.
5 3
Step ...b) Place the fabric with the fabric onto the Deco 340. It is only necessary to keep in mind when...and stabilizer.
7 8
4 5
Important: When placing the fabric on the embroidery hoop, always place the outer hoop on a flat surface, with the ...
User Guide - Page 21

... or more layers can not be hooped
Note: When using paper backed adhesive stabilizer make sure that there is also available Application: To provide body and shape for more stability... • removable iron-on interfacing is no adhesive residue on stabilizers, e. Appliqué: exact securing of the embroidery after stitching • stabilizer will be marked by soaking in warm water &#...
User Guide - Page 26
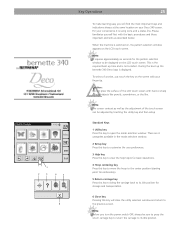
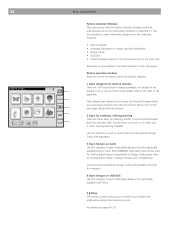
... the bernette 340 Deco logo ... The screen contrast as well as described below. For your Deco 340 screen. During the boot up time and is switched on...move the hoop to the center position (starting point for embroidery).
5 Return carriage key Press this key to bring the ... selection window. 1
2
3
4
5
6
Key Operations
25
To make learning easy you turn the power switch OFF, always be sure to ...
User Guide - Page 27
... memory may be lost or damaged.
= warning sign
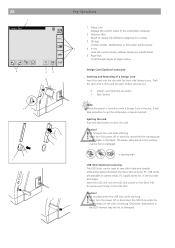
USB Stick (Optional accessory) The USB Sticks can be used to save stitch data and transfer embroidery designs between the Deco 340 and your PC. Otherwise, data stored in the USB memory may be stored.
2
4 X-key:
close the current screen, without saving any modifications.
5 Page...
User Guide - Page 33
... • Personal Designs stored in the internal memory of the
1
designs such as well to access the Personal Designs which
you previously saved into the Deco 340.
Every BERNINA embroidery card can be used. 32
Key Operations
Pattern Selection Window The main screen with the Pattern Selection Window will start automatically when the...
User Guide - Page 37
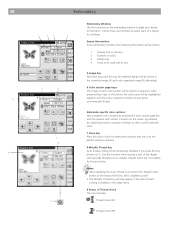
Screen Information In the embroidery window, the following information will be highlighted together with the colour sequence number as well as C). Use this function when sewing a part of a design for thread cutting. Notes: • When disabling the Auto Thread Cut function the Thread Cutter
Button at the head of the Deco 340 is disabled as...
User Guide - Page 47
... as well as designs from USB Sticks or Design Cards can be used to combine embroidery designs.
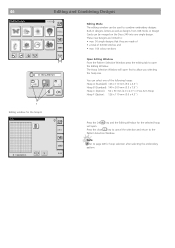
The Hoop Selection Window will open. You can select one single design. Press...for the hoop B
Edit
A.B.C
B: 140x200mm
X
Edit
Editing Mode The editing window can be merged on the Deco 340 into one of 64'000 stitches and • max. 104 colour sections
Open Editing Window From the Pattern ...
User Guide - Page 53
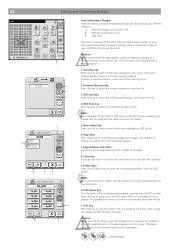
...no writeable Design Card or USB Stick is recommended to make backup copies of your own embroidery design creations. After saving the design the Edit Window ... on the Deco 340 B. 52
Editing and Combining Designs
1
USB : \ EmbF5 \ ABC
1/2
M_009
M_001
M_005
M_002
M_006
M_003 M_004
M_007 M_008
Name 10
OK
6
11
Save Embroidery Designs From the editing window embroidery design can be...
User Guide - Page 55
... Stick or Personal Design Card is saved on the Deco 340. To write modified designs back from Embroidery Software Protection Coalition (ESPC), which you have with...Deco 340 in the US at 1-888-921-5732. Please refer to the respective manuals for Deco must be stored in the :\EmbF5 folder.
54
Design Transfer and Compatibility
Design Transfer to the bernette 340 Deco The bernette 340 Deco...
User Guide - Page 56

...
Requires Reader / Writer Box on PC Do not use with Deco 340 1) Any brand of USB Stick or ATA PCMCIA card may be guaranteed
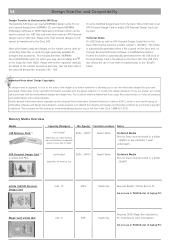
Transfer of Embroidery Designs
Below is a graphical summary of the above memory media to transfer embroidery designs into the Deco 340 and back.
Media Studio BERNINA USB Stick
Design Transfer and Compatibility...
User Guide - Page 57
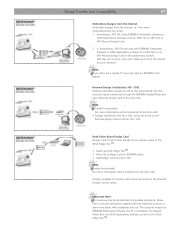
... BERNINA artista sewing machine, are direct compatible (with a desktop PC.
These files may be stored on the ATA Card using Bernina Embroidery Software or OESD Explorations Software. Embroidery designs created on the PC with Bernina Embroidery Software or OESD Explorations Software. Note: In the Device Selection Menu use «deco 330 (write to the Deco 340 by the...
User Guide - Page 58
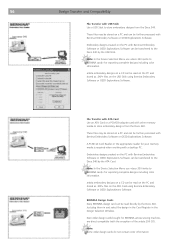
... or
OESD Explorations software write as .EXP file and copy with BERNINA Embroidery Software or OESD Explorations software to the Deco 340. Note: • Limited functionality! No colour information will be transferred to the Deco 340
Designs modified on the Deco 340 cannot be transferred through the BERNINA Reader/Writer Box and a Personal Design Card to a USB...
User Guide - Page 59
...BMP.
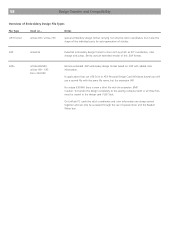
Bernia uses an extended version of stitches.
.EXP
Industrial
Industrial embroidery design format to the sewing computer both or all three files must be accessed through the use... 630/640, artista 160 - 185 Deco 330/340
Bernina extended .EXP embroidery design format based on ... Notes
.ART format
artista 200 / artista 730
special embroidery design format carrying not only the stitch...
User Guide - Page 60
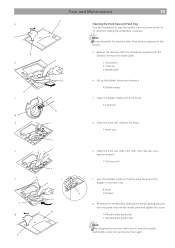
... on the needle plate and tighten the screw.
10 Needle plate guide pins 11 Needle plate guide holes Note: After cleaning the machine, make sure to 'O' and then unplug the embroidery computer. (1) a
1
(2)
2
b
4 c (3)
4 d
e
(5)
10
f
4
(g7) 2
Care and Maintenance
59
3 Cleaning the Hook Race and Feed Dog Turn the handwheel to raise the needle, turn...
Similar Questions

Bernette Deco 340 Embroidery Machine
I am seeking an Embroidery Foot no 22 for the Bernette Deco 340
I am seeking an Embroidery Foot no 22 for the Bernette Deco 340
(Posted by baxterclan 1 year ago)

Bernina Deco 330 Embroidery Machine.
I can not set the top tension. Set the dial to 0 or 9, the tension stays loose.
I can not set the top tension. Set the dial to 0 or 9, the tension stays loose.
(Posted by dvdg59 9 years ago)

What Are The 100 Patterns On The Bernette 340 Embroidery Machine
(Posted by Rahiavi 10 years ago)

How Do I Reset Timing On Bernette 340 Embroidery Machine?
I have an Bernina Bernette 340 deco embroidery machine. I desperately need instructions for resettin...
I have an Bernina Bernette 340 deco embroidery machine. I desperately need instructions for resettin...
(Posted by amykcamp 10 years ago)

I Have A Bernina Deco 330 Embroidery Machine.can It Do Machine Applique?
(Posted by Sugardogsmom 10 years ago)