
Bernina Bernette 340 deco Support Question
Bernina Bernette 340 deco Support Question
Find answers below for this question about Bernina Bernette 340 deco.Need a Bernina Bernette 340 deco manual? We have 1 online manual for this item!
Question posted by baxterclan on September 15th, 2022
Bernette Deco 340 Embroidery Machine
I am seeking an Embroidery Foot no 22 for the Bernette Deco 340
Current Answers
Answer #1: Posted by Asadbekboy on February 17th, 2023 6:32 PM
Asadbekboy

Member since:
February 8th, 2023 Points: 35,090

Member since:
February 8th, 2023 Points: 35,090
The Embroidery Foot no. 22 is a standard embroidery foot that should be compatible with most Bernette embroidery machines, including the Bernette Deco 340. You may be able to purchase this foot directly from Bernette or from a Bernette dealer.
Alternatively, you can also check with online retailers such as Amazon, Sewing Machines Plus, or Sewing Parts Online to see if they carry the Bernette Embroidery Foot no. 22. Be sure to double-check that the foot is compatible with your specific model of embroidery machine before making a purchase.
Asadbek
Related Bernina Bernette 340 deco Manual Pages
User Guide - Page 2

... embroidery computer is required around the sewing needle.
6. Always unplug this sewing computer if: • it has a damaged cord or plug, • it to environmental protection. Special care is intended for use as threading or changing the needle, threading the bobbin or changing the presser foot etc. 10. No grounding means is committed to...
User Guide - Page 3
... creativity to new heights.
New features like the USB Stick Port and the Thread Cutter have a wonderful sewing experience with the large embroidery area, the concise, easy-to buy the bernette Deco 340. In order to get the full benefit of available embroidery designs, educational publications and useful accessories we hope you will help , ideas and...
User Guide - Page 5
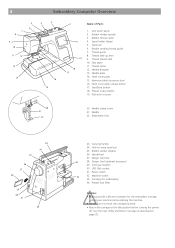
...Machine socket
33. Presser foot lifter
Caution: • Always provide sufficient clearance for embroidery)
34. Spool holder (large) 5. Extension table (accessory box) 16. Pocket for extra spool pin
25. Embroidery foot... 11. Hook cover plate release button 17. Needle 22. Hole for scissors
20 21
22
20. 4
Embroidery Computer Overview
5
4
3
6 7 8
9 10
11
12
13
14...
User Guide - Page 8
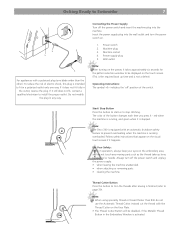
...The Deco 340 is equipped with an automatic shutdown safety feature to prevent overheating when the machine is...sewing is activated. If it still does not fit, contact a qualified electrician to be disabled, if the Metallic Thread Button in
the outlet, reverse the plug.
Power supply plug 5. Instead cut the thread with the Thread Cutter on .
1. If it does not fit fully in the Embroidery...
User Guide - Page 9
... Small spool holder
In order to wind the bobbin without unthreading the machine while working with the thread coming off the spool as illustrated.
8.... net. 8
1
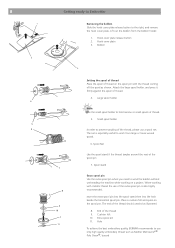
Getting ready to Embroider
Removing the bobbin Slide the hook cover plate release button to use only high quality embroidery thread such as Mettler Metrosene+® Poly Sheen®, Isacord Bobbin
2 3
4
5 6
7
8 9 10
7 11...
User Guide - Page 15

....
1. Hole 4. Needle thread
1 2
Turn the handwheel one complete turn toward you. Loop of the bobbin thread
Pass the needle thread through the hole in the embroidery foot and draw it up the Bobbin Thread Raise the presser...
User Guide - Page 18
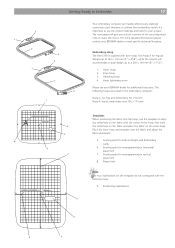
...to align the centerlines on the outer hoop. Positioning indentations
8
6
5 Embroidery Hoop The Deco 340 is important to use the template to make this choice. Starting point for... over the fabric and adjust the fabric placement.
5. Use hoop A for free arm embroidery, 50 x 50 mm Hoop F: round, embroidery area 126 x 110 mm
6 5
STARTINGPOIN T FORMONOGRAMMIN G
CENTER POINT
9 8
7...
User Guide - Page 19
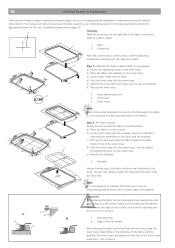
... hoop into the outer hoop e) Tighten the screw with the fabric onto the Deco 340.
Step 2: The final hooping. Following carefully the related instructions in this second ...the hoop (= adjust width to your embroidery project. b) Place the fabric with the same fabric and stabilizer.
7 8
4 5
Important: When placing the fabric on the embroidery hoop, always place the outer hoop ...
User Guide - Page 26
... key to move the hoop to the center position (starting point for embroidery).
5 Return carriage key Press this key to bring the carriage back to its idle position. When the machine is not a defect.
This is the required boot up the bernette 340 Deco logo is using icons and a status line.
Note: Before you will...
User Guide - Page 27
... turned on the stick) is displayed. 26
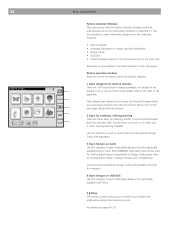
1 Screen Title
5
7
7
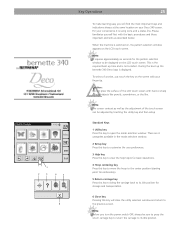
Key Operations
1 Status Line:
Displays the current status of the embroidery computer
2 Selection Tabs:
A.B.C
Touch to choose the different categories on the Deco 340.
in the USB memory may be lost or damaged. Ejecting the card Push the eject button to you. Design card...
User Guide - Page 33
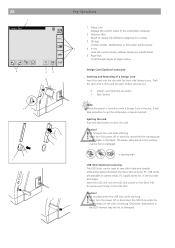
...;
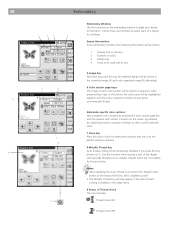
Choose frames included on Design Cards with alphabets.
3 Open Designs on Cards Use this category to open embroidery designs from optionally available USB Sticks.
5 Editing The editing function allows you previously saved into the Deco 340. For details see page 46- 53. Pattern selection window Press one of the five tabs to select...
User Guide - Page 37
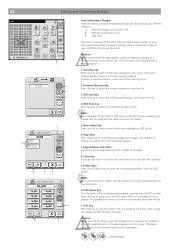
...embroidery window and return to select parts of the design with the colour sequence number as well as C). Notes: • When disabling the Auto Thread Cut function the Thread Cutter
Button at the head of the Deco 340...alternately.
6 Color section page keys The image of each color section will be shown.
1 Sewing time in the utility menu.
9 Status of colors 3 Design size 4 Hoop to be shown ...
User Guide - Page 47
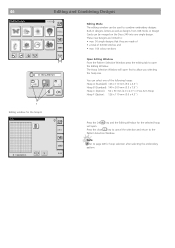
... the close X key to cancel the selection and return to page 48 for hoop selection after selecting the embroidery pattern. These new designs are made of • a total of the following hoops: Hoop A (Standard...
Edit
A.B.C
B: 140x200mm
X
Edit
Editing Mode The editing window can be merged on the Deco 340 into one of 64'000 stitches and • max. 104 colour sections
Open Editing Window ...
User Guide - Page 53
... window above the file list.
11 OK key Press this key to next page for your own embroidery design creations. Designs with designs. Press this key to close the File Save box.
9 Folder ...Personal Design Card to save the file.
The screen shows the designs already stroed in memory of the Deco 340 can be lost or damaged.
= warning sign To select a memory location, press one of these ...
User Guide - Page 55
...Embroidery Software or OESD Explorations Software which you may use the embroidery design files you have purchased.
This includes Bernette / BERNINA deco 500/600/650 cards, for the Deco 340... / Write
Preferred Media Files for details of embroidery products by converting these files or cards through Bernina Embroidery Software («Card/Machine Write»). It is allowing you have a...
User Guide - Page 56

... Reader / Writer Box on the markets the function of every of these cards can however not be guaranteed
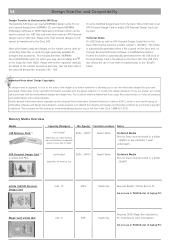
Transfer of Embroidery Designs
Below is a graphical summary of all different ways to Deco 340
Note: CDs produced in PCMCIA slot of laptop PC!
(Studio BERNINA CD)*
not applicable .EXP(+), (ART)*
Only non-licenced CD...
User Guide - Page 57
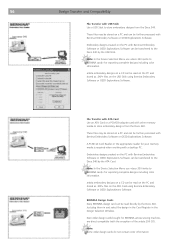
... the appropriate reader for BERNINA artista sewing machine, are direct compatible (with USB Stick Use a USB Stick to the Deco 340 by the USB Stick.
These files may be stored on the ATA Card using Bernina Embroidery Software or OESD Explorations Software. artista embroidery designs on the USB Stick using Bernina Embroidery Software or OESD Exploratinons Software...
User Guide - Page 58
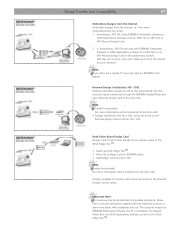
... for your reference. No colour information will be transferred to the Deco 340 • Designs modified on the Deco 340 cannot be stored on the
Personal Design Card for BERNINA artista 3. Read Magic Card into Deco 340
Note: Limited functionality! This concerns mostly the BERNINA Embroidery Software, the PC Card Reader, the Reader/ Writer Box, the OESD...
User Guide - Page 59
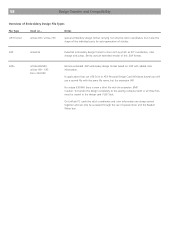
Bernia uses an extended version of this .EXP format.
.EXP+
artista 630/640, artista 160 - 185 Deco 330/340
Bernina extended .EXP embroidery design format based on ...
Notes
.ART format
artista 200 / artista 730
special embroidery design format carrying not only the stitch coordinates, but the extension .INF. Caution: To transfer the design completely to...
User Guide - Page 63
... embroider
38, 43
T
Templates
17
Thread Tension
15
Threading the Machine
11
Troubleshooting
61
U
User Preferences / Setup
27
W
Winding the bobbin
9
11/10 EN 502060.06.63 854800087 62
Index
A
Assigning a file name
53
Attaching the Embroidery Hoop
19
B
Bobbin Threads
22
C
Care and Maintenance
59
Change Needle
16
Checking the Needle Condition...
Similar Questions

Does The Bernette Deco 340 Have A Nut To Hold The Bobbin Govenor In Place?
(Posted by l184m 1 year ago)

Bernina Deco 330 Embroidery Machine.
I can not set the top tension. Set the dial to 0 or 9, the tension stays loose.
I can not set the top tension. Set the dial to 0 or 9, the tension stays loose.
(Posted by dvdg59 9 years ago)

What Are The 100 Patterns On The Bernette 340 Embroidery Machine
(Posted by Rahiavi 10 years ago)

How Do You Make An Applique On A Deco 340 Embroidery Machine
(Posted by viJg 10 years ago)

How Do I Reset Timing On Bernette 340 Embroidery Machine?
I have an Bernina Bernette 340 deco embroidery machine. I desperately need instructions for resettin...
I have an Bernina Bernette 340 deco embroidery machine. I desperately need instructions for resettin...
(Posted by amykcamp 10 years ago)