
Bernina Aurora 430 Support Question
Bernina Aurora 430 Support Question
Find answers below for this question about Bernina Aurora 430.Need a Bernina Aurora 430 manual? We have 1 online manual for this item!
Question posted by jolena1950 on February 25th, 2021
Bernina Aurora 430
when I switch on the electricity the machine make a funny noise and when I start sewing also. after that it is normal. I bought it secondhand and want to know if this is a problem
Current Answers
Answer #1: Posted by Odin on May 11th, 2021 6:11 PM
Odin

Member since:
April 10th, 2010 Points: 41,236,690

Member since:
April 10th, 2010 Points: 41,236,690
Can't interpret "funny noise" very well, but it's probably not normal.
If the issue persists or if you require further advice, you may want to consult the company: use the contact information at https://www.contacthelp.com/bernina/customer-service.
If the issue persists or if you require further advice, you may want to consult the company: use the contact information at https://www.contacthelp.com/bernina/customer-service.
Hope this is useful. Please don't forget to click the Accept This Answer button if you do accept it. My aim is to provide reliable helpful answers, not just a lot of them. See https://www.helpowl.com/profile/Odin.
Related Bernina Aurora 430 Manual Pages
Manual - Page 2
Befee attempting to sew, hewevet, and to ac hove
on veer machine. Tmte %pent alM.% stage will ehmincer eirots and will result In you cue familial wnh the come oh and then functions. Repeal the process until
...
Manual - Page 3

...MACHINE TO POWER SUPPLY FOOT CONTROL NEEDLE LIGHT
6. BOBBIN THREAD TENSION.
9. BLIND HEM STITCH
13. HONEYCOMB STITCH AND EMBROIDERY/DECORATIVE STITCHING lTor Model 440 only)
28. TROUBLE SHOOTING GUIDE
21. THREE NEEDLE POSITIONS SEWING PATTERNS MANUALLY TWIN NEEDLE SEWING... BOOK MODELS 410.420.430.440
Page Title
I. PART NAMES 4. WINDING BOBBIN 8. FOOT PRESSURE
...
Manual - Page 5
... for
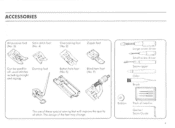
all Owen gileheS including siroighi and zigzag
Darning fool
-> Button hole foot
51
ti
•
Blind horn foot No. 9'. The design of these special sewing feet will improve the quality 01 stitch. Large screw driver
Small screw driver
Seam ripper
Oiler la
Brush Hy=
Bobbin
Pock of needles
Quitter / Seam...
Manual - Page 6
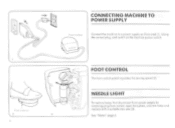
... power supply by removing plug from socket. CONNECTING MACHINE TO POWER SUPPLY
.1111 (41/1.1.0
Connect the machine too power supply as illustrated (11. unscrew lamp and replace With ci suitable new one (3). Notes" page 6 See -
open face plate. and switch on the machine power switch.
`2
3
FOOT CONTROL
The foot control pedal regulates the sewing speed (21.
Manual - Page 7

... follows:
When leaving the sewing machine unattended, the morns swath mull be switched off or the plug must only be performed with the ma(brite switched off (main switch sel to off position). Manipulations within the area of movement of the plug ore unmarked consult a qualified electrician before use. Repairs to the electric section. THE MAXIMUM...
Manual - Page 8
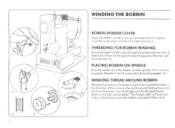
... a eight timesround the bobbin in front of rho spool through the guideot thereat lei',al then back in the direction of the arrow on the machine and holding the end of the thread between your forefinger and thumb, gently press down on to the bobbin winder spindle until ii is property...
Manual - Page 9
... norPolly necessarylaadfuslbobbin thread tension. 2
afizsrc) c-Ff5U7.,5
_Mita
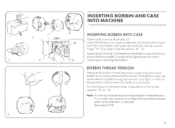
INSERTING BOBBIN AND CASE INTO MACHINE
INSERTING BOBBIN INTO CASE
Open hook cover as illustrated. (1)
a
Insert filled bobbin into...os decoded. (2) Holding the hinged
latch (3) insert bobbin and case into the hook making sure the
finger "A" is locoted inside the section "8" ('1)
lecneobout glernIrl")of the thread...
Manual - Page 12
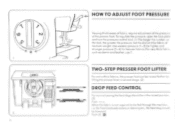
... thick fabrics, the presser foot con be ro,sed further by !thing the presser lever o second stage. 121
DROP FEED CONTROL
For normal sewing the eed dogs should be in the raised position 131 When the fobnc is not required to be lowered Push (31 Set the dial ... medium weight. and stronger pressure (5-61 for free hand embroidery or darningetc., the feed dog s'llnuId be fed through the machine.
Manual - Page 13

Usuolly the heavier the fabric, the thicker the thread and forget the needle Make sure the needle is straight and not dornoged (I)
env or aeon 1.0.C•f •
C3\ f itoota
a I IL:
• 4.1013 ,*
N hasten
[lama
viol ... FITTING OF NEEDLE
Select the correct sq.) needle to as .,!poet
Change the needle regularly and at the lust sgn of sewing problems. lased as (2) il lustrated.
12
Manual - Page 16
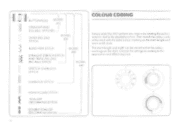
STITCH
MODEL 430
MODEL 440
COLOUR CODING
Simply select the stitch pattern you requite ay rotating the peen n CCIOCIOr dial lo the dewed position. E
'11 £1ti 3 BUTTONHOLE ...
Manual - Page 17
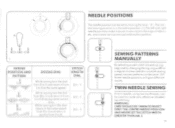
... chorigrng the trayog width in the centre posilion (1) The left and ugh'
needle positions (make iteasier to creole very uthactive !doubler by moving the leve. "A" The not
mot sewing poseion rs in 0 regular manner and of o constant sewing speed, various patterns, can be set by stricenj WARNING. NEEDLE POSITIONS
The needle positron con...
Manual - Page 18
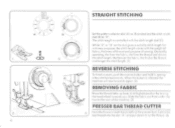
Slide the fabric out horn under 'he stitch length is released the
machine sill sew forwards ogain (21
REMOVING FABRIC
Raise the thread take up lever to cut... the stitch length, 11)
e
1/4. 2 17
REVERSE STITCHING
To finish n scam, push the reverse button and hold it, sewing few stitches backwards. Centre the TO I he foot to "0". I throod into the slot "A" and pull down to its highest...
Manual - Page 20
... fur Kars
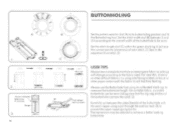
USER TIPS
Always sew o sample buttonhole on some spore fobnc ossettings will change according to the fabric used.
Always use the Buttonhole loot using interfoong (vilene) or tissue or other dillicult fabrics. For very thin, stretchy or other paper underneath the fabric to old machine feeding. BUTTONHOLING
•
A
Set the...
Manual - Page 21
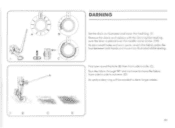
... to side to achieve. (Di An embroidery ring will be needed to move it os illustrated whilst sewing. To dorn small holes and worn ports, stretch the fobric under the foot between both bonds and... and continue to dote forger areas.
2
8
20 Cl Remove the ,honk and replace with the Darning foot making sure the lever is placed over the needle clamp screw. (2A) . A 1 i
C
I
A
DARNING
Set the idiots...
Manual - Page 22
... 3
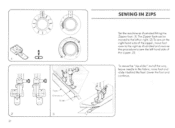
SEWING IN ZIPS
Set the machine as illustrated and 'ewe: se the procedure to sew the left hand side of the woy. leave needle in the fabric, raise foot and slide d behind the foot Lower the foot and continue.
4 II l The Zipper foot can be moved to the leh or right. (2) To sew on...
Manual - Page 23
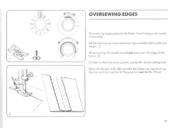
... EDGES
te)
Oversewing edges prevents the fabric from fraying and creates o neat edge Set the rnochine os illustrated selecting o suitable stitch width and length ( l) When sewing, the needle should just pass over the edge of the fabric. a) On fobr.cs that are opt to pucker. use the All Purpose foot not...
Manual - Page 24
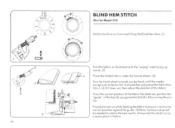
... over la Ole far left.
Alwoys lest the stitch hcst on
a spar° picco of fabric. BLIND HEM STITCH
(Net fee Medal 410)
Set the machine os illustroted fining the Blind Hem foot.
Manual - Page 25
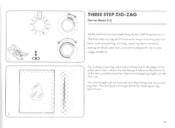
... repo.' ing Operations.
< X
2 The stitch length con be reduced until the pitches ore vets, close together.
mending. sewing on elastic and lace, oversewing edges etc on the first row. This will give o stronger I imsh for Model 410)
Sot... edge of the patch and a tear, where the !filches go firstly over the centre of of sewing applica. bons, suc has potching, darning, reposing tears.
Manual - Page 26
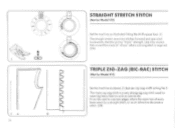
... No 5 The triple sigizog stitch is a very strong sig.:in stitch used for oreos of "'stress- n" 2 A
STRAIGHT STRETCH STITCH
(Not for Model 410)
Set the machine os illustrated fining the All Purpose foot. ;11 The sly night stretch sews two stitches forward and one stitch backwards.
Manual - Page 27

Using the Nr. 8 foot will prevent puckering within fobracs
2
2A
26
U Ft_
STRETCH OVERLOCKING AND OVERLOCKING
(Not lot Models 410 and 420
Set the machine os illustrated using the Nr. 3 or Ns. 8 foot
for finer Fobrecs i
for thicker fabricsFT
liil$§
K.!
Both these stitches o e designed to seom and overlock the ...
Similar Questions

How Can I Purchase The Bernini Aurora 430 Cd. Not The Instructional Presentation
Where can I purchase the Aurora 430 CD. Not the instructional CD. I have that one but the main CD.
Where can I purchase the Aurora 430 CD. Not the instructional CD. I have that one but the main CD.
(Posted by patsy1126 2 years ago)

Bernina Aurora 430 Replacement Parts.
My power cord was damaged on my Aurora 430. Where can I find parts/replacements for my machine.
My power cord was damaged on my Aurora 430. Where can I find parts/replacements for my machine.
(Posted by center6067 8 years ago)

Machine Makes A Grinding Sound
I've bought the machine last week. the machine started making a grinding sound this morning as soon ...
I've bought the machine last week. the machine started making a grinding sound this morning as soon ...
(Posted by Nasreensham 9 years ago)
My Aurora 430 Will Not Recognize My Monogramming Foot.
Why won't my Aurora 430 recognize my monogramming foot when I attach it. I've tried several times.
Why won't my Aurora 430 recognize my monogramming foot when I attach it. I've tried several times.
(Posted by joannvincent 11 years ago)

Aurora 430 Embroidery Machine Start Stop Icon
start stop icon comes up but it won't start sewing
start stop icon comes up but it won't start sewing
(Posted by Anonymous-95347 11 years ago)