
Bernina Aurora 430 Support Question
Bernina Aurora 430 Support Question
Find answers below for this question about Bernina Aurora 430.Need a Bernina Aurora 430 manual? We have 1 online manual for this item!
Question posted by Anonymous-95347 on January 22nd, 2013
Aurora 430 Embroidery Machine Start Stop Icon
start stop icon comes up but it won't start sewing
Current Answers
Related Bernina Aurora 430 Manual Pages
Manual - Page 2

Repeal the process until
you ' complete satislochon and enjoyment. Befee attempting to sew, hewevet, and to ac hove
on veer machine.
Tmte %pent alM.% stage will ehmincer eirots and will result In you cue familial wnh the come oh and then functions. Vow new envmg-mochine is the product of many years of teseotch...
Manual - Page 3

... AND FITTING OF 22.
MAINTAINING THE MACHINE-NEEDLE PLATE
29. CONTENTS INSTRUCTION BOOK MODELS 410.420.430.440
Page Title
I. CONTENTS
3. OVERSEWING EDGES
NEEDLE
23. THREE STEP ZIG-ZAG (Nol for Mode', 410 cdilla)
27. HONEYCOMB STITCH AND EMBROIDERY/DECORATIVE STITCHING lTor Model 440 only)
28. SEWING IN ZIPS BRINGING UP BOBBIN THREAD
15...
Manual - Page 5
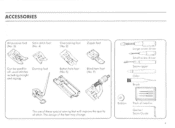
... for
all Owen gileheS including siroighi and zigzag
Darning fool
-> Button hole foot
51
ti
•
Blind horn foot No. 9'. The use of these special sewing feet will improve the quality 01 stitch.
Manual - Page 6
... switch.
`2
3
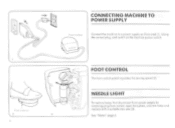
FOOT CONTROL
The foot control pedal regulates the sewing speed (21. open face plate.
unscrew lamp and replace With ci suitable new one (3). Notes" page 6 CONNECTING MACHINE TO POWER SUPPLY
.1111 (41/1.1.0
Connect the machine too power supply as illustrated (11. Using the correct plug. NEEDLE LIGHT
To reploce lomp, first disconnect...
Manual - Page 7

... movement of the needle, such as follows:
When leaving the sewing machine unattended, the morns swath mull be switched off or the plug must be removed from the ... to terminal marked Lo, coloured RED.
When cleaning or lubricoting the machine or changing the lomp and during interruptions in sewing or after completion of the plug ore unmarked consult a qualified electrician before...
Manual - Page 8
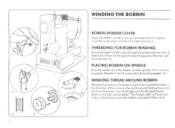
... FOR BOBBIN WINDING
Pass the threod from the spool through the guideot thereat lei',al then back in the direction of the arrow on the machine and holding the end of rho spool through the guide at the rear sight as illustrated. (3)
PLACING BOBBIN ON SPINDLE
Push the bobbin on the...
Manual - Page 9
... its highest position when removing or inserting the bobbin. ISI
Note:IIis not norPolly necessarylaadfuslbobbin thread tension.
2
afizsrc) c-Ff5U7.,5
_Mita
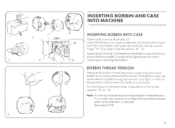
INSERTING BOBBIN AND CASE INTO MACHINE
INSERTING BOBBIN INTO CASE
Open hook cover as illustrated. (1)
a
Insert filled bobbin into cose os decoded. (2) Holding the hinged
latch (3) insert bobbin and case into...
Manual - Page 12
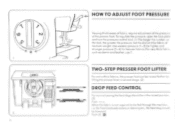
...presser foot con be ro,sed further by !thing the presser lever o second stage. 121
DROP FEED CONTROL
For normal sewing the eed dogs should be in the raised position 131 When the fobnc is not required to be lowered Push (31 e... the pressure. Use weaker pressure It -3) lot light.. and stronger pressure (5-61 for free hand embroidery or darningetc., the feed dog s'llnuId be fed through the...
Manual - Page 13

...
rtel ra
SELECTING AND FITTING OF NEEDLE
Select the correct sq.) needle to as .,!poet
Change the needle regularly and at the lust sgn of sewing problems. lased as (2) il lustrated.
12
Manual - Page 16
... ZIG-ZAG STITCHES
3 STEP ZIG-ZAG STITCH
MODEL 410
BLIND HEM STITCH
STRAIGHT STRETCH STITCH AND TRIPLE ZIG-ZAG IRIC.RAO STITCH _
STRETCH. STITCH
MODEL 430
MODEL 440
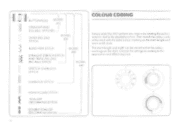
COLOUR CODING
Simply select the stitch pattern you requite ay rotating the peen n CCIOCIOr dial lo the dewed position. OVERLOC.K.
Manual - Page 18
...
fabric, thickness of thread and putpose of the machine. Slide the fabric out horn under 'he stitch length is released the
machine sill sew forwards ogain (21
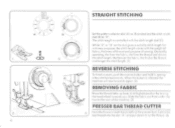
REMOVING FABRIC
Raise the thread ...17
REVERSE STITCHING
To finish n scam, push the reverse button and hold it, sewing few stitches backwards. STRAIGHT STITCHING
H
Set the pattern selector dial lAd as illustrated and the stitch ...
Manual - Page 20
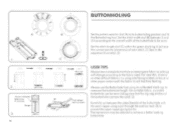
... och iewe the correct density (closeness) of the buttonhole to be reduced to old machine feeding. BUTTONHOLING
•
A
Set the pattern selector chi,' (A) to its colibroled ... overall width of satin stitch. (I) Sew in the
sequence illustrated. (71
1
2
2'
r
1
S
4-1
Artery ,.e[ .n itateitt
.6" `3
IA
Pint, rig fur Kars
USER TIPS
Always sew o sample buttonhole on some spore fobnc...
Manual - Page 21
.... Turn the fobric through 90 and continue to dote forger areas.
2
8
20
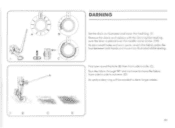
First sew round the hole lel then from side to side to achieve. (Di An embroidery ring will be needed to move it os illustrated whilst sewing. Cl Remove the ,honk and replace with the Darning foot making sure the lever...
Manual - Page 22
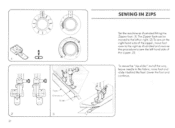
... Zipper loot. leave needle in the fabric, raise foot and slide d behind the foot Lower the foot and continue.
4 '
0
9
2 2s
Enonono 3
SEWING IN ZIPS
Set the machine as illustrated and 'ewe: se the procedure to sew the left hand side of the zipper. (3)
To move foot over to the leh or right. (2) To...
Manual - Page 23
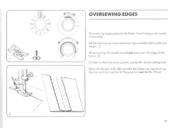
use the All Purpose foot not the Nt. 8 fool.
22 Note On Models 410.430 and 440, the 3step zigzag stitch can n150 In used, but use the Nr 8 overcasting tool. 1-D
\2
OVE ... fraying and creates o neat edge Set the rnochine os illustrated selecting o suitable stitch width and length ( l) When sewing, the needle should just pass over the edge of the fabric. a) On fobr.cs that are opt to pucker.
Manual - Page 24
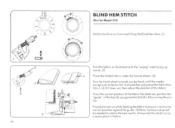
BLIND HEM STITCH
(Net fee Medal 410)
Set the machine os illustroted fining the Blind Hem foot. lz
Place the folded fabric under the foot as illustrated with the "wrong" side facing upwards.
Alwoys lest ...
Manual - Page 26
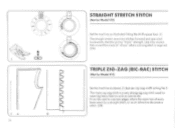
... the seam hos already been sewn by o stroight stitch, or os an attractive decorative stitch. 12B) n" 2 A
STRAIGHT STRETCH STITCH
(Not for Model 410)
Set the machine os illustrated fining the All Purpose foot. ;11 The sly night stretch sews two stitches forward and one stitch backwards.
Manual - Page 27

... pierce iha edge of the fabric according to the effect you 'cairn.. U Ft_
STRETCH OVERLOCKING AND OVERLOCKING
(Not lot Models 410 and 420
Set the machine os illustrated using the Nr. 3 or Ns. 8 foot
for finer Fobrecs i
for thicker fabricsFT
liil$§
K.!
Using the Nr. 8 foot will prevent puckering within fobracs...
Manual - Page 28
With satin stitch use the satin stitch foot No 4 and a paper boc king. Fat visible seams and hemscol-shirts, sweaters, under. A
B C
O
O
(t"
2 27
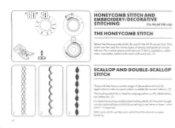
HONEYCOMB STITCH AND
EMBROIDERY/DECORATIVE
STITCHING
(For Model 440 only)
THE HONEYCOMB STITCH
Select the Honeycomb stitch fik) and fit the AN Purpose fool. This stitch can be used ...
Manual - Page 29
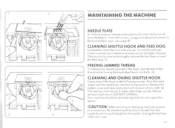
.... {4) Use sewi ng-mochine oil, or some other high-qtrebly refined minetol machine oil. DO NOT OVEROIL. Unplug the machine when nor in use.
:44 CLEANING SHUTTLE HOOK AND FEED DOG
Completely clean...oil the hook in the following manner. 2
wna5nu
rr I
.3a83
BNE
h. 3
4
MAINTAINING THE MACHINE
NEEDLE PLATE
To remove snop-on needle plate open hook cover ond pnso off homthebottom-from mound the feed...
Similar Questions

How Can I Purchase The Bernini Aurora 430 Cd. Not The Instructional Presentation
Where can I purchase the Aurora 430 CD. Not the instructional CD. I have that one but the main CD.
Where can I purchase the Aurora 430 CD. Not the instructional CD. I have that one but the main CD.
(Posted by patsy1126 2 years ago)

Bernina Aurora 430 Replacement Parts.
My power cord was damaged on my Aurora 430. Where can I find parts/replacements for my machine.
My power cord was damaged on my Aurora 430. Where can I find parts/replacements for my machine.
(Posted by center6067 8 years ago)

How Do I Reset Timing On Bernette 340 Embroidery Machine?
I have an Bernina Bernette 340 deco embroidery machine. I desperately need instructions for resettin...
I have an Bernina Bernette 340 deco embroidery machine. I desperately need instructions for resettin...
(Posted by amykcamp 10 years ago)

I Have A Bernina Aurora 440 Embroidery Machine.
While I was busy stitching the design the thread broke, after I have fixed it the machine does' nt w...
While I was busy stitching the design the thread broke, after I have fixed it the machine does' nt w...
(Posted by elizesmit 10 years ago)

My Aurora 430 Will Not Recognize My Monogramming Foot.
Why won't my Aurora 430 recognize my monogramming foot when I attach it. I've tried several times.
Why won't my Aurora 430 recognize my monogramming foot when I attach it. I've tried several times.
(Posted by joannvincent 11 years ago)