Acer Aspire E1-571 Support Question
Acer Aspire E1-571 Support Question
Find answers below for this question about Acer Aspire E1-571.Need a Acer Aspire E1-571 manual? We have 1 online manual for this item!
Question posted by louellai on January 10th, 2013
I Cannot Connect To The Internet And Also If I Connet To A Network It's Not Show
The person who posted this question about this Acer product did not include a detailed explanation. Please use the "Request More Information" button to the right if more details would help you to answer this question.
Current Answers
Answer #1: Posted by tintinb on January 15th, 2013 9:40 AM
tintinb

Member since:
October 26th, 2012 Points: 7,056,550

Member since:
October 26th, 2012 Points: 7,056,550
The LAN or Wireless LAN driver might not be installed in your computer system. Remember that these drivers are required to make your Internet connection work properly. If you believe so, you can download the LAN and Wireless LAN driver for this machine from the following links.
Acer Aspire E1-571 LAN Driver
Acer Aspire E1-571 Wireless LAN DriverRemember to restart your computer system after the installation of drivers.
If you have more questions, please don't hesitate to ask here at HelpOwl. Experts here are always willing to answer your questions to the best of our knowledge and expertise.
Regards,
Tintin
Related Acer Aspire E1-571 Manual Pages
Acer Aspire E1-531 and E1-571 Notebook Service Guide - Page 10
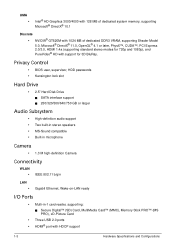
... Subsystem
• High-definition audio support • Two built-in stereo speakers • MS-Sound compatible • Built-in microphone
Camera
• 1.3 M high-definition Camera
Connectivity
WLAN
•
IEEE 802.11 b/g/n
LAN
•
Gigabit Ethernet, Wake-on-LAN ready
I/O Ports
• Multi-in-1 card reader, supporting:
Secure Digital™ (SD) Card...
Acer Aspire E1-531 and E1-571 Notebook Service Guide - Page 14
... PRO), and xD-Picture Card (xD) for
1
MULTIMEDIACARD
Card Reader
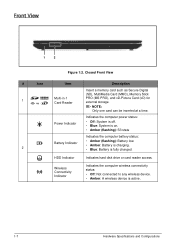
external storage. Front View
1
2
Figure 1:2.
NOTE:
Only one card can be inserted at a time. Wireless Connectivity Indicator
Indicates the computer wireless connectivity status:
• Off: Not connected to any wireless device. • Amber: A wireless device is fully charged.
Acer Aspire E1-531 and E1-571 Notebook Service Guide - Page 15
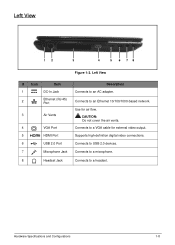
... to a headset. Use for external video output. Connects to USB 2.0 devices.
7
Microphone Jack Connects to a microphone.
8
Headset Jack
Connects to an Ethernet 10/100/1000-based network.
Connects to an AC adapter. Supports high-definition digital video connections.
CAUTION: Do not cover the air vents. Hardware Specifications and Configurations
1-8 Left View
12
3
4
5 6 78...
Acer Aspire E1-531 and E1-571 Notebook Service Guide - Page 16
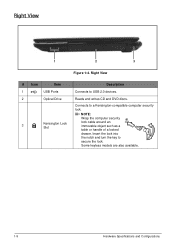
Connects to secure the lock. Insert the lock into the notch and turn the key to a Kensington-compatible ... table or handle of a locked drawer. Right View
# Icon
Item
1
USB Ports
2
Optical Drive
3
Kensington Lock Slot
Description
Connects to USB 2.0 devices. Right View
1
2
3
Figure 1:4. Some keyless models are also available.
1-9
Hardware Specifications and Configurations
Acer Aspire E1-531 and E1-571 Notebook Service Guide - Page 20
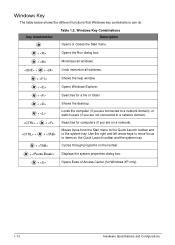
... Windows key combinations can do:
Key Combination
Table 1:2. Moves focus from the Start menu to the Quick Launch toolbar and to a network domain), or switch users (if you are connected to the system tray. Locks the computer (if you are on the Quick Launch toolbar and the system tray.
Cycles through programs...
Acer Aspire E1-531 and E1-571 Notebook Service Guide - Page 21

... your computer.
Stop Previous Next D2D Recovery
+
Stops media file.
Switches the display output between the display screen, external monitor (if connected), and both. Brightness Up
Increases screen brightness. Play/Pause
Plays or pauses media file.
Plays the previous media file in the play sequence. Press any ...
Acer Aspire E1-531 and E1-571 Notebook Service Guide - Page 44
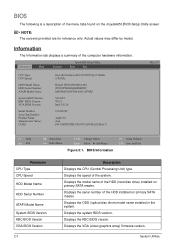
... Number: Product Name: Manufacturer Name: UUID:
Intel (R) Pentium (R) CPU B970 @ 2.30GHz 2.30GHz
Hitachi HTS545032B9A300 091023PBH306Q6DBBJDV MATSHITADVD-RAM UJ870BJ
V0.22F1 V0.21 Intel V2126
123456789
Aspire E1 Acer F0CC9FDD27BF11E187CADC0EA129FAC0
Rev. 3.7
F1 Help Esc Exit
Select Item Select Menu
F5/F6 Change Values Enter Select Sub-Menu
Figure 2:1. System Utilities
Displays the ODD...
Acer Aspire E1-531 and E1-571 Notebook Service Guide - Page 46
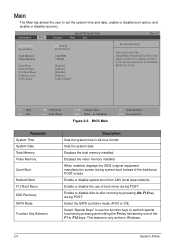
... Setup Utility
Boot
Exit
Rev. 3.7
System Time : System Date :
Total Memory: Video Memory:
Quiet Boot Network Boot F12 Boot Menu D2D Recovery SATA Mode
[19:03:49] [01/01/2012]
6144 MB 128MB
[Enable...AHCI Mode]
Item Specific Help
This is from 0 to 23, Minute is from LAN (local area network). Hour valid range is from 0 to 59.
Enable or disable disc-to perform special functions by pressing...
Acer Aspire E1-531 and E1-571 Notebook Service Guide - Page 51
ATAPI CDROM : MATSHITADVD-RAM UJ870BJ 3. Network Boot : BRCM MBA Slot 0200 v15.0.11 5.
BIOS Boot
F9 Setup Defaults F10 Save and Exit
System Utilities
2-10 Information
Main
Security
InsydeH20 Setup Utility
...
Acer Aspire E1-531 and E1-571 Notebook Service Guide - Page 53
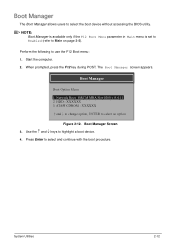
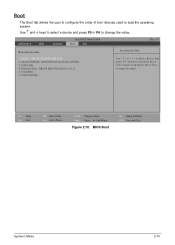
... accessing the BIOS utility. Boot Manager
The Boot Manager allows users to highlight a boot device.
4. Boot Manager
Boot Option Menu 1.
The Boot Manager screen appears. Network Boot : BRCM MBA Slot 0200 v15.0.11 2.
Boot Manager Screen
3.
Acer Aspire E1-531 and E1-571 Notebook Service Guide - Page 56
...to the USB HDD.
2. Move the USB HDD to position 1 (refer to move it up the list. Network Boot : BRCM MBA Slot 0200 v15.0.11 5. USB CDROM :
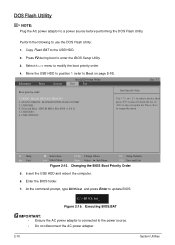
Use or to select a device, then ... to use the DOS Flash Utility:
1. Executing BIOS.BAT
IMPORTANT:
• Ensure the AC power adaptor is connected to enter the BIOS Setup Utility.
3. Enter the BIOS folder.
7. Press F2 during boot to the power...
Acer Aspire E1-531 and E1-571 Notebook Service Guide - Page 92
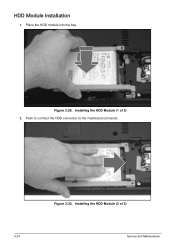
HDD Module Installation
1. Place the HDD module into the bay. Push to connect the HDD connector to the mainboard connector. Installing the HDD Module (2 of 2) 2.
Installing the HDD Module (1 of 2)
3-24
Service and Maintenance Figure 3:29. Figure 3:30.
Acer Aspire E1-531 and E1-571 Notebook Service Guide - Page 96
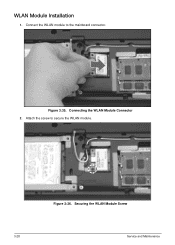
Connect the WLAN module to secure the WLAN module. Figure 3:35.
Connecting the WLAN Module Connector 2. WLAN Module Installation
1. Attach the screw to the mainboard connector. Figure 3:36. Securing the WLAN Module Screw
3-28
Service and Maintenance
Acer Aspire E1-531 and E1-571 Notebook Service Guide - Page 97

... (B -
WLAN Module Screws
Screw Name
Screw Type
M 2.0 x 3.0
Quantity 1
Service and Maintenance
3-29 3. Table 3:7.
A
B
Figure 3:37. black) antenna cable to the WLAN module connectors: • Main (A - Connecting the Antenna Cables 4. Install the base door (see Base Door Installation on page 3-13). white) antenna cable to the lower connector.
Acer Aspire E1-531 and E1-571 Notebook Service Guide - Page 98

... six (6) latches circled below to detach it from the upper case.
Releasing the Keyboard Latches 2. Figure 3:38. Figure 3:39. Removing the Keyboard
CAUTION:
A cable is connected underneath the keyboard. Keyboard Removal
Prerequisite:
Battery Pack Removal on page 3-7
1.
Acer Aspire E1-531 and E1-571 Notebook Service Guide - Page 100
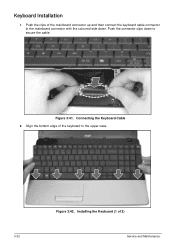
... Keyboard Cable 2. Push the connector clips down . Align the bottom edge of the mainboard connector up and then connect the keyboard cable connector to the mainboard connector with the coloured side down to the upper case. Push the clips of the keyboard to secure ...
Acer Aspire E1-531 and E1-571 Notebook Service Guide - Page 107
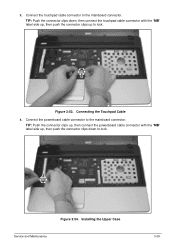
... powerboard cable connector with the "MB" label side up, then push the connector clips down , then connect the touchpad cable connector with the "MB" label side up, then push the connector clips up to lock. Installing the Upper Case
Service and Maintenance
3-...
Acer Aspire E1-531 and E1-571 Notebook Service Guide - Page 114

Figure 3:65. Connecting the DC-In Cable
2.
Installing the Mainboard
3-46
Service and Maintenance Align the left side connectors of the mainboard to the slots on the lower case, and then push to the mainboard connector. Connect the DC-in cable connector to install the mainboard. Figure 3:66. Mainboard Installation
1.
Acer Aspire E1-531 and E1-571 Notebook Service Guide - Page 115

...: • Left speaker cable connector (A) • LVDS cable connector (B) • Microphone cable connector (C) • Right speaker cable connector (D) • USB module cable connector (E)
A C
B
D
E
Figure 3:68. Connecting the Cable Connectors
Service and Maintenance
3-47 Figure 3:67. Securing the Mainboard Screws
4. 3. ...
Acer Aspire E1-531 and E1-571 Notebook Service Guide - Page 131

Figure 3:94. Align and place the left speaker on its slot on the lower case. Installing the Left Speaker
Service and Maintenance
3-63 3. Connecting the Right Speaker Cable 4. Figure 3:93.
Connect the right speaker cable connector to the mainboard connector and hook the cable in place.
Similar Questions

My Acer Laptop Aspire E1-531 Is Locked,i Can Not Enter A Password So How Do I
unlock it?
unlock it?
(Posted by Stjaczed 9 years ago)


My Acer Asks For Pin On Router And Still Doesnt Work For Internet.
(Posted by emmabowersock 10 years ago)

How To Connect To Wireless Network??after Restore Then Cant Go Through Internet
(Posted by mandytsy2102 11 years ago)