Acer Aspire 5532 Support Question
Acer Aspire 5532 Support Question
Find answers below for this question about Acer Aspire 5532.Need a Acer Aspire 5532 manual? We have 2 online manuals for this item!
Question posted by davkea on December 30th, 2013
How To Remove Cmos Battery On A Acer 5532
The person who posted this question about this Acer product did not include a detailed explanation. Please use the "Request More Information" button to the right if more details would help you to answer this question.
Current Answers
Related Acer Aspire 5532 Manual Pages
Acer Aspire 5532 Notebook Series Service Guide - Page 1
Aspire 5532 Service Guide
Service guide files and updates are available on the ACER/CSD web; for more information,
please refer to http://csd.acer.com.tw
PRINTED IN TAIWAN
Acer Aspire 5532 Notebook Series Service Guide - Page 7
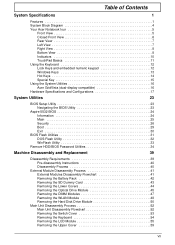
...BIOS Utility 23
Aspire 5532 BIOS 24 Information 24 Main 25 Security 26 Boot 29 Exit 30
BIOS Flash Utilities 31 DOS Flash Utility 32 WinFlash Utility 33
Remove HDD/BIOS ...Flowchart 41 Removing the Battery Pack 42 Removing the SD Dummy Card 43 Removing the Lower Covers 44 Removing the Optical Drive Module 45 Removing the DIMM Modules 47 Removing the WLAN Module 48 Removing the ...
Acer Aspire 5532 Notebook Series Service Guide - Page 9
... Clearing Password Check and BIOS Recovery 140 Clearing Password Check 140 Clear CMOS Jumper 140 BIOS Recovery by Crisis Disk 141
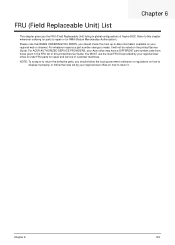
FRU (Field Replaceable Unit) List
143
Aspire 5532 Exploded Diagrams 144 Main Assembly 144 Base Assembly 146 Rear Assembly 147
Aspire 5532 FRU List 148
Model Definition and Configuration
156
Test Compatible Components
171...
Acer Aspire 5532 Notebook Series Service Guide - Page 34
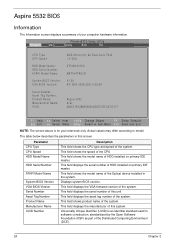
Aspire 5532 BIOS
Information
The Information screen displays a summary of the CPU. Information M a i n
PhoenixBIOS Setup Utility
... UUID:
AMD Athlon(tm) 64 Dual-Core TK42 1.6 GHz
ST9160310AS
MATSHITADVD
V1.00 ATI M92 V008.050I.0-26.00
Aspire 5532 Acer 39353164386665643635001EECE1D377
F1 Help Esc Exit
Select Item F5/F6 Change Values
F9 Setup Defaults
Select Menu Enter Select Sub-Menu F10 ...
Acer Aspire 5532 Notebook Series Service Guide - Page 50

Remove the battery pack. For example, if you want to any part of the sequence to avoid damage to remove the mainboard, you do the following stages:
• ... process is faulty, such as the camera, antenna or LCD panel, the whole module must first remove the keyboard, then disassemble the inside assembly frame in the succeeding disassembly sections illustrate the entire disassembly ...
Acer Aspire 5532 Notebook Series Service Guide - Page 52
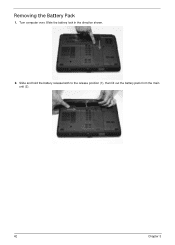
Turn computer over. Slide the battery lock in the direction shown.
2. Removing the Battery Pack
1. Slide and hold the battery release latch to the release position (1), then lift out the battery pack from the main unit (2). 2 1
42
Chapter 3
Acer Aspire 5532 Notebook Series Service Guide - Page 54
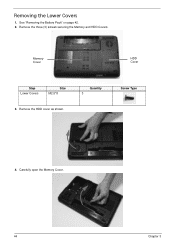
Memory Cover
HDD Cover
Step Lower Covers
Size M2.5*8
3. Remove the HDD cover as shown. Quantity 3
Screw Type
4.
Carefully open the Memory Cover.
44
Chapter 3 Removing the Lower Covers
1. See "Removing the Battery Pack" on page 42. 2. Remove the three (3) screws securing the Memory and HDD Covers.
Acer Aspire 5532 Notebook Series Service Guide - Page 55

Remove the screw securing the ODD module. Gently lever the ODD module out of the chassis.
4. Pull the optical drive module out from the chassis.
Chapter 3
45 Insert a suitable tool into the access slot in the battery bay as shown. Removing the Optical Drive Module
1. Step ODD Module
Size M2.5*8
Quantity 1
Screw Type
3.
See "Removing the Battery Pack" on page 42. 2.
Acer Aspire 5532 Notebook Series Service Guide - Page 63

... (or finger) and pry the Switch Cover upward, away from the Upper Cover.
3. See "Removing the Battery Pack" on the right side of the Keyboard to the outer casing. Removing the Switch Cover
CAUTION: Using metal tools to remove the Switch Cover may cause damage to expose the cutout. The use of the computer...
Acer Aspire 5532 Notebook Series Service Guide - Page 132
... desktop display resolution is missing from the operating system DVD and follow the onscreen prompts. 11. Remove and reinstall the video driver. 8. Run the Windows Memory Diagnostic from the BIOS, the drive ...brightness to the previous version if updated. 7. See "Disassembly Process" on battery alone as this may be defective and should be replaced. If display size is more than one year...
Acer Aspire 5532 Notebook Series Service Guide - Page 142
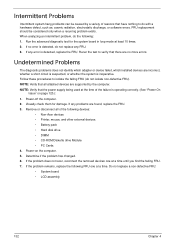
...to verify that all of the following devices:
• Non-Acer devices • Printer, mouse, and other external devices • Battery pack • Hard disk drive • DIMM •... a hardware defect, such as: cosmic radiation, electrostatic discharge, or software errors. Remove or disconnect all attached devices are no error is inoperative. Intermittent Problems
Intermittent system...
Acer Aspire 5532 Notebook Series Service Guide - Page 150
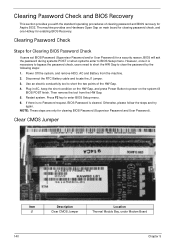
... steps and try
again.
Power Off the system, and remove HDD, AC and Battery from the HW Gap. 5. Plug in AC, keep the... short condition on main board for clearing password check, and one Hotkey for a security reason, BIOS will ask the password during systems POST or when systems enter to BIOS Setup menu. NOTE: These steps are only for Aspire 5532...
Acer Aspire 5532 Notebook Series Service Guide - Page 153
...properly, or follow the rules set by your Acer office may have a DIFFERENT part number code from those given in global configurations of Aspire 5532. You MUST use the local FRU list ...order FRU parts for repair and service of customer machines.
For ACER AUTHORIZED SERVICE PROVIDERS, your regional Acer office to -date information available on the printed Service Guide. Chapter 6
143...
Acer Aspire 5532 Notebook Series Service Guide - Page 181

... components, adapter cards, and peripherals which have passed these tests. Appendix B
171 Test Compatible Components
Appendix B
This computer's compatibility is tested and verified by the Acer Mobile System Testing Department.
All of its system functions are tested under Windows® Vista and Windows® 7 environments.
Refer to the...
Aspire 5740DG Notebook Series Users Guide - Page 15
... a soft, moist cloth.
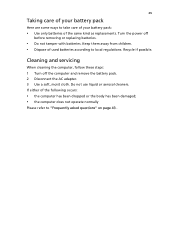
Recycle if possible. Cleaning and servicing
When cleaning the computer, follow these steps: 1 Turn off
before removing or replacing batteries.
• Do not tamper with batteries. If either of used batteries according to local regulations. Keep them away from children. • Dispose of the following occurs:
• the computer has been...
Aspire 5740DG Notebook Series Users Guide - Page 18
...
Music
21
Online Media (only for certain models)
22
YouTube
22
Flickr
22
Battery pack
23
Battery pack characteristics
23
Maximizing the battery's life
23
Installing and removing the battery pack
24
Charging the battery
25
Checking the battery level
25
Optimising battery life
25
Battery-low warning
26
Taking your notebook PC with you
27
Disconnecting from the...
Aspire 5740DG Notebook Series Users Guide - Page 44
... computer first.
English
24
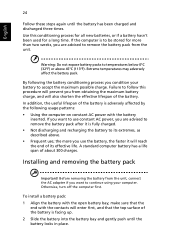
Follow these steps again until the battery locks in place.
Warning: Do not expose battery packs to remove the battery pack after it will also shorten the effective lifespan of the battery is fully charged. • Not discharging and recharging the battery to use constant AC power, you from obtaining the maximum...
Aspire 5740DG Notebook Series Users Guide - Page 45
... correctly installed in a significantly faster charge time.
English
25
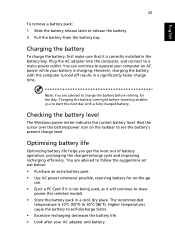
To remove a battery pack: 1 Slide the battery release latch to a mains power outlet.
Plug the AC adapter into the computer, and connect to release the battery. 2 Pull the battery from the battery bay. Optimising battery life
Optimizing battery life helps you to start the next day with the computer...
Aspire 5740DG Notebook Series Users Guide - Page 57
...ExpressCard
Before ejecting an ExpressCard: 1 Exit the application using the card. 2 Left-click on the remove hardware icon on the taskbar and stop the card
operation. 3 Push the card gently into position. ...Then turn the computer over to access its base. 2 Remove the screws from the slot. English
37 Inserting an ExpressCard
Insert the card into the slot ...
Aspire 5740DG Notebook Series Users Guide - Page 67
...47
English
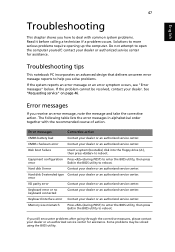
Troubleshooting
This chapter shows you how to reboot. Error messages
Corrective action
CMOS battery bad
Contact your dealer or an authorized service center.
Keyboard error or no keyboard ...reports an error message or an error symptom occurs, see "Error messages" below. CMOS checksum error
Contact your dealer or an authorized service center. Hard disk 0 extended type...


