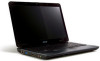
Acer Aspire 5532 Support Question
Acer Aspire 5532 Support Question
Find answers below for this question about Acer Aspire 5532.Need a Acer Aspire 5532 manual? We have 2 online manuals for this item!
Question posted by terannie on July 31st, 2013
How To Factory Reset My Acer Aspire 5532 Laptop To Factory Settings
The person who posted this question about this Acer product did not include a detailed explanation. Please use the "Request More Information" button to the right if more details would help you to answer this question.
Current Answers
Related Acer Aspire 5532 Manual Pages
Acer Aspire 5532 Notebook Series Service Guide - Page 1
Aspire 5532 Service Guide
Service guide files and updates are available on the ACER/CSD web; for more information,
please refer to http://csd.acer.com.tw
PRINTED IN TAIWAN
Acer Aspire 5532 Notebook Series Service Guide - Page 2

Revision History
Please refer to the table below for the updates made on Aspire 5532 service guides.
Date
Chapter
Updates
II
Acer Aspire 5532 Notebook Series Service Guide - Page 7
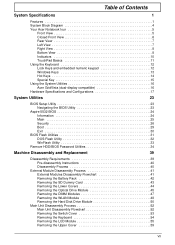
Table of Contents
System Specifications
1
Features 1 System Block Diagram 4 Your Acer Notebook tour 5
Front View 5 Closed Front View 6 Rear View 7 ...Using the System Utilities 16 Acer GridVista (dual-display compatible 16 Hardware Specifications and Configurations 17
System Utilities
23
BIOS Setup Utility 23 Navigating the BIOS Utility 23
Aspire 5532 BIOS 24 Information 24 Main...
Acer Aspire 5532 Notebook Series Service Guide - Page 9
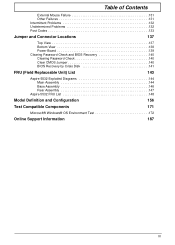
... Password Check 140 Clear CMOS Jumper 140 BIOS Recovery by Crisis Disk 141
FRU (Field Replaceable Unit) List
143
Aspire 5532 Exploded Diagrams 144 Main Assembly 144 Base Assembly 146 Rear Assembly 147
Aspire 5532 FRU List 148
Model Definition and Configuration
156
Test Compatible Components
171
Microsoft® Windows® OS Environment Test...
Acer Aspire 5532 Notebook Series Service Guide - Page 26
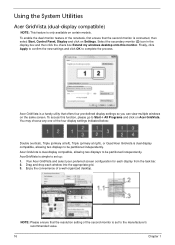
... and drop each display from the task bar. 2. To enable the dual monitor feature of the four display settings indicated below:
Double (vertical), Triple (primary at left), Triple (primary at right), or Quad Acer Gridvista is dual-display compatible, allowing two displays to the manufacturer's recommended value.
16
Chapter 1 AcerGridVista is simple...
Acer Aspire 5532 Notebook Series Service Guide - Page 34
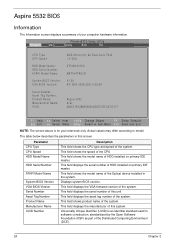
... IDE master. Universally Unique Identifier (UUID) is for your computer hardware information. Aspire 5532 BIOS
Information
The Information screen displays a summary of the system. This field displays...Core TK42 1.6 GHz
ST9160310AS
MATSHITADVD
V1.00 ATI M92 V008.050I.0-26.00
Aspire 5532 Acer 39353164386665643635001EECE1D377
F1 Help Esc Exit
Select Item F5/F6 Change Values
F9 Setup Defaults
...
Acer Aspire 5532 Notebook Series Service Guide - Page 35
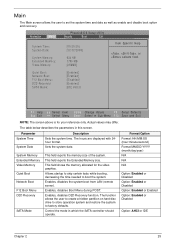
...). Allows startup to skip certain tests while booting, decreasing the time needed to factory defaults. The function allows the user to create a hidden partition on hard disc...memory size of the system. Enables, disables Boot Menu during POST.
Enables, disables D2D Recovery function.
Sets the system date.
Quiet Boot: Network Boot: F12 Boot Menu: D2D Recovery: SATA Mode:
[...
Acer Aspire 5532 Notebook Series Service Guide - Page 36
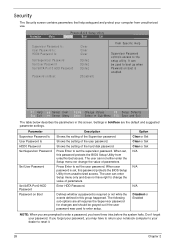
... user password is required or not while the events defined in this password protects the BIOS Setup Utility from unauthorized access.
Defines whether a password is set the user password. Press Enter to reset it.
26
Chapter 2 Press Enter to enter setup. The following sub-options are the default and suggested parameter...
Acer Aspire 5532 Notebook Series Service Guide - Page 50

... want to any part of the LCD Module is divided into the following : 1. Disassembly Process
IMPORTANT: The LCD Module cannot be replaced. If any of factory conditions. The disassembly process is faulty, such as the camera, antenna or LCD panel, the whole module must first remove the keyboard, then disassemble the...
Acer Aspire 5532 Notebook Series Service Guide - Page 138

...; System and Maintenance´ System´ Device Manager.
128
Chapter 4
Check that AutoPlay is set to correct the problem. 1. Double-click DVD/CD-ROM drives. c. a. Click Properties. Select... at a time to DMA: a. Click OK. 2. b. Check that the Regional Code is the factory default. If a device displays a down arrow, right-click on the disc is record enabled:
a....
Acer Aspire 5532 Notebook Series Service Guide - Page 150
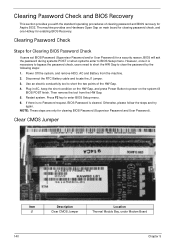
...to BIOS Setup menu. Clearing Password Check
Steps for Clearing BIOS Password Check
If users set BIOS Password (Supervisor Password and/or User Password) for clearing BIOS Password (Supervisor Password..., AC and Battery from the HW Gap. 5. The machine provides one Hotkey for Aspire 5532. Clearing Password Check and BIOS Recovery
This section provides you with the standard operating procedures...
Acer Aspire 5532 Notebook Series Service Guide - Page 153
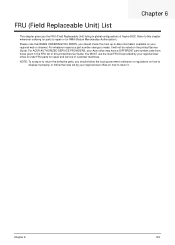
...follow the rules set by your Acer office may ...ACER AUTHORIZED SERVICE PROVIDERS, your regional Acer office to order FRU parts for RMA (Return Merchandise Authorization). FRU (Field Replaceable Unit) List
Chapter 6
This chapter gives you the FRU (Field Replaceable Unit) listing in the FRU list of this chapter whenever ordering for parts to repair or for repair and service of Aspire 5532...
Acer Aspire 5532 Notebook Series Service Guide - Page 154
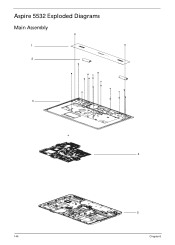
Aspire 5532 Exploded Diagrams
Main Assembly
1 2
3
4
5
144
Chapter 6
Acer Aspire 5532 Notebook Series Service Guide - Page 158
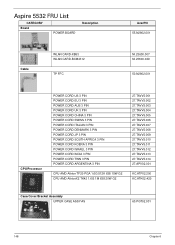
Aspire 5532 FRU List
CATEGORY Board
POWER BOARD
Description
AcerPN 55.N2802.001
Cable
WLAN CARD-XB63 WLAN CARD-BCM4312
TP FFC
NI.23600.007 NI.23600....
Acer Aspire 5532 Notebook Series Service Guide - Page 181

... and test procedures, please refer to the following lists for components, adapter cards, and peripherals which have passed these tests. Appendix B
171 Refer to the Aspire 5532 Compatibility Test Report released by Acer's internal testing department.
Test Compatible Components
Appendix B
This computer's compatibility is tested and verified by the...
Aspire 5740DG Notebook Series Users Guide - Page 13
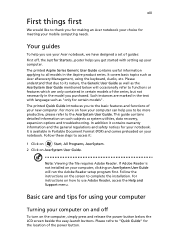
...is available in the text with setting up your Acer notebook, we have designed a set of guides:
First off
To ...turn on the computer, simply press and release the power button below will run the Adobe Reader setup program first. Such instances are only contained in certain models of the series, but not necessarily in the Aspire...
Aspire 5740DG Notebook Series Users Guide - Page 28
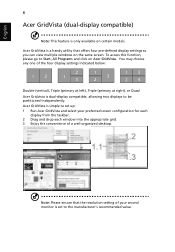
... you can view multiple windows on the same screen. To access this function, please go to be partitioned independently.
Acer GridVista is a handy utility that the resolution setting of your preferred screen configuration for each
display from the taskbar. 2 Drag and drop each window into the appropriate grid. 3 Enjoy the convenience of...
Aspire 5740DG Notebook Series Users Guide - Page 31
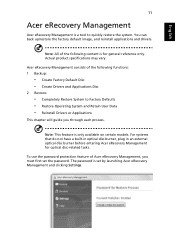
... have a built-in optical disc burner, plug in an external optical disc burner before entering Acer eRecovery Management for general reference only. The password is set the password.
English
11
Acer eRecovery Management
Acer eRecovery Management is a tool to Factory Defaults • Restore Operating System and Retain User Data • Reinstall Drivers or Applications
This...
Aspire 5740DG Notebook Series Users Guide - Page 32
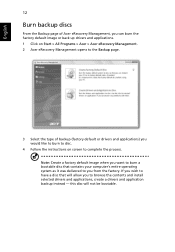
... to you would like to burn to disc.
4 Follow the instructions on Start > All Programs > Acer > Acer eRecovery Management. 2 Acer eRecovery Management opens to the Backup page.
3 Select the type of Acer eRecovery Management, you can burn the factory default image or back up drivers and applications. 1 Click on screen to browse the contents and...
Aspire 5740DG Notebook Series Users Guide - Page 33
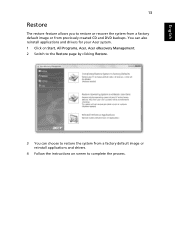
You can also reinstall applications and drivers for your Acer system. 1 Click on Start, All Programs, Acer, Acer eRecovery Management. 2 Switch to the Restore page by clicking Restore.
3 You can choose to restore the system from a factory default image or reinstall applications and drivers.
4 Follow the instructions on screen to restore or recover the system...


