8512161 - eMachines Desktop Hardware Reference Guide
Page 4
... 40 Adding or replacing an optical disc drive 42 Replacing the media panel 44 Adding or replacing a hard drive 47 Replacing the heat sink and processor 49 Adding or replacing an expansion card 52 Replacing the system battery 53 Replacing the system board 54 Chapter 5: Maintaining Your Computer 57 Setting up...
... 40 Adding or replacing an optical disc drive 42 Replacing the media panel 44 Adding or replacing a hard drive 47 Replacing the heat sink and processor 49 Adding or replacing an expansion card 52 Replacing the system battery 53 Replacing the system board 54 Chapter 5: Maintaining Your Computer 57 Setting up...
8512161 - eMachines Desktop Hardware Reference Guide
Page 22
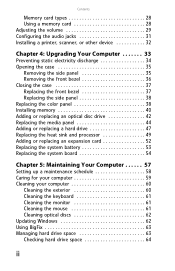
...cables to your computer according to the setup poster. 2 Press the power button on , check the power cord connections. Both the system fan and processor fan can connect a telephone to the PHONE jack on any USB or audio peripheral devices, such as printers, scanners, and speakers. You may have... lines.) 3 If you want, you can use only No. 26 AWG or larger telecommunications line cord. In addition, your computer uses a powerful processor which produces heat and has its setup instructions. 16 Chapter 3: Setting Up and Getting Started Connecting a dial-up modem Warning To reduce the risk ...
...cables to your computer according to the setup poster. 2 Press the power button on , check the power cord connections. Both the system fan and processor fan can connect a telephone to the PHONE jack on any USB or audio peripheral devices, such as printers, scanners, and speakers. You may have... lines.) 3 If you want, you can use only No. 26 AWG or larger telecommunications line cord. In addition, your computer uses a powerful processor which produces heat and has its setup instructions. 16 Chapter 3: Setting Up and Getting Started Connecting a dial-up modem Warning To reduce the risk ...
8512161 - eMachines Desktop Hardware Reference Guide
Page 39
Chapter 4 Upgrading Your Computer • Preventing static electricity discharge • Opening the case • Closing the case • Replacing the color panel • Installing memory • Replacing the system battery • Adding or replacing an optical disc drive • Replacing the media panel • Adding or replacing a hard drive • Replacing the heat sink and processor • Adding or replacing an expansion card • Replacing the system board 33
Chapter 4 Upgrading Your Computer • Preventing static electricity discharge • Opening the case • Closing the case • Replacing the color panel • Installing memory • Replacing the system battery • Adding or replacing an optical disc drive • Replacing the media panel • Adding or replacing a hard drive • Replacing the heat sink and processor • Adding or replacing an expansion card • Replacing the system board 33
8512161 - eMachines Desktop Hardware Reference Guide
Page 55
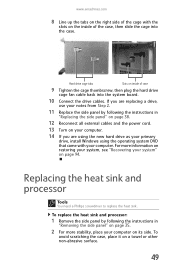
Replacing the heat sink and processor Tools You need a Phillips screwdriver to replace the heat sink. www.emachines.com 8 Line up the tabs on the right side of the cage with your computer. To avoid scratching the case, place it on the inside ... are using the operating system DVD that came with the slots on a towel or other non-abrasive surface. 49 To replace the heat sink and processor: 1 Remove the side panel by following the instructions in "Removing the side panel" on page 35. 2 For more information on restoring your system, see "Recovering...
Replacing the heat sink and processor Tools You need a Phillips screwdriver to replace the heat sink. www.emachines.com 8 Line up the tabs on the right side of the cage with your computer. To avoid scratching the case, place it on the inside ... are using the operating system DVD that came with the slots on a towel or other non-abrasive surface. 49 To replace the heat sink and processor: 1 Remove the side panel by following the instructions in "Removing the side panel" on page 35. 2 For more information on restoring your system, see "Recovering...

8512161 - eMachines Desktop Hardware Reference Guide
Page 56
Chapter 4: Upgrading Your Computer 3 Unplug the heat sink fan cable from the system board. Processor fan cable 4 Loosen the four captive screws that secure the heat sink and fan assembly to the system board, then remove the assembly and place it on a stable surface with the flat surface of the heat sink (the side with the thermal grease) up. (The four screws cannot be completely removed.) Screws (only two shown) 50
Chapter 4: Upgrading Your Computer 3 Unplug the heat sink fan cable from the system board. Processor fan cable 4 Loosen the four captive screws that secure the heat sink and fan assembly to the system board, then remove the assembly and place it on a stable surface with the flat surface of the heat sink (the side with the thermal grease) up. (The four screws cannot be completely removed.) Screws (only two shown) 50
8512161 - eMachines Desktop Hardware Reference Guide
Page 57
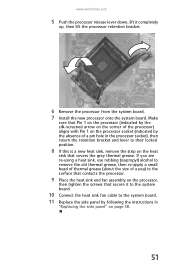
... that covers the gray thermal grease. www.emachines.com 5 Push the processor release lever down, lift it to the system board. 10 Connect the heat sink fan cable to the system board. 11 Replace the side panel by following the instructions in the processor socket), then return the retention bracket and lever...If this is a new heat sink, remove the strip on the heat sink that Pin 1 on the processor (indicated by the silk-screened arrow on the corner of the processor) aligns with Pin 1 on the processor socket (indicated by the absence of a pin hole in "Replacing the side panel" on page 38. 51...
... that covers the gray thermal grease. www.emachines.com 5 Push the processor release lever down, lift it to the system board. 10 Connect the heat sink fan cable to the system board. 11 Replace the side panel by following the instructions in the processor socket), then return the retention bracket and lever...If this is a new heat sink, remove the strip on the heat sink that Pin 1 on the processor (indicated by the silk-screened arrow on the corner of the processor) aligns with Pin 1 on the processor socket (indicated by the absence of a pin hole in "Replacing the side panel" on page 38. 51...
8512161 - eMachines Desktop Hardware Reference Guide
Page 61
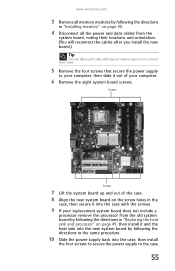
... tape to make it easier to re-connect them later. 5 Remove the four screws that secure the power supply to the case. 55 www.emachines.com 3 Remove all memory modules by following the directions in the same procedure. 10 Slide the power supply back into the new system board by... supply to your computer, then slide it out of your replacement system board does not include a processor remove the processor from the old system board by following the directions in "Replacing the heat sink and processor" on page 40. 4 Disconnect all the power and data cables from the system board, noting ...
... tape to make it easier to re-connect them later. 5 Remove the four screws that secure the power supply to the case. 55 www.emachines.com 3 Remove all memory modules by following the directions in the same procedure. 10 Slide the power supply back into the new system board by... supply to your computer, then slide it out of your replacement system board does not include a processor remove the processor from the old system board by following the directions in "Replacing the heat sink and processor" on page 40. 4 Disconnect all the power and data cables from the system board, noting ...
8512780 - eMachines Desktop PC User Guide
Page 82
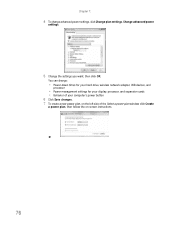
You can change advanced power settings, click Change plan settings, Change advanced power settings. 5 Change the settings you want, then click OK. Chapter 7: 4 To change : • Power-down times for your hard drive, wireless network adapter, USB devices, and processor • Power management settings for your display, processor, and expansion cards • Behavior of your computer's power button 6 Click Save changes. 7 To create a new power plan, on the left side of the Select a power plan window click Create a power plan, then follow the on-screen instructions. 76
You can change advanced power settings, click Change plan settings, Change advanced power settings. 5 Change the settings you want, then click OK. Chapter 7: 4 To change : • Power-down times for your hard drive, wireless network adapter, USB devices, and processor • Power management settings for your display, processor, and expansion cards • Behavior of your computer's power button 6 Click Save changes. 7 To create a new power plan, on the left side of the Select a power plan window click Create a power plan, then follow the on-screen instructions. 76


