eMachines Desktop PC User Guide
Page 57
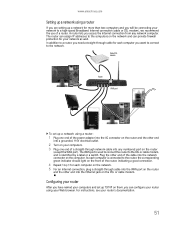
...can configure your router using a router: 1 Plug one end of the power adapter into the AC connector on the router and the other end into the network connector on your network to a high-speed Broadband Internet connection (cable or DSL modem), we recommend the use of a router. The ...on the front of the router, indicating a good connection. 4 Repeat Step 3 for your router's documentation. 51 Plug the other end into any network computer. Configuring your Web browser. As each computer is identified by a label or a switch. www.emachines.com Setting up a network using a router If you...
...can configure your router using a router: 1 Plug one end of the power adapter into the AC connector on the router and the other end into the network connector on your network to a high-speed Broadband Internet connection (cable or DSL modem), we recommend the use of a router. The ...on the front of the router, indicating a good connection. 4 Repeat Step 3 for your router's documentation. 51 Plug the other end into any network computer. Configuring your Web browser. As each computer is identified by a label or a switch. www.emachines.com Setting up a network using a router If you...
eMachines Desktop PC User Guide
Page 58
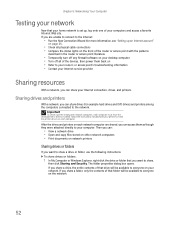
...network, you are shared, you can access them back on each network computer are unable to connect to the network. If you share a folder, only the contents of the devices, then power them as though they were attached directly to share, then click Sharing and Security. To ...the network. 52 After the drives and printers on • Refer to your router's or access point's troubleshooting information • Contact your Internet connection, drives, and printers. Sharing drives and printers With a network, you can share drives (for more information, see "Setting up , log onto...
...network, you are shared, you can access them back on each network computer are unable to connect to the network. If you share a folder, only the contents of the devices, then power them as though they were attached directly to share, then click Sharing and Security. To ...the network. 52 After the drives and printers on • Refer to your router's or access point's troubleshooting information • Contact your Internet connection, drives, and printers. Sharing drives and printers With a network, you can share drives (for more information, see "Setting up , log onto...

eMachines Desktop PC User Guide
Page 70
...you view your computer. To turn it on. Chapter 6: Customizing Windows 4 Plug the projector's or monitor's power cord into an AC power outlet, then turn on external video by default, connect the television (or other end of the cable to the Video in this section are for its driver. ...set of an appropriate video cable to hear sound while playing a DVD. To view your computer display on a television: 1 With your computer off, connect one end of headphones or external powered speakers to the video out or S-Video out jack on your display on the desktop, then click Properties.
...you view your computer. To turn it on. Chapter 6: Customizing Windows 4 Plug the projector's or monitor's power cord into an AC power outlet, then turn on external video by default, connect the television (or other end of the cable to the Video in this section are for its driver. ...set of an appropriate video cable to hear sound while playing a DVD. To view your computer display on a television: 1 With your computer off, connect one end of headphones or external powered speakers to the video out or S-Video out jack on your display on the desktop, then click Properties.

8512635 - eMachines Desktop Hardware Reference Guide
Page 3
Contents Chapter 1: About This Reference 1 About this guide 2 Accessing the online User Guide 2 eMachines contact information 3 Microsoft Certificate of Authenticity 3 Chapter 2: Checking Out Your Computer . . . . . 5 Front 6 Back 8 Chapter 3: Setting Up and Getting ...your computer 14 Avoiding discomfort and injury from repetitive strain . . 14 Preparing power connections 14 Protecting from power source problems 14 Checking the voltage selection 15 Connecting to a broadband modem or network 16 Connecting a dial-up modem 16 Starting your computer 17 Waking up your computer 17...
Contents Chapter 1: About This Reference 1 About this guide 2 Accessing the online User Guide 2 eMachines contact information 3 Microsoft Certificate of Authenticity 3 Chapter 2: Checking Out Your Computer . . . . . 5 Front 6 Back 8 Chapter 3: Setting Up and Getting ...your computer 14 Avoiding discomfort and injury from repetitive strain . . 14 Preparing power connections 14 Protecting from power source problems 14 Checking the voltage selection 15 Connecting to a broadband modem or network 16 Connecting a dial-up modem 16 Starting your computer 17 Waking up your computer 17...

8512635 - eMachines Desktop Hardware Reference Guide
Page 15
...the case. For more information, see "Preparing power connections" on page 27. Plug a PS/2 keyboard into this port. Plug USB (Universal Serial Bus) devices (such as a digital camcorder) into this jack. www.emachines.com Component Icon Power connector PS/2 keyboard port Monitor (VGA) ...) Wireless network antenna (optional) and connectors Case thumbscrew PS/2 mouse port Description Plug the power cord into this port. 9 Plug a PS/2 mouse into this connector. For more information on connecting power, see "Installing a printer, scanner, or other device" on page 26. Plug a ...
...the case. For more information, see "Preparing power connections" on page 27. Plug a PS/2 keyboard into this port. Plug USB (Universal Serial Bus) devices (such as a digital camcorder) into this jack. www.emachines.com Component Icon Power connector PS/2 keyboard port Monitor (VGA) ...) Wireless network antenna (optional) and connectors Case thumbscrew PS/2 mouse port Description Plug the power cord into this port. 9 Plug a PS/2 mouse into this connector. For more information on connecting power, see "Installing a printer, scanner, or other device" on page 26. Plug a ...

8512635 - eMachines Desktop Hardware Reference Guide
Page 17
Chapter 3 Setting Up and Getting Started • Working safely and comfortably • Preparing power connections • Connecting to a broadband modem or network • Connecting a dial-up modem • Starting your computer • Turning off your computer • Restarting (rebooting) your computer • Using the keyboard • Using the mouse • Using optical drives • Adjusting the volume • Configuring the audio jacks • Installing a printer, scanner, or other device 11
Chapter 3 Setting Up and Getting Started • Working safely and comfortably • Preparing power connections • Connecting to a broadband modem or network • Connecting a dial-up modem • Starting your computer • Turning off your computer • Restarting (rebooting) your computer • Using the keyboard • Using the mouse • Using optical drives • Adjusting the volume • Configuring the audio jacks • Installing a printer, scanner, or other device 11
8512635 - eMachines Desktop Hardware Reference Guide
Page 20
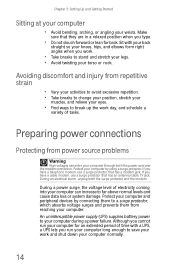
... your position, stretch your muscles, and relieve your computer during a power failure. Although you type. • Do not slouch forward or lean far back. Protect your computer by connecting them from power source problems Warning High voltages can increase to a surge protector, which... Sitting at your computer • Avoid bending, arching, or angling your computer normally. 14 Preparing power connections Protecting from reaching your torso or neck. During a power surge, the voltage level of electricity coming into your computer can enter your computer and peripheral devices by...
... your position, stretch your muscles, and relieve your computer during a power failure. Although you type. • Do not slouch forward or lean far back. Protect your computer by connecting them from power source problems Warning High voltages can increase to a surge protector, which... Sitting at your computer • Avoid bending, arching, or angling your computer normally. 14 Preparing power connections Protecting from reaching your torso or neck. During a power surge, the voltage level of electricity coming into your computer can enter your computer and peripheral devices by...

8512635 - eMachines Desktop Hardware Reference Guide
Page 23
...emachines.com Starting your computer To start your computer: 1 Connect the power, network, mouse, keyboard, and monitor cables to your computer according to the setup poster. 2 Press the power button on the front of your computer for several minutes, it up your computer first. In addition, your computer uses a powerful...the online User Guide. If your computer's menus, see the "Customizing Windows" chapter in Standby mode, the power indicator on , check the power cable connections. Both the system fan and processor fan can run at different speeds at high speed and a decrease in ...
...emachines.com Starting your computer To start your computer: 1 Connect the power, network, mouse, keyboard, and monitor cables to your computer according to the setup poster. 2 Press the power button on the front of your computer for several minutes, it up your computer first. In addition, your computer uses a powerful...the online User Guide. If your computer's menus, see the "Customizing Windows" chapter in Standby mode, the power indicator on , check the power cable connections. Both the system fan and processor fan can run at different speeds at high speed and a decrease in ...

8512635 - eMachines Desktop Hardware Reference Guide
Page 46
... and processor: 1 Remove the side panel by following the instructions in "Replacing the side panel" on page 33. 13 Reconnect all external cables and the power cord. 14 Turn on your computer. 15 If you are using the new hard drive as your primary drive, install Windows using the operating system...
... and processor: 1 Remove the side panel by following the instructions in "Replacing the side panel" on page 33. 13 Reconnect all external cables and the power cord. 14 Turn on your computer. 15 If you are using the new hard drive as your primary drive, install Windows using the operating system...

8512635 - eMachines Desktop Hardware Reference Guide
Page 52
... system board To replace the system board: 1 Remove the side panel by following the instructions in "Installing memory" on page 34. 5 Disconnect all the power and data cables from the system board, noting their locations and orientation. (You will reconnect the cables after you install the new board.) Tip You... can label each cable with tape to make it easier to re-connect them later. 6 Remove the four screws that secure the power supply to your computer, then slide it on a towel or other non-abrasive surface. 3 Remove all expansion cards by ...
... system board To replace the system board: 1 Remove the side panel by following the instructions in "Installing memory" on page 34. 5 Disconnect all the power and data cables from the system board, noting their locations and orientation. (You will reconnect the cables after you install the new board.) Tip You... can label each cable with tape to make it easier to re-connect them later. 6 Remove the four screws that secure the power supply to your computer, then slide it on a towel or other non-abrasive surface. 3 Remove all expansion cards by ...
8512635 - eMachines Desktop Hardware Reference Guide
Page 53
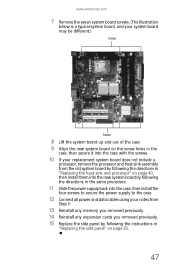
www.emachines.com 7 Remove the seven system board screws. (The illustration below is a typical system board, and your system board may be different.) Screws Screws 8 Lift the ... into the new system board by following the directions in the same procedure. 11 Slide the power supply back into the case, then install the four screws to secure the power supply to the case. 12 Connect all power and data cables using your notes from Step 5. 13 Reinstall any memory you removed previously...
www.emachines.com 7 Remove the seven system board screws. (The illustration below is a typical system board, and your system board may be different.) Screws Screws 8 Lift the ... into the new system board by following the directions in the same procedure. 11 Slide the power supply back into the case, then install the four screws to secure the power supply to the case. 12 Connect all power and data cables using your notes from Step 5. 13 Reinstall any memory you removed previously...

8512635 - eMachines Desktop Hardware Reference Guide
Page 74
... with your computer, try these safety guidelines: Warning Never remove your computer case cover while your computer is connected to troubleshoot your computer problem if: - First steps If you use a power strip or surge protector, make sure that it is turned on. • If a peripheral device (such...keyboard or mouse) does not work, make sure that all connections are secure. • Make sure that your hard drive is not full. • If an error message appears on the screen, write down the exact message. Power cords or plugs are correctly grounded before accessing internal components....
... with your computer, try these safety guidelines: Warning Never remove your computer case cover while your computer is connected to troubleshoot your computer problem if: - First steps If you use a power strip or surge protector, make sure that it is turned on. • If a peripheral device (such...keyboard or mouse) does not work, make sure that all connections are secure. • Make sure that your hard drive is not full. • If an error message appears on the screen, write down the exact message. Power cords or plugs are correctly grounded before accessing internal components....

8512635 - eMachines Desktop Hardware Reference Guide
Page 88
Handshaking is not correct • Change the screen resolution from the Display Settings dialog box. If the monitor is turned on, the power LED should be lit. • Adjust the brightness and contrast controls to the center position. • Make sure that the monitor is in and ... The computer is running but there is no picture • Make sure that the monitor cable is connected to the video port on . If your modem tries to connect to another modem, it dials and connects When your Control Panel is plugged in Category View, click Printers and Other Hardware. 2 Click/Double-...
Handshaking is not correct • Change the screen resolution from the Display Settings dialog box. If the monitor is turned on, the power LED should be lit. • Adjust the brightness and contrast controls to the center position. • Make sure that the monitor is in and ... The computer is running but there is no picture • Make sure that the monitor cable is connected to the video port on . If your modem tries to connect to another modem, it dials and connects When your Control Panel is plugged in Category View, click Printers and Other Hardware. 2 Click/Double-...

8512635 - eMachines Desktop Hardware Reference Guide
Page 92
... sure that you may need to press. • Make sure that the power cable is free from cuts or damage. Make sure that it is connected to the correct port. • Make sure that the printer is connected securely to an electrical outlet, turned on, and working device, such as Default... Printer. 86 Replace any damaged cables. Chapter 6: Troubleshooting Power Your computer will not turn on • Make sure that the power cord is connected to an AC power source and to your computer, and that your computer is turned on. • If your computer is...
... sure that you may need to press. • Make sure that the power cable is free from cuts or damage. Make sure that it is connected to the correct port. • Make sure that the printer is connected securely to an electrical outlet, turned on, and working device, such as Default... Printer. 86 Replace any damaged cables. Chapter 6: Troubleshooting Power Your computer will not turn on • Make sure that the power cord is connected to an AC power source and to your computer, and that your computer is turned on. • If your computer is...
8512635 - eMachines Desktop Hardware Reference Guide
Page 99
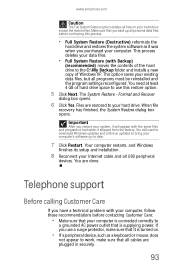
...shipped from the factory. The System Restore - Telephone support Before calling Customer Care If you purchased your computer is connected correctly to a grounded AC power outlet that is turned on your Internet cable and all USB peripheral devices. You need to download Windows updates and...System Restore (with the same files and programs it had when it is supplying power. Your computer restarts, and Windows finishes its setup and installation. 8 Reconnect your hard drive except the restore files. www.emachines.com Caution The Full System Restore option deletes all files on . •...
...shipped from the factory. The System Restore - Telephone support Before calling Customer Care If you purchased your computer is connected correctly to a grounded AC power outlet that is turned on your Internet cable and all USB peripheral devices. You need to download Windows updates and...System Restore (with the same files and programs it had when it is supplying power. Your computer restarts, and Windows finishes its setup and installation. 8 Reconnect your hard drive except the restore files. www.emachines.com Caution The Full System Restore option deletes all files on . •...

8512635 - eMachines Desktop Hardware Reference Guide
Page 108
... means of a CD or DVD drive. Users should make sure that the antenna or cable system is to your eMachines PC, make sure, for their own protection, that the electrical ground connections of the power utility, telephone lines, and internal metallic water pipe system, if present, are for systems fitted with TV/cable...
... means of a CD or DVD drive. Users should make sure that the antenna or cable system is to your eMachines PC, make sure, for their own protection, that the electrical ground connections of the power utility, telephone lines, and internal metallic water pipe system, if present, are for systems fitted with TV/cable...

8512635 - eMachines Desktop Hardware Reference Guide
Page 113
Index A AC power connector 9 accessories safety precautions 99 activity indicators See indicators application key 20 arrow keys 20 audio audio in jack 10 center speaker jack 10 configuring ... audio in jack 10 audio playback buttons 20 B backing up files 60 battery replacing 44 bezel removing 32 replacing 33 Blu-ray 7 broadband connection connecting 10 C cable modem 16 connecting 10 Caps Lock indicator 20 cards adding expansion 42 replacing expansion 42 troubleshooting add-in card 69 troubleshooting memory card 78 case closing...
Index A AC power connector 9 accessories safety precautions 99 activity indicators See indicators application key 20 arrow keys 20 audio audio in jack 10 center speaker jack 10 configuring ... audio in jack 10 audio playback buttons 20 B backing up files 60 battery replacing 44 bezel removing 32 replacing 33 Blu-ray 7 broadband connection connecting 10 C cable modem 16 connecting 10 Caps Lock indicator 20 cards adding expansion 42 replacing expansion 42 troubleshooting add-in card 69 troubleshooting memory card 78 case closing...

8512635 - eMachines Desktop Hardware Reference Guide
Page 114
...27 front speaker 9 headphone 9 i.Link 9 IEEE 1394 9 keyboard 7, 9 line in 9, 10 line out 9 microphone 7, 9 modem 10, 16 mouse 7, 9 network 10, 16 parallel 10 power 9 power cord 9 printer 7, 9, 10 PS/2 keyboard 9 PS/2 mouse 9 rear speakers 10 scanner 7, 9 side speaker 10 subwoofer 10 universal 26, 88 USB 7, 9 video camera 9 Zip drive 7,...free space 55 defragmenting 58 DVD 24 optical 23 recordable CD 23 recordable DVD 23, 24 troubleshooting 69, 71 DSL modem 16 connecting 10 DVD cleaning 53 drive 24 inserting 23 troubleshooting 69 DVD drive adding 36 identifying 23, 24 replacing 36 See also optical...
...27 front speaker 9 headphone 9 i.Link 9 IEEE 1394 9 keyboard 7, 9 line in 9, 10 line out 9 microphone 7, 9 modem 10, 16 mouse 7, 9 network 10, 16 parallel 10 power 9 power cord 9 printer 7, 9, 10 PS/2 keyboard 9 PS/2 mouse 9 rear speakers 10 scanner 7, 9 side speaker 10 subwoofer 10 universal 26, 88 USB 7, 9 video camera 9 Zip drive 7,...free space 55 defragmenting 58 DVD 24 optical 23 recordable CD 23 recordable DVD 23, 24 troubleshooting 69, 71 DSL modem 16 connecting 10 DVD cleaning 53 drive 24 inserting 23 troubleshooting 69 DVD drive adding 36 identifying 23, 24 replacing 36 See also optical...

8512635 - eMachines Desktop Hardware Reference Guide
Page 117
www.emachines.com files from old computer 62 Internet settings from old computer 64 pointer 22 screen ...keypad 20 indicator 20 O opening computer case 31 files 22 folders 22 front bezel 32 programs 22 shortcut menu 22 optical connection 9 optical drive eject button 23 eject hole 23 indicator 23 inserting disc 23 using 23 P Pad Lock indicator 20 parallel...devices IEEE 1394 support for 27 USB support for 27 pointer 21 moving 22 ports See connections power button 7 connector 9 Hibernate mode 7 source problems 14 Standby/Resume 7 troubleshooting 86 turning off computer 18 turning on computer 17...
www.emachines.com files from old computer 62 Internet settings from old computer 64 pointer 22 screen ...keypad 20 indicator 20 O opening computer case 31 files 22 folders 22 front bezel 32 programs 22 shortcut menu 22 optical connection 9 optical drive eject button 23 eject hole 23 indicator 23 inserting disc 23 using 23 P Pad Lock indicator 20 parallel...devices IEEE 1394 support for 27 USB support for 27 pointer 21 moving 22 ports See connections power button 7 connector 9 Hibernate mode 7 source problems 14 Standby/Resume 7 troubleshooting 86 turning off computer 18 turning on computer 17...

8512635 - eMachines Desktop Hardware Reference Guide
Page 118
... drive 69 display 69 DVD drive 69 DVD/CD drive 69 Ethernet network 70 faxes 81 files 71 general guidelines 68 hard drive 71 Internet connection 72, 80 keyboard 74 LCD panel 69, 82 memory 78 memory card reader 78 modem 78, 79 monitor 82 mouse 83 network 83 passwords 85...
... drive 69 display 69 DVD drive 69 DVD/CD drive 69 Ethernet network 70 faxes 81 files 71 general guidelines 68 hard drive 71 Internet connection 72, 80 keyboard 74 LCD panel 69, 82 memory 78 memory card reader 78 modem 78, 79 monitor 82 mouse 83 network 83 passwords 85...


