
User Guide
Page 3
...for a topic 4 BigFix 4 Online help 5 eMachines contact information 6 2 Checking Out Your eMachines Computer 7 Desktop PC Front 8 Desktop PC Back 10 Identifying your model 13 eMachines model and serial number 13 Microsoft Certificate of Authenticity 13 3 Getting Started 15 Working safely 16 Reducing eye strain 16 ...17 Avoiding discomfort and injury from repetitive strain 17 Protecting from power source problems 18 Checking the voltage selection 18 Starting your computer 19 Waking up your computer 20 Turning off your computer 20 Restarting (rebooting) your computer 21 Adjusting...
...for a topic 4 BigFix 4 Online help 5 eMachines contact information 6 2 Checking Out Your eMachines Computer 7 Desktop PC Front 8 Desktop PC Back 10 Identifying your model 13 eMachines model and serial number 13 Microsoft Certificate of Authenticity 13 3 Getting Started 15 Working safely 16 Reducing eye strain 16 ...17 Avoiding discomfort and injury from repetitive strain 17 Protecting from power source problems 18 Checking the voltage selection 18 Starting your computer 19 Waking up your computer 20 Turning off your computer 20 Restarting (rebooting) your computer 21 Adjusting...
User Guide
Page 9
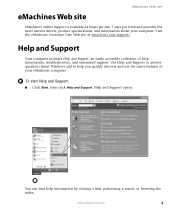
...Start, then click Help and Support. Use Help and Support to help you quickly discover and use the many features of help information by clicking a link, performing a search, or browsing the index. You can find help information, troubleshooters, and automated support. Help and Support opens. Visit the eMachines... Customer Care Web site at emachines.com/support/. www.eMachines.com 3 Help and Support Your computer includes Help and Support, an easily accessible collection ...
...Start, then click Help and Support. Use Help and Support to help you quickly discover and use the many features of help information by clicking a link, performing a search, or browsing the index. You can find help information, troubleshooters, and automated support. Help and Support opens. Visit the eMachines... Customer Care Web site at emachines.com/support/. www.eMachines.com 3 Help and Support Your computer includes Help and Support, an easily accessible collection ...
User Guide
Page 10
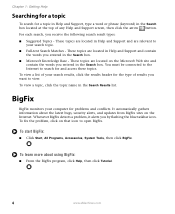
...Suggested Topics - It automatically gathers information about using BigFix: ■ From the BigFix program, click Help, then click Tutorial. 4 www.eMachines.com To learn more about the latest bugs, security alerts, and updates from BigFix sites on that icon to search for problems and conflicts.... To start BigFix: ■ Click Start, All Programs, Accessories, System Tools, then click BigFix. These topics are located in the Search box. ■ Microsoft ...
...Suggested Topics - It automatically gathers information about using BigFix: ■ From the BigFix program, click Help, then click Tutorial. 4 www.eMachines.com To learn more about the latest bugs, security alerts, and updates from BigFix sites on that icon to search for problems and conflicts.... To start BigFix: ■ Click Start, All Programs, Accessories, System Tools, then click BigFix. These topics are located in the Search box. ■ Microsoft ...

User Guide
Page 21
Chapter 3 Getting Started • Using your computer safely • Protecting your computer from power source problems • Turning your computer on and off • Adjusting the volume • Using the keyboard and the mouse • Using the computer display • Installing peripheral devices 15
Chapter 3 Getting Started • Using your computer safely • Protecting your computer from power source problems • Turning your computer on and off • Adjusting the volume • Using the keyboard and the mouse • Using the computer display • Installing peripheral devices 15
User Guide
Page 22
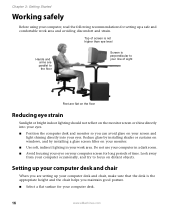
...appropriate height and the chair helps you can avoid glare on the monitor screen or shine directly into your computer desk. 16 www.eMachines.com Setting up your computer desk and chair When you are flat on the floor Reducing eye strain Sunlight or bright indoor lighting should...■ Use soft, indirect lighting in a dark room. ■ Avoid focusing your eyes on your computer screen for your eyes. Chapter 3: Getting Started Working safely Before using your line of time. Reduce glare by installing shades or curtains on windows, and by installing a glare screen filter on distant...
...appropriate height and the chair helps you can avoid glare on the monitor screen or shine directly into your computer desk. 16 www.eMachines.com Setting up your computer desk and chair When you are flat on the floor Reducing eye strain Sunlight or bright indoor lighting should...■ Use soft, indirect lighting in a dark room. ■ Avoid focusing your eyes on your computer screen for your eyes. Chapter 3: Getting Started Working safely Before using your line of time. Reduce glare by installing shades or curtains on windows, and by installing a glare screen filter on distant...

User Guide
Page 24
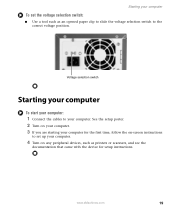
...is operating in an environment such as Europe, the utility power is typically set the voltage selection switch incorrectly, your computer. Chapter 3: Getting Started Protecting from reaching your system will be damaged. Protect your computer. Although you have a telephone modem, use a surge protector that your ... normal levels and cause data loss or system damage. The power supply should be set the power supply to 230. 18 www.eMachines.com In other areas of your environment, check the voltage selection switch. During an electrical storm, unplug both the power cord and...
...is operating in an environment such as Europe, the utility power is typically set the voltage selection switch incorrectly, your computer. Chapter 3: Getting Started Protecting from reaching your system will be damaged. Protect your computer. Although you have a telephone modem, use a surge protector that your ... normal levels and cause data loss or system damage. The power supply should be set the power supply to 230. 18 www.eMachines.com In other areas of your environment, check the voltage selection switch. During an electrical storm, unplug both the power cord and...
User Guide
Page 25
...eMachines.com 19 See the setup poster. 2 Turn on -screen instructions to set up your computer To set the voltage selection switch: ■ Use a tool such as printers or scanners, and see the documentation that came with the device for the first time, follow the on your computer. 3 If you are starting... your computer for setup instructions. Starting your computer. 4 Turn on any peripheral devices, such as an opened paper clip to slide the voltage selection switch to...
...eMachines.com 19 See the setup poster. 2 Turn on -screen instructions to set up your computer To set the voltage selection switch: ■ Use a tool such as printers or scanners, and see the documentation that came with the device for the first time, follow the on your computer. 3 If you are starting... your computer for setup instructions. Starting your computer. 4 Turn on any peripheral devices, such as an opened paper clip to slide the voltage selection switch to...

User Guide
Page 26
...from your computer will not be used your computer for several minutes or have not used for about five seconds, then release it. 20 www.eMachines.com Important If for some reason you have not turned off your computer. To turn off your computer, press and hold the power button for... long periods. If your computer: 1 Click Start, then click Turn Off Computer. We recommend disconnecting the power cord and modem cable when your computer, unplug the power cord and modem cable from...
...from your computer will not be used your computer for several minutes or have not used for about five seconds, then release it. 20 www.eMachines.com Important If for some reason you have not turned off your computer. To turn off your computer, press and hold the power button for... long periods. If your computer: 1 Click Start, then click Turn Off Computer. We recommend disconnecting the power cord and modem cable when your computer, unplug the power cord and modem cable from...
User Guide
Page 27
...Enhanced keyboard" on again. When the checks are not responding. Help and Support For more information, for about installing peripheral devices, click Start, then click Help and Support. Adjusting the volume You can use the mute and volume control buttons on the front of the speakers. ...If you are using external speakers, turn the knob on the keyboard. www.eMachines.com 21 The Task Manager window opens. 2 Click the Applications tab, then click the program that are finished, Windows starts. For more information about five seconds, then release it on page 22. Important...
...Enhanced keyboard" on again. When the checks are not responding. Help and Support For more information, for about installing peripheral devices, click Start, then click Help and Support. Adjusting the volume You can use the mute and volume control buttons on the front of the speakers. ...If you are using external speakers, turn the knob on the keyboard. www.eMachines.com 21 The Task Manager window opens. 2 Click the Applications tab, then click the program that are finished, Windows starts. For more information about five seconds, then release it on page 22. Important...

User Guide
Page 28
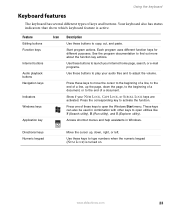
Chapter 3: Getting Started Using the keyboard Enhanced keyboard Editing buttons Function keys Audio playback buttons Internet buttons Navigation keys Indicators Windows keys Application key Directional keys Numeric keypad Standard keyboard Function keys Indicators Navigation keys Internet buttons Windows keys Application key Directional keys Numeric keypad 22 www.eMachines.com
Chapter 3: Getting Started Using the keyboard Enhanced keyboard Editing buttons Function keys Audio playback buttons Internet buttons Navigation keys Indicators Windows keys Application key Directional keys Numeric keypad Standard keyboard Function keys Indicators Navigation keys Internet buttons Windows keys Application key Directional keys Numeric keypad 22 www.eMachines.com
User Guide
Page 29
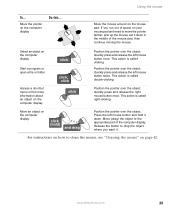
.... Directional keys Numeric keypad Move the cursor up the page, down , right, or left. Start program actions. Press the corresponding key to find out more about the function key actions. Press one of keys and buttons. www.eMachines.com 23 Feature Editing buttons Function keys Internet buttons Audio playback buttons Navigation keys... NUM LOCK, CAPS LOCK, or SCROLL LOCK keys are activated. Access shortcut menus and help assistants in combination with other keys to open the Windows Start menu.
.... Directional keys Numeric keypad Move the cursor up the page, down , right, or left. Start program actions. Press the corresponding key to find out more about the function key actions. Press one of keys and buttons. www.eMachines.com 23 Feature Editing buttons Function keys Internet buttons Audio playback buttons Navigation keys... NUM LOCK, CAPS LOCK, or SCROLL LOCK keys are activated. Access shortcut menus and help assistants in combination with other keys to open the Windows Start menu.
User Guide
Page 30
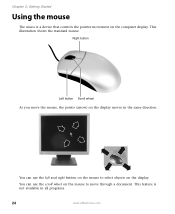
You can use the left and right buttons on the mouse to select objects on the mouse to move the mouse, the pointer (arrow) on the computer display. You can use the scroll wheel on the display. Chapter 3: Getting Started Using the mouse The mouse is not available in the same direction. This illustration shows the standard mouse. Right button Left button Scroll wheel As you move through a document. This feature is a device that controls the pointer movement on the display moves in all programs. 24 www.eMachines.com
You can use the left and right buttons on the mouse to select objects on the mouse to move the mouse, the pointer (arrow) on the computer display. You can use the scroll wheel on the display. Chapter 3: Getting Started Using the mouse The mouse is not available in the same direction. This illustration shows the standard mouse. Right button Left button Scroll wheel As you move through a document. This feature is a device that controls the pointer movement on the display moves in all programs. 24 www.eMachines.com
User Guide
Page 31
Select an object on the computer display Start a program or open a file or folder Access a shortcut menu or find more information about an object on the mouse pad. click click, click click Position ..." on how to the appropriate part of the mouse pad, then continue moving the mouse. Quickly press and release the right mouse button once. www.eMachines.com 25
Select an object on the computer display Start a program or open a file or folder Access a shortcut menu or find more information about an object on the mouse pad. click click, click click Position ..." on how to the appropriate part of the mouse pad, then continue moving the mouse. Quickly press and release the right mouse button once. www.eMachines.com 25

User Guide
Page 32
The modem will not work with digital or PBX telephone lines. 3 Start your computer, then start your 2 Insert the other end of your communications program. 26 www.eMachines.com To connect the modem: 1 Insert one end of fire, use to connect to a standard telephone line. Chapter 3: Getting Started Connecting the modem Your computer has a built-in 56K modem that you can use only No. 26 AWG or larger telecommunications line cord. on the back of the modem cable into the modem jack computer. Warning To reduce the risk of the modem cable into a telephone wall jack.
The modem will not work with digital or PBX telephone lines. 3 Start your computer, then start your 2 Insert the other end of your communications program. 26 www.eMachines.com To connect the modem: 1 Insert one end of fire, use to connect to a standard telephone line. Chapter 3: Getting Started Connecting the modem Your computer has a built-in 56K modem that you can use only No. 26 AWG or larger telecommunications line cord. on the back of the modem cable into the modem jack computer. Warning To reduce the risk of the modem cable into a telephone wall jack.
User Guide
Page 34
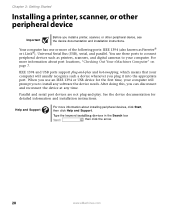
...for detailed information and installation instructions. Type the keyword installing devices in the Search box , then click the arrow. 28 www.eMachines.com See the device documentation for the first time, your computer will usually recognize such a device whenever you install a printer...to connect peripheral devices such as Firewire® or i.Link®), Universal Serial Bus (USB), serial, and parallel. Chapter 3: Getting Started Installing a printer, scanner, or other peripheral device, see the device documentation and installation instructions. Your computer has one or more of...
...for detailed information and installation instructions. Type the keyword installing devices in the Search box , then click the arrow. 28 www.eMachines.com See the device documentation for the first time, your computer will usually recognize such a device whenever you install a printer...to connect peripheral devices such as Firewire® or i.Link®), Universal Serial Bus (USB), serial, and parallel. Chapter 3: Getting Started Installing a printer, scanner, or other peripheral device, see the device documentation and installation instructions. Your computer has one or more of...
User Guide
Page 36
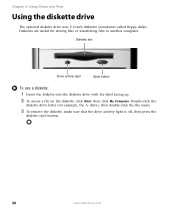
...button To use a diskette: 1 Insert the diskette into the diskette drive with the label facing up. 2 To access a file on the diskette, click Start, then click My Computer. Diskettes are useful for example, the A: drive), then double-click the file name. 3 To remove the diskette, make sure that... the drive activity light is off, then press the diskette eject button. 30 www.eMachines.com Double-click the diskette drive letter (for storing files or transferring files to another computer. Chapter 4: Using Drives and Ports Using the diskette...
...button To use a diskette: 1 Insert the diskette into the diskette drive with the label facing up. 2 To access a file on the diskette, click Start, then click My Computer. Diskettes are useful for example, the A: drive), then double-click the file name. 3 To remove the diskette, make sure that... the drive activity light is off, then press the diskette eject button. 30 www.eMachines.com Double-click the diskette drive letter (for storing files or transferring files to another computer. Chapter 4: Using Drives and Ports Using the diskette...
User Guide
Page 38
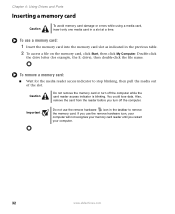
..., the E: drive), then double-click the file name. If you use the remove hardware icon, your computer will not recognize your computer. 32 www.eMachines.com Chapter 4: Using Drives and Ports Inserting a memory card Caution To avoid memory card damage or errors while using a media card, insert only one...card: 1 Insert the memory card into the memory card slot as indicated in the previous table. 2 To access a file on the memory card, click Start, then click My Computer. To use the remove hardware icon in a slot at a time. Also, remove the card from the reader before you restart your...
..., the E: drive), then double-click the file name. If you use the remove hardware icon, your computer will not recognize your computer. 32 www.eMachines.com Chapter 4: Using Drives and Ports Inserting a memory card Caution To avoid memory card damage or errors while using a media card, insert only one...card: 1 Insert the memory card into the memory card slot as indicated in the previous table. 2 To access a file on the memory card, click Start, then click My Computer. To use the remove hardware icon in a slot at a time. Also, remove the card from the reader before you restart your...
User Guide
Page 44
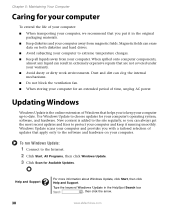
... any liquid can always get the most recent updates and fixes to protect your computer and keep your computer up-to the Internet. 2 Click Start, All Programs, then click Windows Update. 3 Click Scan for your computer's operating system, software, and hardware. To run Windows Update: 1...keyword Windows Update in extremely expensive repairs that are not covered under your warranty. ■ Avoid dusty or dirty work environments. www.eMachines.com New content is the online extension of Windows that helps you to extreme temperature changes. ■ Keep all liquids away from ...
... any liquid can always get the most recent updates and fixes to protect your computer and keep your computer up-to the Internet. 2 Click Start, All Programs, then click Windows Update. 3 Click Scan for your computer's operating system, software, and hardware. To run Windows Update: 1...keyword Windows Update in extremely expensive repairs that are not covered under your warranty. ■ Avoid dusty or dirty work environments. www.eMachines.com New content is the online extension of Windows that helps you to extreme temperature changes. ■ Keep all liquids away from ...
User Guide
Page 45
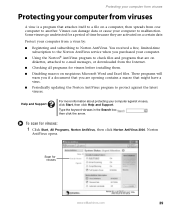
... program to another. Viruses can damage data or cause your computer from one computer to protect against viruses, click Start, then click Help and Support. Some viruses go undetected for viruses www.eMachines.com 39 You received a free, limited-time subscription to the Norton AntiVirus service when you are activated on a computer...
... program to another. Viruses can damage data or cause your computer from one computer to protect against viruses, click Start, then click Help and Support. Some viruses go undetected for viruses www.eMachines.com 39 You received a free, limited-time subscription to the Norton AntiVirus service when you are activated on a computer...
User Guide
Page 47
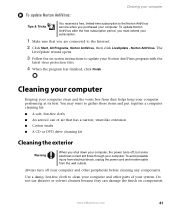
... or DVD drive cleaning kit Cleaning the exterior Warning When you are connected to the Internet. 2 Click Start, All Programs, Norton AntiVirus, then click LiveUpdate - The LiveUpdate wizard opens. 3 Follow the on components. www.eMachines.com 41 To update Norton AntiVirus after the free subscription period, you must extend your computer clean...
... or DVD drive cleaning kit Cleaning the exterior Warning When you are connected to the Internet. 2 Click Start, All Programs, Norton AntiVirus, then click LiveUpdate - The LiveUpdate wizard opens. 3 Follow the on components. www.eMachines.com 41 To update Norton AntiVirus after the free subscription period, you must extend your computer clean...


