
User Guide
Page 1
...outlet. This is provided. 5 Never push objects of the extension cord. If you have been provided for ventilation. Important Safety Instructions The following instructions pertain to the risk of AC power available, consult your dealer or local power company. This product should not be connected ... Don't use an extension cord with a 3-wire grounding type plug, a plug having a third (grounding) pin. Never spill liquid of these instructions carefully. 1 Save these openings. Use a damp cloth for later use this product on your computer, and to protect it does not exceed the...
...outlet. This is provided. 5 Never push objects of the extension cord. If you have been provided for ventilation. Important Safety Instructions The following instructions pertain to the risk of AC power available, consult your dealer or local power company. This product should not be connected ... Don't use an extension cord with a 3-wire grounding type plug, a plug having a third (grounding) pin. Never spill liquid of these instructions carefully. 1 Save these openings. Use a damp cloth for later use this product on your computer, and to protect it does not exceed the...
User Guide
Page 2
... change in performance indicating a need for service. Maintenance If the product does not operate normally, adjust only those controls that are covered by the operating instructions. Unplug this product from the main power outlet and call for service under any of other controls may result in . (Apres le couvercle a enleve, visse...
... change in performance indicating a need for service. Maintenance If the product does not operate normally, adjust only those controls that are covered by the operating instructions. Unplug this product from the main power outlet and call for service under any of other controls may result in . (Apres le couvercle a enleve, visse...

User Guide
Page 8
... Original Software 5-1 Chapter 6 Using the PowerDVD About DVD ...6-1 Playing the PowerDVD 6-1 How to Run the PowerDVD 6-1 Buttons of the PowerDVD 6-2 Appendix A. Approval Statements Battery Warning Instruction B-1 Fuse Warning Instruction B-1 Laser Product ...B-2 viii
... Original Software 5-1 Chapter 6 Using the PowerDVD About DVD ...6-1 Playing the PowerDVD 6-1 How to Run the PowerDVD 6-1 Buttons of the PowerDVD 6-2 Appendix A. Approval Statements Battery Warning Instruction B-1 Fuse Warning Instruction B-1 Laser Product ...B-2 viii

User Guide
Page 14
... Off the Computer To turn off the monitor and any other peripheral devices. 2-4 Setting Up Your System Turning the Computer On and Off Follow the instructions below to turn on the computer or to shut down the system. 4. Turning On the Computer To turn it off your computer, save your computer...
... Off the Computer To turn off the monitor and any other peripheral devices. 2-4 Setting Up Your System Turning the Computer On and Off Follow the instructions below to turn on the computer or to shut down the system. 4. Turning On the Computer To turn it off your computer, save your computer...

User Guide
Page 15
... manual that came with already installed on . To install another operating system such as shown below. The procedures in this manual assume that system for instructions on your computer. You could lose data. Using an Optional Floppy Disk Drive To use . Using Your Computer 3-1 Also, remove all disks before you are...
... manual that came with already installed on . To install another operating system such as shown below. The procedures in this manual assume that system for instructions on your computer. You could lose data. Using an Optional Floppy Disk Drive To use . Using Your Computer 3-1 Also, remove all disks before you are...
User Guide
Page 26
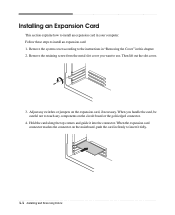
... Removing Drives When you want to touch any switches or jumpers on the circuit board or the gold-edged connector. 4. Follow these steps to the instructions in "Removing the Cover" in this chapter. 2.
... Removing Drives When you want to touch any switches or jumpers on the circuit board or the gold-edged connector. 4. Follow these steps to the instructions in "Removing the Cover" in this chapter. 2.
User Guide
Page 27
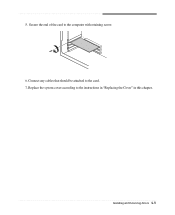
Replace the system cover according to the card. 7. Connect any cables that should be attached to the instructions in "Replacing the Cover" in this chapter. Installing and Removing Drives 4-5 5. Secure the end of the card to the computer with retaining screw. 6.
Replace the system cover according to the card. 7. Connect any cables that should be attached to the instructions in "Replacing the Cover" in this chapter. Installing and Removing Drives 4-5 5. Secure the end of the card to the computer with retaining screw. 6.
User Guide
Page 28
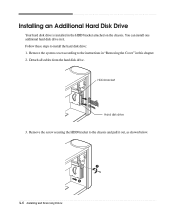
Detach all cables from the hard disk drive. HDD bracket Hard disk drive 3. Remove the system cover according to the instructions in "Removing the Cover" in the HDD bracket attached on the chassis. You can install one additional hard disk drive in it out, as shown below. 4-6 Installing and Removing Drives Remove the screw securing the HDD bracket to install the hard disk drive: 1. Installing an Additional Hard Disk Drive Your hard disk drive is installed in this chapter. 2. Follow these steps to the chassis and pull it .
Detach all cables from the hard disk drive. HDD bracket Hard disk drive 3. Remove the system cover according to the instructions in "Removing the Cover" in the HDD bracket attached on the chassis. You can install one additional hard disk drive in it out, as shown below. 4-6 Installing and Removing Drives Remove the screw securing the HDD bracket to install the hard disk drive: 1. Installing an Additional Hard Disk Drive Your hard disk drive is installed in this chapter. 2. Follow these steps to the chassis and pull it .

User Guide
Page 30
Connect the power and hard disk drive cable to the instructions in "Replacing the Cover" in this chapter. 4-8 Installing and Removing Drives Slide the HDD bracket into the chassis and secure it .) 9. 7. Replace the system cover according to your hard disk drive. (If you removed the hard disk drive cable from the motherboard, replace it with the retaining screw, as shown below. 8.
Connect the power and hard disk drive cable to the instructions in "Replacing the Cover" in this chapter. 4-8 Installing and Removing Drives Slide the HDD bracket into the chassis and secure it .) 9. 7. Replace the system cover according to your hard disk drive. (If you removed the hard disk drive cable from the motherboard, replace it with the retaining screw, as shown below. 8.
User Guide
Page 31
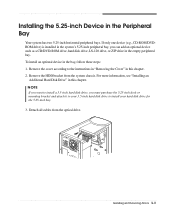
... in this chapter. 2. For more information, see "Installing an Additional Hard Disk Drive" in the bay, follow these steps: 1. Remove the cover according to the instructions in "Removing the Cover" in the empty peripheral bay. Detach all cables from the system chassis. Installing and Removing Drives 4-9 NOTE If you want to...
... in this chapter. 2. For more information, see "Installing an Additional Hard Disk Drive" in the bay, follow these steps: 1. Remove the cover according to the instructions in "Removing the Cover" in the empty peripheral bay. Detach all cables from the system chassis. Installing and Removing Drives 4-9 NOTE If you want to...
User Guide
Page 36
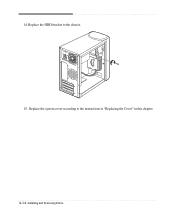
Replace the system cover according to the chassis. 15. Replace the HDD bracket to the instructions in "Replacing the Cover" in this chapter. 4-14 Installing and Removing Drives 14.
Replace the system cover according to the chassis. 15. Replace the HDD bracket to the instructions in "Replacing the Cover" in this chapter. 4-14 Installing and Removing Drives 14.

User Guide
Page 43
...) into the computer. If it is listed first, followed by sudden power failure, it before calling a technician if a problem occurs. Solving Common Problems This chapter instructs you how to the Windows Help. The problem is not working . Wall outlet is firmly plugged into the wall outlet and into the wall outlet...
...) into the computer. If it is listed first, followed by sudden power failure, it before calling a technician if a problem occurs. Solving Common Problems This chapter instructs you how to the Windows Help. The problem is not working . Wall outlet is firmly plugged into the wall outlet and into the wall outlet...
User Guide
Page 47
...ouvrir. Mettre au rébut les batteries usagées conformément aux instructions du fabricant. Only connect this equipment to the manufacturer's instructions. Apparaten skall anslutas till jordat nätuttag. Atencion Desconecte fuerza electrica antes del servicio... earthed socket outlet. Approva Statements B-1 Vorsicht Explosionsgefahr bei unsachgemäß em Austausch der Batterie. Fuse Warning Instruction Caution For continued protection against risk of explosion. Laite on liitettävä suojakosketinistoraasian. Remplacer uniquement avec une batterie...
...ouvrir. Mettre au rébut les batteries usagées conformément aux instructions du fabricant. Only connect this equipment to the manufacturer's instructions. Apparaten skall anslutas till jordat nätuttag. Atencion Desconecte fuerza electrica antes del servicio... earthed socket outlet. Approva Statements B-1 Vorsicht Explosionsgefahr bei unsachgemäß em Austausch der Batterie. Fuse Warning Instruction Caution For continued protection against risk of explosion. Laite on liitettävä suojakosketinistoraasian. Remplacer uniquement avec une batterie...


